StaticMesh actors are the meshed geometry in the scene used by designers to represent fixed environment components. A large library of these comes with the content provided by Epic Games in UDK. In this recipe we'll look at ways to bring that content into the scene, shift it around and adjust it, and make sure that lining it up with other content is no problem. We'll also look at converting a StaticMesh for other uses. In the previous recipe we set up a small scene just using BSP elements. This time we'll only use meshes from the Browser.
- Open the Content Browser (Ctrl + Shift + F). In the Packages List, make sure UDKGame is the selected folder. You can click on it to expand the sub-folders it contains.
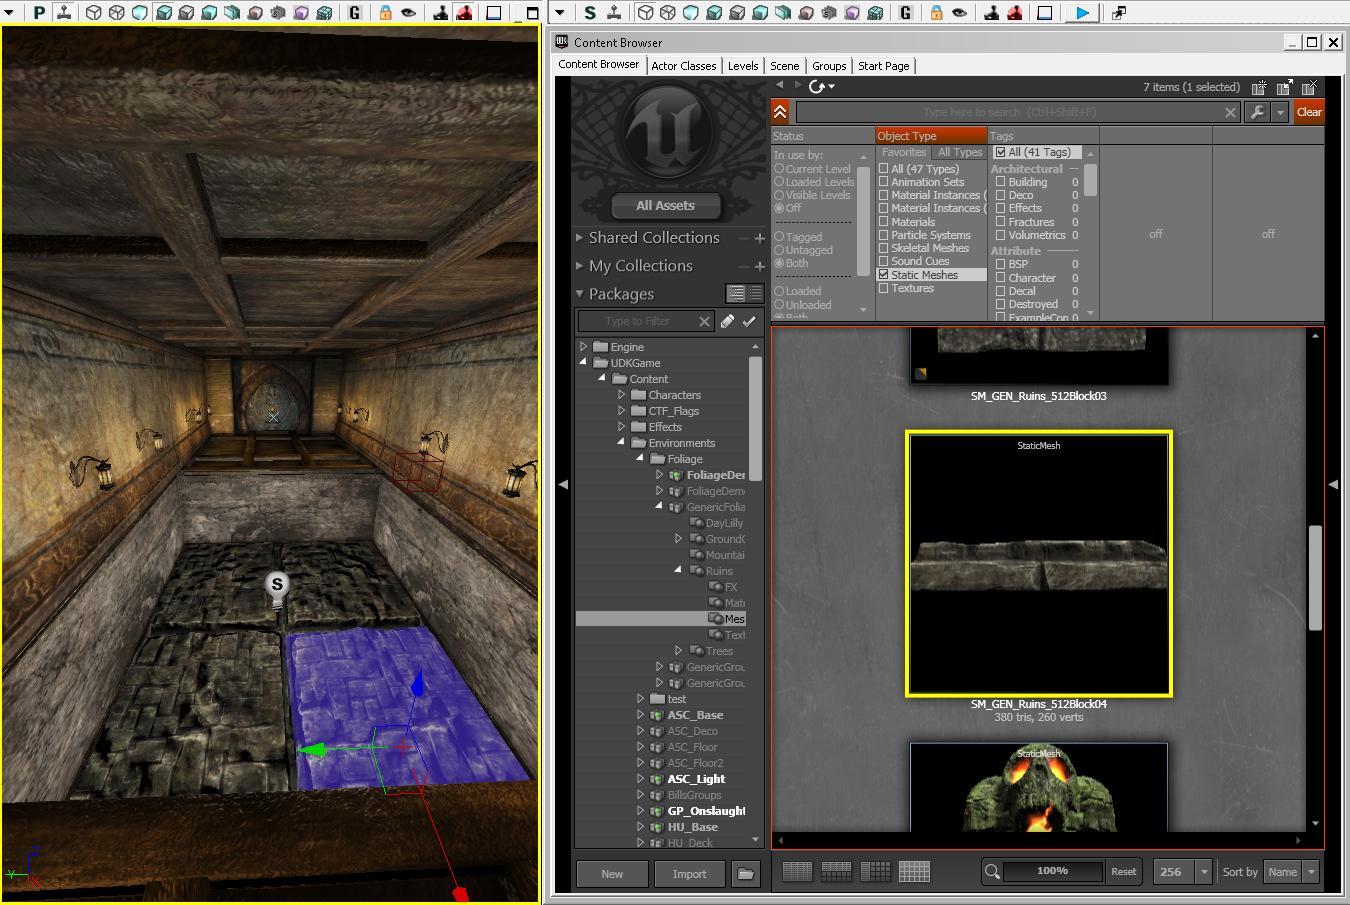
- Click on the Object Type filter for Static Meshes and, under Tags, click on Building.
- Scroll down the assets (or type in the search field) to find S_NEC_Roofs_SM_Tiled_Solid.
- Drag this into the perspective viewport. While it is selected, press F4 and expand the properties section Movement | Location. Adjust the XYZ values to 0,0,0. This ensures the StaticMesh is situated at the world center or origin.
- Alt-drag a copy of this up to about 300 in Z (you can fine-tune this, as before, in the Movement | Location section of the mesh's properties). This will be a ceiling. Having the floor at Z = 0 and the ceiling at Z = 300 will ensure the default character can easily walk in between.

- Select and rotate the lower mesh 180 degrees. We'll use it as a floor. Press Space to cycle the transform mode, and make sure the wood boards face up. In Move mode, Alt-drag both meshes sideways to create a string of them. Repeat this to form a passageway about five blocks deep, as in the previous screenshot.
-
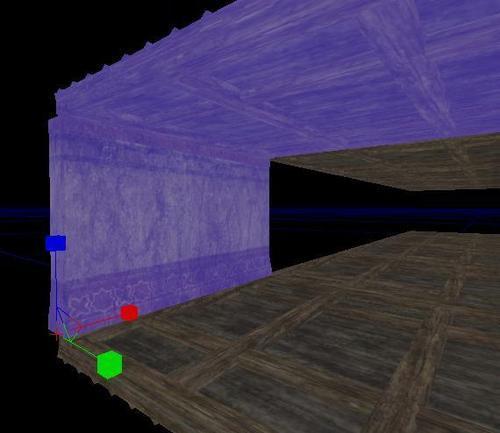
Following the same image, where it is shown highlighted, drag into the view from the Browser the mesh called S_NEC_Trims_SM_Plain_STRb. Place it along the edge of the floor, and then Non-uniform Scale [
 ] it to match the dimensions of the first floor piece, effectively creating a wall. This is shown in the next screenshot. It can help to set the Scale Grid Snap [
  ] to 1% so it is easier to fit the two pieces to the same dimensions. The values I used for scaling were X=4, Y=1, Z=4.2 but yours may differ. The values can be set in the fields at the bottom of the screen.
- Note that the scale along the X axis that I used was 4, an even number. Because the asset is modular, that is a safe amount to scale it up by and still have the ends touching without crossing into each other. It is okay to have meshes penetrate each other at an angle, but not at the same angle (co-planar) because then you'll see Z fighting (flickering) in the overlap. Also you want to avoid gaps.
- When you are happy with the scaling, move copies along to match the entire floor, and reproduce this on the other side too using Alt-drag on the set again.
- At either end of the passage we've made, add the StaticMesh called S_NEC_Walls_SM_Archwalls_01 and then fit a pillar called S_NEC_Walls_SM_CASup1 on either side, into the corners.
- In the Content Browser, turn off the Building tag filter which was set before. Then search for LAMP to expose the asset S_NEC_Lights_SM_TurkLamp01. With the asset highlighted, select a right-hand side wall in the viewport, right-click, and choose Add Static Mesh: S_NEC_Lights_SM_TurkLamp01. Note that if you added the light based on the left-hand side wall, the object might be facing through the wall, so in that case choose Rotate and turn it 180 degrees to face the correct direction, into the passage.
- Press F4 with the light selected and expand the setting Static Mesh Actor | Static Mesh Component | Lightmass | Lightmass Settings | Use Emissive For Static Lighting. Turn this on. What this does, since the mesh has a Material with an active Emissive channel, is cast light into the scene based on its Material.
- Distribute copies of this lamp at regular intervals. To select all the lamps, right-click one and choose Select | Select all with matching Material. Now right-click on this set and choose Create Prefab. This encapsulates all those assets into a single one for easier handling. When creating the Prefab, you'll have to name it. Set the Package to YourPackage, the Group to Prefab, and the Name to TurkLamps. You'll be asked if you want to replace the source meshes with an instance of the prefab, which you can, but you can't edit the lights' properties after having done so. A way around the problem of editing prefab constituent parts is to right-click on the prefab in the scene and choose Convert Prefab to Normal Actors. Then you can edit the component lamps' properties. Prefabs are discussed in greater detail in the first recipe of Chapter 5, It Is Your Destiny!
- Right-click one of the lamps and Select | Select all with matching Material. Changing the Emissive Light Falloff Exponent to 1, the Emissive Light Explicit Influence Radius to 0, and the Emissive Boost, at 3 should illuminate the passage adequately. Those values accumulate together to control the brightness and range of the light cast by the lamp's texture. You can hold your mouse over each property to get a tool-tip explaining what it does. The effect of the emissive lighting from the lamps is shown in the next screenshot, where there is a yellow glow constrained around the walls around each lamp:

Moving on, let's delete the middle piece of the passage floor to create a hole. Place a point light in the scene and move it into this hole. Fill the black void by extending the walls down with a stone foundation made from S_NEC_walls_SM_CAWall_STRc and at the base of those, add the mesh SM_GEN_Ruins_512Block04 and scale it so it fits two by two into the lowered floor space.
Tip
Note that if you have an actor selected in the scene, you can press Home or the new Go To Actor icon [ ![]() ] on the left-hand side of the editor, to jump all viewports to it. You can press End to align a mesh to the surface directly below it, though this works best if both surfaces are flat, and aligned. On a slope, it has limitations.
] on the left-hand side of the editor, to jump all viewports to it. You can press End to align a mesh to the surface directly below it, though this works best if both surfaces are flat, and aligned. On a slope, it has limitations.
The intended result is shown in the next screenshot.
- Select UDKGame as the folder level in the Packages List in the Content Browser, then type crate into the search field. Highlight and fully load the mesh asset S_LT_Mech_SM_Cratebox02a.
- At one end of the passage, right-click on the ground and choose Add RigidBody: LT_Mech_SM_Cratebox02a. A RigidBody is a mesh that is enabled for physics calculation, and consequently it will collide with objects in the scene when under a kinematic impulse such as a hit impact, a throw, or gravity. A RigidBody will be listed in the current level as a KActor.
- You could also drag the asset from the browser into the scene as a StaticMesh and then right-click on it and choose Convert | Convert StaticMeshActor to KActor.
- Be sure to also right-click on it and choose Set Collision Type: Block All. This prevents objects like the player or bullets from traveling through it.
- If you have trouble placing the crate accurately on the ground, try raising it into the air and pressing the End key to drop it to the nearest surface.
- Select the floor at the bottom of the hole, press F4, and take note of the Movement | Location value of Z for the floor mesh.
- Go to the menu View | World Properties, and open up ZoneInfo. Set the KillZ value to the height you took note of, then adjust it so the value is a little higher. You'll see a red line in the orthographic view that indicates the KillZ height. The point of doing this is so if the player falls in the shaft they will die upon hitting that line. Otherwise, you'd have to build in some way to let them climb out.
- Also in the View | World Properties menu, adjust the Game Type For PIE to UTGame. This ensures that when you play you'll have a preset body and gun. Formerly, UTGame was a default setting in UDK, but it has been deprecated for a setting that allows designers to more easily insert their own player controller.
-
Add a PlayerStart just by the RigidBody, then Build All [
 ] and PIE [
  ].
].
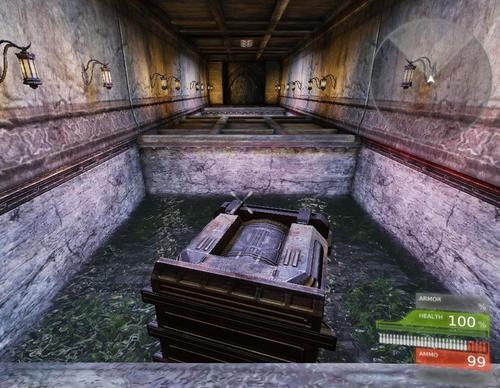
- Try to knock the RigidBody into the hole and use it as a bridge to get across. While playing, use the mouse scroll wheel to cycle guns until the PhysicsGun is showing. It has just a white X cross-hair, shown in the next screenshot. You can left-click with it to poke an object, and right-click drag to take hold of an object then right-click release to throw it. Note that the PhysicsGun will more easily knock rigid bodies than the impulse from the default LinkGun, and using the PhysicsGun with the right mouse button will let you hoist RigidBody actors into the air.
- If you made your hole too deep, try raising the KillZ value accordingly. You may also need to adjust the the crate's DrawScale3D property so it enables you to bridge the hole. An example scene is included in the available content: PACKT_01_StaticMesh_DEMO.UDK.