
The previous recipe touched on the use of lighting channels to specify that lights will exclusively affect objects given the same lighting channels. In this recipe the intention is to learn how levels and channels can be employed to make sure lights influence only what you want them to. Levels are actual division of content into distinct maps, loading as required. Channels relate content according to which channel an object is assigned to, something like layers. Either way, lights will effect objects in the same level or channel that they are assigned to.
- Grab any PointLight and press F4 to expose its properties and look in the Lighting | Lighting Channels section, which is a long list of channels such as Unnamed1, Cinematic1, and Gameplay1.
- Add a PointLight to the scene we've been using, or you can otherwise open: Packt_08_CornellChannels_Start.UDK and set its Lighting | Lighting Channels | Unnamed1 checkbox to be ticked on. By default the light will have the BSP, Static, and Composite Dynamic channels already ticked. Turn those off, or the light won't be exclusive at all.
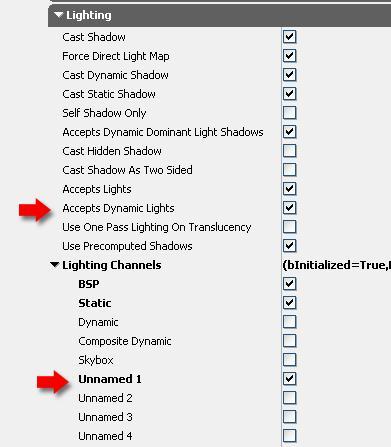
- Select the prefab meshes (you may have to right-click on the prefab and choose Convert PrefabInstance to Normal Actors) and set the gray ones at the back through their properties to also use the lighting channel Unnamed1, as with the light, as shown in the following screenshot:
- Set the light's Light | Light Component | Light Component | Brightness to 3.0 and, just underneath, the Light Color to a chromatic blue R=0, G=0, B=1, as this is a color not used elsewhere in the scene.
- Repeat this using a new light that has the Lighting Channel | Unnamed2 ticked and also set some other scene objects to use their Lighting Channel | Unnamed2, and set the new light's color to a strong yellow.
- It should be apparent in the editor that only the Unnamed1 objects are affected by the Unnamed1 light, and only Unnamed2 objects are effects by the Unnamed2 light, but when you rebuild and PIE there will be a lot of spill and fill.
- So how to solve that? In the light properties, for both lights, turn off the property Use Direct Light Map. If this is set to true, the light will be baked into a Lightmap for all static primitives it affects. Since we are concerned with a live, dynamic light we don't need that here. Tick on Force Dynamic Light. Setting this option will preclude any pre-computation for that light (no Lightmaps or ShadowMaps), forcing it to be a dynamic light casting stencil shadows. So we're doubly covered.
- For the objects that were assigned a unique lighting channel, turn on the property Lighting | Accepts Dynamic Lights. This makes sure they won't be discarded from the dynamic light calculated during game play. Add a small fill light (with an intensity of 0.1) to light the BSP and to cast shadows. Or you could use an Emissive BSP, as in the previous recipe.
- You should end up with a result similar to the next screenshot, which comes from Packt_08_CornellChannels_DEMO.UDK. It is worth noting that experimenting with changes to the values and settings will help you figure out what to expect as you go. Try not to change too many properties all at once or you can lose track of what is contributing to the result.

UDK's editing environment is in a way layered, in the sense that content can be assigned to individual, mutually exclusive levels. This feature allows us to leverage lighting effects only for objects in the same level that the light occupies. We discussed the use of levels for streaming in Chapter 6, Under the Hood. It works much the same way for lighting control. Here's a quick example:
- Create a hollow BSP box with a blue PointLight placed at one end and an orange PointLight placed at the other. Add some Static Meshes inside the room.
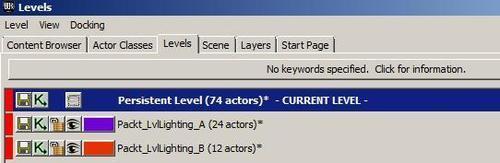
- Open the Content Browser and switch across to the Levels tab, shown below. Select the PointLight, and all the objects you want to be lit by it and choose New Level from Selected. In this example, set the option Always Loaded on when creating levels. The other PointLight and objects will remain in the default layer. Select those and make a new level for them, the same way.
- To move objects back and forth between levels you can use copy objects, switch active levels, then paste. To switch active levels, right-click on the level you're aiming for and choose Make Current.
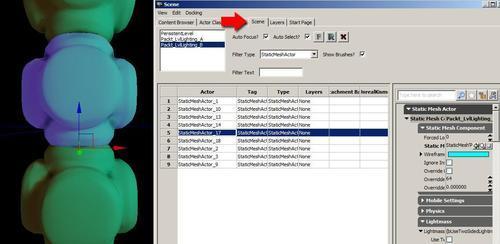
- You can actually navigate the level content easily by switching over to the Scene tab next to it, which lists the actors according to their level. If you tick the AutoFocus? checkbox, when you highlight an actor the view will jump to it. In the next screenshot, the Scene tab is shown, with a highlighted actor selecting and framing in the viewport, as well as displaying its properties. To gain familiarity with this tool, try selecting, copying, and pasting content from one level to another to re-arrange the lit meshes into a new lighting pattern.
- Right-click on each level and choose Self Contained Lighting. You should notice the lighting distribution for the objects is now exclusive. In the next illustration, only the foremost StaticMesh and the BSP room are in the persistent level.
- The next screenshot shows the result of containing the lights to light their current level only. This is a powerful feature, because of the unique map files it generates that can be independently updated, allocated, and managed.
