
The goal of this chapter has been to overview a broad spectrum of the UDK content generation tools, so now we jump to a new area, particle effects. In the first chapter we created an asset which was an empty particle system, aiming to show how its package would be created and saved, but having left it at that it would be good to flesh it out. So we'll look a little deeper into Cascade and create a steamy plume which can be applied in a scene as a set dressing. This recipe is a quick guide to the essentials. We will deal with advanced Cascade challenges in Chapter 7, Hi, I'm Eye Candy!
- Create a Blank Map and, in the Content Browser, select your package folder. If you haven't created one, just click on New Packages. You'll be prompted for a package save location later. Right-click in the assets panel and choose New Particle System. Make the Group name of the Particle System Cascade and the asset name SmokePlume. The Unreal Cascade Editor will open after the asset is created. Later, when you need to re-open Cascade, just double-click on the asset.
- The Cascade Editor has three windows (Preview, where we see what's happening, Properties, for defining the look and behavior of the particles, and Curve Editor, for adjusting animated values). The main part of the editor is a set of emitters and their modules. This section defaults to one emitter, which should be currently playing. Commands to adjust modules are accessed by right-clicking.
-
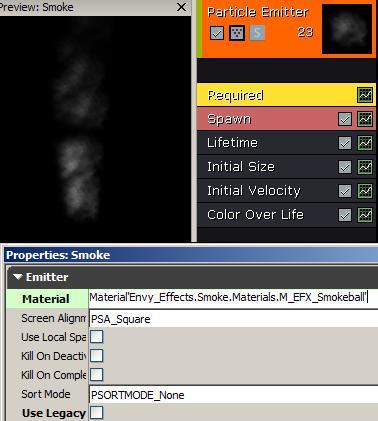
In the Preview window, hold the RMB and drag to zoom in and frame the playing particles. If you wish to stop them playing you can either toggle Real Time [
 ] or press the Pause button in the Play/Pause icon pair [
  ]. Notice they use a default Material designed to be memory light and provide a clear illustration of the individual particles. Let's change this to something more smoky. In the Content Browser, search for a Material called M_EFX_Smokeball and highlight it. Now go to the list of operators currently active in Particle Emitter. Choose Required and look in its properties (at the bottom of the Cascade Editor) for Emitter | Material. Click the assign icon [
  ] to assign the Material that's highlighted in the Content Browser.

Tip
For navigation, Cascade's preview panel works a lot like any preview panel in UDK, where LMB+drag orbits in Z around the object, RMB+drag up and down zooms in and out. MMB+drag pans. LMB+RMB+drag orbits in Y around the object. There is also an axis free orbit mode, accessed by clicking on the icon [
 ].
].
-
The Material we're using is slightly regular as it plumes up. Change this by finding it in the Content Browser (use the magnifying glass in the Material channel [
 ] or just search by name for M_EFX_Smokeball. Right-click on the asset and Create a Copy to your own package. Now double-click the displayed asset to open the Material Editor.
- We're going to make the texture rotate and include a link into the Distortion channel too, so whatever is behind the smoke in the scene will ripple a little. To create the rotation, type Rotator in the Material Expressions search field on the right at the top. Drag a Rotator operator from the list to the canvas and hook up its output to the texture sample UV's input. When you have an expression (or node) selected, its properties are exposed in the Properties window. For the Rotator, in its properties set the rotation Speed to 0.4 and in its Desc field type Positive (just to recall its purpose). Create a copy of the Rotator and set its Speed to -0.4 and name its Desc Negative. Now reorganize the nodes so that they're arranged like what you see in the next screenshot. Click-and-drag to pan the canvas. Ctrl-drag on a node to move it. Ctrl+Alt+drag around some nodes to select several. Press Alt over a wire's In or Out connector (or nub) to break a connection. Reducing the nodes used where possible gives the asset fewer instructions, making it process faster. Check the little square in the corner of the Multiply node to preview the resulting rotation effect.
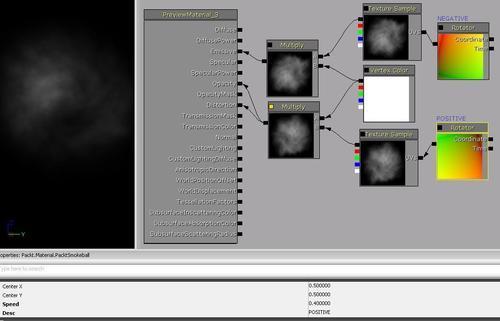
- This screenshot shows the Negative and Positive nodes for the Rotator we made. In the image, besides the Emissive channel giving the steam its whiteness, the same spinning texture drives the Distortion channel of the Material. What this does is slightly squiggle the background behind the steam.
-
Now tick the compile icon [
 ] in the top corner of the Material Editor. This commits your changes to the original Material and its use in the world, and you can close the editor and go back to the particle system to assign it, given we now have an adjusted copy of the Material initially set there. Also, right-click and choose Save on the Material in the Browser.
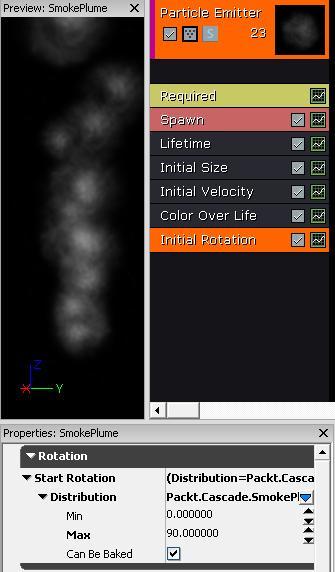
- You can also rotate the particles themselves in Cascade. Right-click in the Particle Emitter module list and add an item called Rotation | Initial Rotation. With this highlighted, in its properties set Rotation | Start Rotation | Distribution so the Max value is 90.
- To change the speed of the puffs of smoke in the plume, click on the Spawn module in the Particle Emitter modules. Go to the module's properties and expand Spawn. Change Rate | Distribution | Constant to 75 and, below it, the Rate Scale | Distribution | Constant to 5. It would be a good idea to experiment with different values to see how they alter the look of the plume.
- At the moment our steam is straight white, and it might be nice to tint it. Click the Color Over Life module in the Particle Emitter list, then adjust its property Color | Color Over Life | Distribution | Constant Curve | Points | [0] | Out Val | Y to 2 and notice how the base turns slightly blue.
- Now change the Color | Color Over Life | Distribution | Constant Curve | Points | [0] | Out Val | X, Y and Z to 0.1, 2 and 3 respectively. This should effect the color of the top of the plume. The next screenshot shows this coloration.
- Let's change the character of the smoke by adjusting the Initial Velocity module in the Particle Emitter list. In its properties change Velocity | Start Velocity | Distribution | Max to Z=222 and Min to Z=2, and the stream of particles should become tall and thin.
- If you want to make the plume less regular, change the Lifetime module in the Particle Emitter list. In its properties change Lifetime | Distribution | Max to 5. You should see little breakaway puffs come off the main plume.
-
Our plume is now pretty tall, so to moderate its maximum height, we can add a Kill module to the Particle Emitter list as shown above. In its properties, set the Kill | Height | Distribution type using the blue downward triangle [
 ] to Distribution Float Uniform. This gives you a Min and Max value to edit. Set those to Min=200 and Max=300.

- In the Kill module properties, don't turn on Absolute unless you want to use world space for the calculation of the height the particles can reach. What that would do is constrain the particle within that range of the scene's height.
-
That's probably enough to get things started. To explore Cascade more you can examine similarly each of the items available by right-clicking the Particle Emitter list, such as Collision, Attraction, and Event modules. When you finish experimenting, save your asset in its package. You can also save a thumbnail of the particle system using the menu command View | Save Cam Position [
 ].
].
- To add your asset to the scene, just drag it from the Browser into the viewport or right-click in the scene and choose Add Emitter: SmokePlume.
- For adding a particle system to a skeletal mesh socket see Chapter 7, Hi, I'm Eye Candy!