
In this recipe we'll go through the steps to create a MaterialInstanceConstant (MIC), and show how a MIC can be used to set up player influence over the qualities within a Material. This was already set up and used in the final recipes from Chapter 4, Got Your Wires Crossed? They were active in the night-to-day transition in the scenes. A MaterialInstanceConstant exposes a parameter to animation such as an RGB color channel, a brightness channel or the strength of an Alpha channel. In practical applications, you could use this as a way to alter Materials on assets; making the tattoos on a magic creature glow for instance, as its powers charge up.
From the provided content, load the scene Packt_09_MIC_Start.UDK.
The scene shows a quite abstract special effect. If you don't want to see this looping in the perspective viewport, press the Real time toggle
(Ctrl + R), which is the joystick icon [ ![]() ].
].
- In the Content Browser, search the provided content for Packt.Material.GridPanner, right-click on it and choose Create a Copy.
- Name the copy Yourfolder.Material.GridPanner_Params.
- Double-click on the result. The Material Editor will open, and you can see the nodes for the Material are fairly diverse. While this Material setup possibly merits some explanation, we'll just focus on the nodes that allow us to expose values to Kismet. See the upcoming How it works section for more information.
- Along the top are Constant nodes marked A, B, and C. These have values that will be interesting to change.
- Select A = Constant 1 and right-click on it. Choose Convert to Parameter. Notice that there is now an entry in the properties of the new Parameter node called Parameter Name. Here, type in Saturation.
- Select B = Constant 3 (RGB) and right-click on it. Choose Convert to Parameter. As before, we need to add a Parameter Name in its properties. This time, type in Color Shift.
- Select C = Constant 1 and right-click on it. Choose Convert to Parameter. Again, we need to add a Parameter Name in its properties. This time, type in Brightness.

- What you see in this screenshot is our goal, a radiant digital furnace. When we shoot the four globular floating balls, each produces a change in the furnace Material. Now that each Parameter Name has been set up, right-click on the Material GridPanner_Param in the Content Browser and choose Create New Material Instance Constant. Call it GridPanner_MIC1.
- Double-click on GridPanner_MIC1 and in the window that pops up, turn on the params. Adjust the color, brightness, and saturation params to suit our needs.
- Make three more copies: GridPanner_MIC2, GridPanner_MIC3, and GridPanner_MIC4. Change each one's params to a somewhat different color, brightness, and saturation than the rest.
- In Kismet, examine the current set of events and actions. These are explained in the How it works section after this recipe.
- Hook up to each Trigger | Take Damage event's output a New Action | Actor | Set Material action. In the properties of each event, assign a different colored GridPanner_MIC until all four triggers have a unique one. Also, create a Delay and one more Set Material action in some clear space. Set the Delay to 5.00 and the Material assigned to the extra Set Material action to be the main GridPanner. In the scene, select the two big meshes InterpActor_0 and InterpActor_1 and then assign them to the Target of the Set Material action.
- Right-click in Kismet and choose New Event | Remote Event. In the properties of this, assign the Event Name to DelayStart. With the Remote Event selected, press Ctrl + C then Ctrl + V to spin off a copy. In the properties of the copy, assign the Event Name to DelayStop.
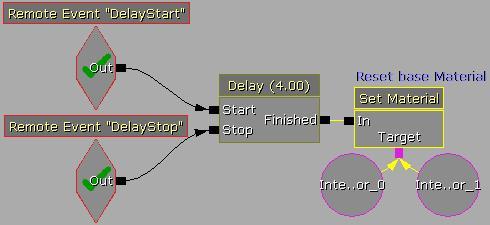
- As shown here, hook up the DelayStart output into the Delay (4.00)'s Start nub. Hook up the DelayStop output into the Delay (4.00)'s Stop nub.
- Right-click in Kismet and choose New Action | Event | Activate Remote Event. In the properties of this action set the Event Name to DelayStart. For both the Remote Event DelayStart and the Activate Remote Event DelayStart its tick should go green. You can click on each to jump from one to the other.
- Create three more copies of this node and distribute them near each Play Sound action. To each event's Out, hook up the Finished nub of a Play Sound.
- Paste one more Activate Remote Event, and set the Event Name in its properties to DelayStop. Make sure that it's highlighted, then copy it, and paste three more.
- Hook up each of these to a Take Damage event. They perform the task of stopping any current delay that may be ticking over when an actor takes damage. You could just hook up all the events to one Activate Remote Event: DelayStop but then inevitably wires would start crossing all over the place and possibly be hard to read. Each of the four Take Damage events will have a similar network, as shown here, with different MIC assets applied to the Set Material action, MIC1, MIC2, MIC3, and MIC4.

To get the most out of this image, open up the Kismet in the demo map Packt_09_MIC_DEMO.UDK. The toolbar toggle Hide Unused Connectors
[ ![]() ] has been turned on to save some room. You will notice that there are four copied sets of nodes that work on the four particle emitters, and the four globular meshes.
] has been turned on to save some room. You will notice that there are four copied sets of nodes that work on the four particle emitters, and the four globular meshes.

The parent Material Packt.Material.GridPanner is not as complicated as the clustered nodes in the image might look. All the nodes can be added in the Material Editor by typing in the search field on the right-hand side panel of the editor, which is called the Material Expressions list . The read order to follow the description of the nodes is from right-to-left. Each node adds a slight change to the two loaded textures. The first node is a TexCoord tiling node, which tells a texture to repeat or tile across whatever object it winds up on. The second two nodes are Panners. These control the vertical movement of the two textures on a surface at different speeds. The texture coordinates feed into 2D Texture Samples. This example uses a grid-like texture and a gradient-like photo of surf. The next group of nodes are mostly Constants. These include fixed values that modify the textures in terms of the amount of brightness or saturation taken from them. There is also a One Minus or (1-x) node which inverts the grid texture. These are like filters in Photoshop essentially; they adjust the incoming content by a fixed rule. The fourth vertical line of nodes from the right includes a Sine (which creates a noisy wave-like perturbation) in the incoming data and another One Minus. The fifth vertical line of nodes from the right includes Multiply nodes which mix together two inputs, a Dot Product and a Subtract operation feeding into them. The thumbnails show the effect of these nodes. The fourth line of nodes includes the Constant 3 we made into our color parameter vector (RGB values we can access externally). The final group of nodes going into the Material's Diffuse and Emissive channels just pull together the elements on the left, with value adjustments to tweak their intensity. The bottom group of nodes control the Material Opacity channel, and the operators include a DepthBiasedAlpha so edges close to the camera fade, and a Clamp to limit the extend of the inputs from the animating texture. The PreviewMaterial node's properties are set to Blend Type = Translucent, and Lighting Mode = MLM_Unlit, since the Emissive channel generates the brightness of the Material in the scene.
In this example we changed the Material parameters using a Set Material action in Kismet. We can also animate values exposed by the Parameter node.
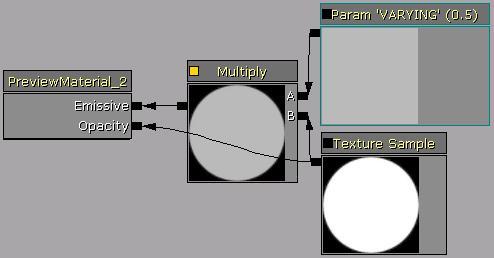
- In the Content Browser, right-click and choose Create New Material. Keep the Material Editor open, then, back in the Content Browser, search for and highlight Texture2DPackt.Texture.FrazettaMask.
- In the Material you just created, add a Texture Sample (hold T and click), using the texture asset Packt.Texture.FrazettaMask, a white circle.
- Add a Multiply (hold M and click) node and a Constant (hold 1 and click) node. Hook the Texture Sample node's RGB nub and the Constant into the Multiply A and B nodes, then hook the Multiply into the Material's Emissive channel.
- Right-click on the Constant and choose Convert to Parameter. In its properties, set the Parameter Name as Varying. Save the Material as TEST_MAT.
- Right-click on the Material you created in the Content Browser and choose Create new MaterialInstanceConstant.
- Open the new MIC asset and tick the scalar value VARYING. If you don't, it won't be found by a Matinee. Save the asset as TESTVarying_MIC.
- In the scene, press Ctrl + Shift + F, then switch to the Content Browser's Actor Classes tab. Uncheck the filter Show Categories and highlight in the list MaterialInstanceActor. This actor acts a sole conduit through the MIC to a single Object Variable in Kismet, given that many actors might possibly use the MIC in the scene. Any animation effecting the MIA affects all the actors using its assigned MIC.
-
Right-click in the scene and choose Add MaterialInstanceActor Here. This will create an MIA in the scene [
 ]. It can sit anywhere as it is just a placeholder actor. In its properties assign TESTVarying_MIC in the Mat Inst channel.

- Also add a PlayerStart actor, a PointLight, and a floor to stand on. Drag any StaticMesh into the scene. Right-click on it and choose Convert | Convert StaticMesh to Mover. With the Mover selected, highlight TESTVarying_MIC in the Content Browser, then right-click on the mesh and choose Materials | Apply from Content Browser. It now refers to the same asset as the MaterialInstanceActor.
- Open Kismet, hold Ctrl + S and click to add a Level Loaded event. While the MIA actor is selected in the scene, hold M and click to add a new Matinee. Double-click the Matinee to open the Matinee Editor.
-
Right-click in the Matinee Editor's dark gray tracks panel, and add a New Empty Group and call it MyTrack. Highlight MyTrack, right-click, and choose Add New Float Material Param Track. In the properties of the new track, press the assign icon [
 ] in the Material channel to add an entry. Expand [0] and highlight the channel Target Material.
-
Select your TESTVarying_MIC asset in the Content Browser and assign it here using the green arrow [
 ]. Under this entry, change Param Name to VARYING (the parameter name we set earlier in Test_Mat that TestVarying_MIC can access).

- Highlight the Float Material Param Track in the Matinee Editor timeline, and key it (using Enter to add keys). This track takes the Float value (0.5) in the original Material's Parameter node and lets us control it. Right-click on each key and choose Set Value to adjust them as desired to create varying values for the Parameter VARYING. The default value for the key is 0. The Material's 100% amount is a value of 1.

- If you used 0 and 1 for the curve, as shown here, the Material should fade in and out. Don't forget to set the time-line range to the longest key time.
- To make this loop, in Kismet, select the Matinee action and in its properties turn on Looping. Build the scene and PIE to verify whether the VARYING amount that we set appears to be pulsing. An example is the disc floating by the PlayerStart in the provided scene Packt_09_MIC_DEMO.UDK.
- In the original Material TEST_MAT, right-click and choose Parameters | New Vector Parameter. Call the parameter name COLOR in its properties.
- As before add a Multiply node, then hook the Vector and Multiply up so the parameter COLOR can affect the Emissive channel. Compile and save.
- Open the TESTVarying_MIC asset and turn on auto-activate for the Color parameter.
- Double-click the Matinee in Kismet, highlight MyTrack, and add a new Vector Material Parameter Track under the existing parameter track. Highlight the new track to expose its properties.
-
In the properties, under Material, hit the add entry icon [ ] and expanding
[0] to show Target Material. Make sure TestVarying_MIC is highlighted in the Browser and press the assign icon [ ]. Underneath, enter COLOR as the Param Name.
- Key-frame the RGB components of the Vector Material Parameter track. To do so, tick on the small square on the end of the vector track in the Matinee Editor so it goes yellow. You should see a Graph Editor above with TimeVarying_Vector Material... displayed, and RGB squares below it.
- Ticking the RGB squares on and off will expose individual RGB tracks to key frame. For example, leave only the Red square on, key frame it from 0 to 1 over 2 seconds. Then leave only the Blue square on, and key frame it from 1 to 0 over 2 seconds. You will get a blend from one hue to another.