
This recipe shows how to set up the environment of UDK to allow our character to use an AnimTree we have been working on. While in the editor we can preview the AnimTree performance, that isn't the same as seeing it in action during gameplay. To deploy our AnimTree requires us to create a custom pawn class derived from the default pawn UDK includes. To do so, we first need to adjust some of UDK's configuration so it will accept the adjustments we're going to make.
The configuration steps are not very difficult, it is just that all the changes are made outside of the editor, an approach which may feel unfamiliar to designers used to working totally inside a software environment to produce content. In short, we just edit a few UnrealScript files to alert UDK to use our AnimTree when it loads. I am going to use a tool called ConTEXT for this example. This is a text editor which sits in the middle ground between Notepad and Microsoft Visual Studio. It is freely available from www.contexteditor.org and the Desktop Version is what I'll be using, along with its UnrealEd Highlighter template that can be found in the list at http://www.contexteditor.org/highlighters/.
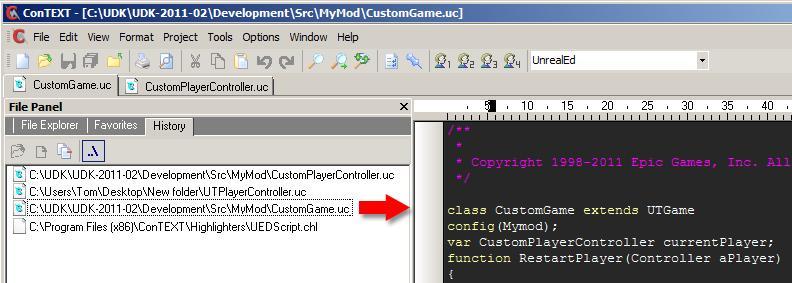
This screenshot shows the simple, tabbed interface of ConTEXT, its convenient History list, and an open UnrealScript. Note that the UnrealScript Highlighter displays as UnrealEd in the icon row. Highlighters can be added by following the instructions from the ConTEXT website: To add a new highlighter to ConTEXT, download the highlighter and copy it to the Highlighters folder of your ConTEXT installation's folder. If ConTEXT is running, restart it to update the list of external highlighters. For full information on how ConTEXT works, look to their documentation. For us, it is only necessary to set the UnrealEd Highlighter to be active in an open document from the Select Active Highlighter list on the right-hand side end of the icon row.
Note that a dark blue background will be applied, which is a visual aid as it is easier on the eyes than a bright white color. If you are fond of changing colors, just edit the color entries in UEDScript.chl using HTML color codes (for instance CommentCol: clLime could be replaced with CommentCol: $00FF00) and you can find a list of color codes at http://www.w3schools.com/html/html_colors.asp. Bear in mind there is a foreground and background color pair that needs to be defined.
- ConTEXT is a text editor with nice highlighting and code template tools, but it doesn't help to set up the UDK folders or settings that are the entry point for creating a custom game. Assuming you have a fresh install of UDK, and haven't already set up your own game folders besides those created to store assets in the
UDKGameContentfolder, you will need to create a folder called MyGame in the location:C:UDK~DevelopmentSrc(where~is your version). The folder name MyGame can be any name but the upcoming code refers to it repeatedly, so you may find it helps to stick with this if you aren't sure you can track it all the way. - In
C:UDK~DevelopmentSrcMyGame, add a new sub-folder called Classes. - In the folder
C:UDK~DevelopmentSrcMyGameClasses, create three new text files, MyGame.UC, MyPlayerController.UC, and MyPawn.UC, then right-click on each and choose Properties and ensure their Read Only checkbox is not ticked.Tip
What is MyGame anyway? When a designer creates a level, UDK requires a game type to be set, especially in later versions which no longer default to UTGame. The game type defines what kind of allocations hold out for the game, such as camera type, HUD used, details about the player, and everything that needs to be set at the entry point of the game.
- In ConTEXT open
C:UDK~DevelopmentSrcMyGameClassesMyGame.UC. This will be empty currently. Paste in the following code to define how MyGame.UC configures the player:class MyGame extends UTGame config(MyGame); DefaultProperties { DefaultControllerClass = class'MyGame.MyPlayerController' DefaultPawnClass = class'MyGame.MyPawn' } - Above we set a variable referring to MyPawn, which is there to set all the information for how a player can behave and appear in game. Next, we'll provision that. After it, we'll provision MyPlayController.
- Open the file we made before which should be empty:
C:UDK~DevelopmentSrcMyGameClassesMyPawn.UC. Treat lines in the code which are darkened as particularly important. Author comments are demarcated using//and explain what follows. Type in the following code:class MyPawn extends UTPawn config(MyGame); //The Object class defined below provisions the player model. DefaultProperties { Begin Object class=SkeletalMeshComponent Name=SkeletalMeshComponent0 SkeletalMesh=SkeletalMesh'Package.Group.Asset' AnimSets(0)=AnimSet'Package.Group.Asset' AnimTreeTemplate=AnimTree'Package.Group.Asset' PhysicsAsset=PhysicsAsset'Package.Group.Asset' bEnableSoftBodySimulation=True bSoftBodyAwakeOnStartup=True bAcceptsLights=True End Object Mesh=SkeletalMeshComponent0 Components.Add(SkeletalMeshComponent0) //The setting below sets the apparent camera distance from its pivot, which is where the player model is located. The DrawScale of the pawn can be increased or decreased to suit, with testing. DrawScale=1 CameraScale=30 }
Tip
This code doesn't refer to specific character assets; they are listed only as Package.Group.Asset. It is important to realize code will vary according to different needs. Our examples will include only what's needed to produce a result for the problem of this chapter, using the Packt_SkinTailFBX character. The following section deals with referencing the existing SkeletalMesh assets to work with our own animation.
- You will need to replace the asset names according to the package files of interest. In our case, we are using the provided content from the Packt folder.
- In the code entered so far, find the line
SkeletalMesh=SkeletalMesh. Here's how the entries below that need to be adjusted for the character we've worked with so far in the chapter:// The top part of the code entered in the previous steps doesn't change, just the following lines: SkeletalMesh=SkeletalMesh'Packt.Mesh.Packt_SkinTailFBX' AnimSets(0)=AnimSet'Packt.Anims.Packt_SkinTailAnims' AnimTreeTemplate=AnimTree'Packt.Anims.Packt_CharTree' PhysicsAsset=PhysicsAsset'Packt.Mesh.Packt_CharPhysics' - The assets shown here are those for the most complete version of our character that's provided with the book. The AnimTree we have been referring to all along has now been set. Of course, eventually you'll want to use your own.
- Now we need to furnish the MyPlayerController.UC class we referred to earlier in the MyGame.UC file we wrote. Open this file, which should be empty:
C:UDK~DevelopmentSrcMyGameClassesMyPlayerController.UC - UDK defaults to a first person view. We can't test the character works if we can't see it, so what we need is an entry to set the camera view behind the player. Type in the following:
class MyPlayerController extends UTPlayerController; DefaultProperties { bBehindView=True } - Save all the open .UC files. As things are, the classes are ready. Now we have to tell UDK to use the folder
MyGameand its classes, and then test them out. - Make sure UDK is not running and go to
C:UDK~UDKGameConfigand open the file DefaultEngine.INI in ConTEXT. - That change at the moment is simply to type in:
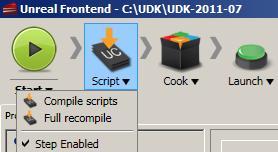
+ModEditPackages=MyGameunder the last entry in the section headed:[UnrealEd.EditorEngine](which you can search for using the menu command Edit | Find). The added line should come last because the list order determines the order that classes get loaded and compiled. Save the DefaultEngine.INI file. - In Windows choose Start | All Programs | Unreal Development Kit | ~ | Tools | Unreal Frontend where ~ is your install version for UDK. Frontend will load, and you can recompile the scripts for UDK using either the Script | Full Recompile command or Script | Compile Scripts command. If you have changed scripts and start up UDK, it will also prompt you to recompile scripts automatically. If you choose not to, changes will be ignored.
- If you have made any typos or other errors in your classes, the compiler should feedback errors in red and warnings in yellow in the analysis at the bottom of Frontend after compiling. You can open the .UC file with a problem in ConTEXT and use Ctrl + G to go to the line mentioned in the error. Here is a hypothetical example of an error report:
C:UDKUDK-2011-02DevelopmentSrcMyGameClassesMyGame.UC(16) : Error, Illegal character in name. Compile aborted due to errors.
In this case MyGame.UC contained a typo fault on line
16; the line is found in brackets after the file name. - If your MyPawn.UC has incorrect package references, warnings will be listed in yellow at the end of compiling. Here is another hypothetical example:
...MyPawn.UC(47) : Warning, ObjectProperty MyGame.MyPawn:DefaultMesh: unresolved reference to 'SkeletalMesh'Package.Group.Asset''.
The problem is that the asset is still in the abstract, not specifically one that exists such as SkeletalMesh'Packt.Mesh.Packt_SkinTailFBX. Again in ConTEXT, loading MyPawn.UC and using Ctrl + G to find line 47 would allow us to locate and fix this. Since you may periodically update the assets you want to use, this kind of oversight can easily occur.
- To recover from a non-compiling custom game, you can temporarily comment out the line in
C:UDK~UDKGameConfigDefaultEngine.INIthat points to your classes by adding;in front of the line+ModEditPackages=MyGame. - In UDK, there are a couple of requirements to complete the process we've been through. Although it's been set already for the final character asset Packt_SkinTail, a Z offset from the Origin is required in the AnimSet Editor to avoid the character walking in the air. For Packt_SkinTailFBX a value of
Z = -40works well. The next screenshot shows this setting. Note in the small image that the character's feet are no longer on the ground line and she has dropped below. While this looks disconcerting in the viewer, in gameplay it looks okay.
- After setting the Origin | Z offset, close the AnimSet Editor and save the package. Finally, go to the View menu and click on World Properties. Expand the section Game Type and in the entries GameType and GameType for PIE choose from the list MyGame.
To provision the player model is a matter of telling MyGame.UC to use your MyPawn.UC and configuring UDK to use the MyGame folder. You should extend UTPawn.UC and set the default properties in the new MyPawn.UC class to those of your assets. There are plenty of examples of this on the UDK
forum www.udk.com/forums. An example using the asset Packt_SkinTailFBX is included in this book's provided content: /files/Development/MyGame/Classes/.
After recompiling scripts, to place her in the scene as an NPC, place a Trigger actor and a PathNode actor. Create a Trigger event which connects to an Actor Factory action in Kismet. In its properties choose the Factory setting for an NPC by clicking [ ![]() ] and choosing UTActorFactoryAI then under it set the Controller Class to None and the Pawn Class to MyPawn, which should now show up in the list within the factory.
] and choosing UTActorFactoryAI then under it set the Controller Class to None and the Pawn Class to MyPawn, which should now show up in the list within the factory.
An example is in the provided map Packt_03_CheckMyPawnworks.UDK.