
Our model can look in an XY cone of rotation while swimming, but so far we haven't associated this looking behavior with any controller in gameplay. Normally, either the player controls the look, or the look is controlled by an object in the scene dynamically, using a LookAt control.
- Fully load the Packt package by right-clicking on it in the Content Browser Packages List, then highlight the group Anims. Create a copy of the AnimTree Packt_CharTree. Call the copy MyTreeLookat.

- Select the main AnimTree node and right-click on it and choose Add SkelControl Chain using b_head. Right-click on the canvas and choose New Skeletal Control | SkelControlLookAt.

- In the Properties of the new SkelControlLookAt expand the Controller section and in Control Name type HeadControl. This is a name we'll reference in code. Underneath the Control Name, set the Control Strength to 1.0 so that there will be a visible effect.
- In the AnimTree Editor, set the slider weight of the HeadControl node to 1.0 and hook the In nub of this to the b_Head nub you added to the AnimTree node.
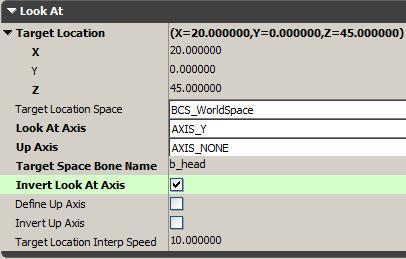
- In the SkelControlLookAt Properties expand the LookAt section and set Target Location X=20, Y=0, and Z=45. Set the Target Location Space to BCS_WorldSpace. Set the Look At Axis to AXIS_Y. Set the Up Axis to AXIS_None. Set the Target Space Bone Name to b_Head. Tick on the checkbox for Invert Look At Axis. All of this is shown in the next screenshot.
What we are doing here is telling the character's head where it's able to focus its attention. In the preview window your character should now be looking at a little blue diamond widget just ahead of itself. You can move the widget directly in the viewport.
- To avoid the head flopping too much, we'll now add Limits to the possible head rotation. Expand the Properties section Limit. Tick the checkbox Enable Limit. Tick the checkbox Show Limit, and you should see a green cone which represents the space the head can look within (which is a bit like the aim space we covered in the prior part of this recipe). Show Limit just displays in the Preview window so you know what you're doing. Turn off Allow Rotation Z (this prevents the character looking up and down). This is shown here:

- In the property Limit | Max Angle, and also set the Outer Max Angle to 145. Set the Rotation Angle Range X between -100 and 100. Do the same for Rotation Angle Range Y. This allows the head to turn a little more than the defaults. Don't set Rotation Angle Range Z, since you'll want to make sure that the head turning works around side to side axis first. It can always be set later on.
- Save your package and close UDK.
- Now you need to code a custom class that extends UTPawn.UC. You should already know how to make UDK use your custom class by setting configuration and recompiling. If not, see the earlier recipe in this chapter called Configuring your character to use your AnimTree.
- Create a new file in
C:UDK~DevelopmentSrcMyGameClassescalled MyPawnLookAt.UC. Using ConTEXT, enter the following code in the file:class MyPawnLookAt extends UTPawn; var SkelControlLookAt SkelControlLookAt; simulated event PostInitAnimTree(SkeletalMeshComponent SkeletalMeshLookAt) { Super.PostInitAnimTree(SkeletalMeshLookAt); if (SkeletalMeshLookAt == Mesh) { SkelControlLookAt = SkelControlLookAt(mesh.FindSkelControl('HeadControl')); } } simulated event Destroyed() { Super.Destroyed(); SkelControlLookAt = None; } simulated event Tick(float DeltaTime) { local PlayerController PlayerController; Super.Tick(DeltaTime); if (SkelControlLookAt != None) { PlayerController = GetALocalPlayerController(); if (PlayerController != None && PlayerController.Pawn != None) { SkelControlLookAt.TargetLocation = PlayerController.Pawn.Location + (Vect(0.f, 0.f, 45.f)); //+45 in Z } } } DefaultProperties { Begin Object class=SkeletalMeshComponent Name=SkeletalMeshLookAt SkeletalMesh=SkeletalMesh'Packt.Mesh.Packt_SkinTailFBX' AnimSets(0)=AnimSet'Packt.Anims.Packt_SkinTailAnims' //This assigns the AnimTree you've just been working on. AnimTreeTemplate=AnimTree'Yourfolder.Group.MyTreeLookAt' PhysicsAsset=PhysicsAsset'Packt.Mesh.Packt_Character_Physics' bEnableSoftBodySimulation=True bSoftBodyAwakeonStartup=True bAcceptsLights=True End Object Mesh=SkeletalMeshLookAt Components.Add(SkeletalMeshLookAt) Physics=PHYS_Walking DrawScale=1 CameraScale=30 } - Reloading UDK will force you to recompile scripts. Once that's working, load Packt_03_SkelControlLookAt_Start.UDK, where we'll cause a Bot to be spawned at a PathNode by touching a visible Trigger.
Tip
Bots are variously described as pawns, AI, enemies, NPCs. They are really just another actor or game object spawned in the level. Thinking this way, it would be easy, using the LookAt skelcontrol script, to create a turret which turns to face the player by assigning a different SkeletalMesh with a weapon socket. Then all you'd have to do in Kismet would be to give it a weapon inventory and set a Start Firing At action with a suitable target.
-
Select the Trigger actor in the scene then open Kismet [
 ].
].
- Right-click in Kismet and choose New Event Using Trigger | Touch.
- Right-click near it and choose New Action | Actor | Actor Factory.
- In the scene, select the PathNode actor, which is there to show pawns the paths they can traverse. Back in Kismet, right-click on the pink Spawn Point connector of the Actor Factory and choose New Object Var Using PathNode_0.
- Right-click on the pink Spawned connector of the Actor Factory and choose Create New Object Variable.

-
In the Actor Factory properties, click the blue triangle icon [
 ] in the Factory channel, and from the list choose UTActorFactoryAI. Then expand Factory and set the Controller Class to None and the Pawn Class to MyPawnLookAt.
- In the editor go to the View menu, choose World Properties, and expand Game Type. There, ensure that Game Type for PIE is specified as MyGame. Now when you PIE and spawn the Bot from the Trigger its head should face you as you walk around it (within the Rotation Angle Limit we set in the AnimTree so that it won't break its neck).
- An example scene is in provided: Packt_03_SkelControlLookAt_DEMO.UDK. Observe that in this case, if you jump up and down in front of the Bot then the Bot will look up and down with you. This is because in the AnimTree used, which is Packt.Mesh.Packt_CharTreeLookAt, the Limit properties of the SkelControlLookAt, include Allow Rotation Z.