
WorldPositionOffset was discussed in a couple of cases earlier in this chapter, and there's one more interesting case: how Interactive Foliage Actors use this feature. An Interactive Foliage Actor needn't have anything to do with foliage, but that is what it is often used for. Epic Games provides a video of the actor being used to create a field of undergrowth which reacts to the bounds of a Bot as it runs around amongst it: http://udn.epicgames.com/Three/rsrc/Three/InteractiveFoliageActor/WalkingThroughFields.mp4. A spring system automatically applied to the actor (it can be any StaticMesh) drives the interaction.
In this recipe we'll look at what we can do with the Material nodes that are involved, using the node which possibly has the longest name of all: FoliageNormalizedRotationAxisAndAngle.
- In the Content Browser, find Packt.Mesh.PowerCore and highlight it. Right-click in the scene and choose Add InteractiveFoliageActor: Packt.Mesh.PowerCore. Don't be surprised if it appears quite high off the ground. Lower it using the Translation Mode widget. The End hotkey won't work here.
- Press Alt + C to show object collision in the viewport. You will notice that the PowerCore actor has a huge bounding cylinder. With the PowerCore actor selected in the scene, press F4 and look for the Collision | CollisionComponent | CollisionHeight property and set it to 60. Set the CollisionRadius to 10.
- Set the DrawScale of the PowerCore actor to 3 (down in the entry field at the bottom of the editor) or in the property StaticMeshActor | StaticMeshComponent | PrimitiveComponent | Scale3D and set X=3, Y=3, Z=3.
- In the Content Browser, search for Packt.Material.PowerCore_IFA. Right-click on it and choose Create a copy... then name the copy Yourfolder.Material.PowerCoreIFATest. Drag this onto the power core, then hold Alt and drag out a few copies of the actor. Open the Material in the Material Editor.
- Right-click in the Material Editor and choose Math | New RotateAboutAxis. Hook this up to the World Position Offset channel of the Material (it will return an error warning but that's because we didn't load anything into this node yet). So, right-click and add a Coordinate | New WorldPosition and then a Coordinate | New ObjectWorldPosition. The WorldPosition hooks into the Position nub of the RotateAboutAxis. The ObjectWorldPosition hooks into the PositionOnAxis nub.
- Right-click and add a Coordinates | FoliageNormalizedRotationAxisAndAngle node. Right-click and choose Custom | New Custom.
- Hook its input to the output of the FoliageNormalizedRotationAxisAndAngle. In the properties of the Custom set the name to Custom: FloatAngle. Press Click to Show Editing Box and enter the following code snippet:
float angle = b;
float cosAngle = cos(angle);
float sinAngle = sin(angle);
float3 A = float3((a.x*cosAngle - a.y*sinAngle),
  (a.y*cosAngle + a.x*sinAngle),a.z-20);

return A;
-
Press Apply and close the window. In the properties of the custom node, there needs to be two inputs, one called a and one called b (these are what the code refers to). Add the inputs by clicking the add entry icon [
 ] and ensure the node's Output Type property is set to CMOT_Float 3. Make sure there are no typos. If there are you'll see a red error warning in the Material statistics.
- If you don't put the
-20after thezin the expression, you will get rotation around a different axis. As it is, the impulse applied to the PowerCore actor will turn it to spin around its vertical axis, a bit like a Tibetan prayer wheel. - Hold N and click to add a Normalize, and hook the Custom node to its VectorInput nub. Right-click and choose VectorOps | New AppendVector. Hook up the Normalize output to the A nub of this Append node. Hook the Append output to the NormalizedRotationAxisandAngle nub of the RotateAboutAxis.
- Hold M and click to add a Multiply and name its Desc property as
1. Add another, and name it2. - Right-click and choose Constants | New VertexColor. Hook it to Multiply 1 in the A nub.
- Hold 1 and click to add a Constant, set its R value to 1.5 and hook it up to the Multiply 1 in the B nub.
- Hook the output of Multiply 1 to the A nub of Multiply 2.
- Hold C and click to add a Component Mask, and in its properties uncheck all but the A checkbox. Hook the Mask's output to Multiply 2 in the B nub. Hook up Multiply 2 to the B nub of the Append node.
- Compile, save, and build. To check things are working, you have to PIE. First, open the menu View | World Properties, and scroll down to Game Type and set the Game Type for PIE to UTGame. When you PIE, press Tab and type behindview in the text field. Run up to the PowerCore meshes and check they spin as you bump them.

This example's functionality comes from the mathematics that output a float angle depending on the direction from which the player hits the actor in the scene. This is fed in to the RotationAboutAxis node , and the Constant in the expression defines the intensity of the spring. You could also effect the spring setting by opening the InteractiveFoliageActor properties and expanding the Foliage Physics section to expose the values for its Impulse Scaling, Stiffness, and Dampening.
In the previous example, we set the code segment in the custom node FloatAngle:
...
float3 A = float3((a.x*cosAngle - a.y*sinAngle),
  (a.y*cosAngle + a.x*sinAngle),a.z-20);

return A;
If you set it as follows, which is only a small change, you can change the nature of the bobbing of the object:
...
float3 A = float3((a.x*cosAngle - a.y*sinAngle),
  (a.y*cosAngle + a.x*sinAngle),a.z);
return A;
You then will probably want to adjust the nodes as seen in the next screenshot (in particular by Subtracting 25 from the ObjectWorldPosition so as to lower the PositionOnAxis):
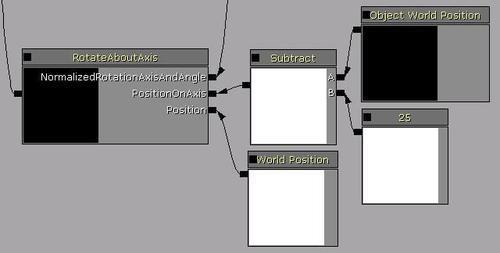
By default, it bobs around its center, which only looks okay when it is spinning around its up axis. If you want a sideways rocking motion, dropping the PositionOnAxis works because we set the Collision Height for the PowerCore to be 60, so the subtraction of 25 puts it at the base (or just above). The Constant driving the spring intensity should be reduced as the rocking motion looks more extreme than the spinning motion. A demo is provided: Packt_09_IFA_DEMO.UDK. Two of the PowerCore actors are set to rock and another two are set to spin.