
Alpha channels are often used to control opacity (of leaves, hair, dirt in windows, or decals). The use of a simple square card, or sprite, to render the complexity of a leaf or a tuft of fur is highly efficient. Getting a 'hair' shadow off a card with translucency isn't hard but there are some limitations to be aware of in UDK, particularly to do with whether you are rendering a shadow off of a moving or static object, or if you want to have moving lights in the scene. Light from Material Emissive channels doesn't really give a detailed result when casting shadows derived from a Texture Sample node's Alpha output. Light from the DominantDirectionalLight type also won't readily produce a good alpha shadow because it must be masked.
To make the translucent Materials cast dynamic shadows as masked Materials, set the Material's Cast Lit Translucency Shadow As Masked property to true and set the Opacity Mask Material parameter
—UDN: Shadow Reference
- A very quick way to get a hair texture from 3ds Max is setting the Hair and Fur modifier on a thin plane, and rendering it against a flat background (if the hair is to be dark, render on white). You can set the background color by pressing 8 and adjusting the Color sampler. The background color will be ignored in the Alpha calculation when saving the image to a 32bit .TGA.
Note
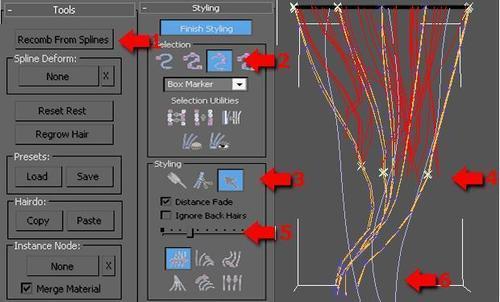
Above, the properties of the Hair and Fur modifier are highlighted in so far as they help give a quick result. For 1, Recomb from Splines lets you choose a Spline Shape, 6, that you've made in the viewport from which to drive the look of the hairs. Styling, 2, using points gives you most control of custom styling. Drag on just the hair ends. To adjust the hair in points mode you have to use the Select tool, 3. The points in the viewport highlight with an X, 4, and brushing them directly will allow you to shape the hair using the transform tool, for which there is a brush size slider, 5. In the previous screenshot the actual hairs (red) are shorter than the guides (orange). Further down in the modifier there are numerical values for root and tip width, scale of the hair, cut length, and so on. In the end, ensure that you render a square (512x512) image of the hair.
- In UDK, import the .TGA to your package, setting in the import options the BLEND_Translucent setting instead of BLEND_Opaque. You can tell the importer to automatically create a Material for you using the RGB channel for Diffuse and the Alpha for Opacity. Set the Material type to Anisotropic so it handles shine in a hair-like way, and to be Two Sided since we'll be using the Material on a plane. This can also be done after importing the texture, within the Material Editor.
- Open the Material, and set up its MaterialPreview properties as shown next, noting the additional Translucency properties that target how hair will respond to lighting and shadowing:

- For the network, set it up something similar to what's given next so that you have a color influence and a specular influence. Multiply the Texture Sample content using a Constant so you can raise and lower the result as required.

- Compile and save the Material. Temporarily unhook the Anisotropic Direction channel from the Texture Sample and set the Blend Mode to MLM_Unlit to show only the Emissive contribution. The hair will darken dramatically, so it's clear the gleam of the hair needs the Anisotropic setting. An Anisoptropic Direction should ideally be biased to R, G, or B, given they represent an X, Y, or Z direction. Close the Material Editor without saving this change.
Shadows for transparent surfaces
- Keep the Material asset highlighted in the Content Browser. In the main editor, place the provided StaticMesh Packt.Mesh.HairMesh and apply your Material to that. In a real situation you'd be using many small sets of hair meshes. The same process could be used for long grass, cobwebs, or branches, but it is good to test this out for the first time using just one isolated piece. Remember that the situation works for any Material with transparency that you want shadows from, and the point is to learn how static shadowing differs from dynamic shadowing.
-
The Material you've made is translucent so it can only be selected directly when View | Allow Translucent Selection [
 ] is active.
- Add a ground object, a BSP box will be fine, with the 'hair' placed above it. Select all the BSP surfaces by clicking one BSP surface in the perspective view and pressing Shift + S, then F5, and set the surfaces' Lightmap Resolution to 1 or 2, for the best shadowing possible.
- Hold L and click to add a PointLight, and build to see how the defaults turn out. Press F4 and edit the property LightmassSettings | LightSourceRadius to a small value, because the default 32.0 may cause a significant shadow spread if placed closed to the Hair BSP. Be careful what angle you view the hair BSP from because its anisotropic highlight will tend to only show from a certain angle. Realizing this may save time, so just orbit around the object to check this.
- Build and PIE to see the results. A base PointLight will give a reasonable shadow for this kind of situation, but remember that this is static lighting or BSP lighting. Hair is usually applied to moving dynamic objects like SkeletalMeshes.

- Certain lights are designed for dynamic objects, and the shadow we have built is not really going to work. Select the Hair BSP and right click and choose Convert | Convert to Static Mesh. Name it YOURFOLDER.Mesh.HairTest. Place this in the scene beside the BSP using the right-click method (choose Add RigidBody: YOURFOLDER.Mesh.HairTest). This is important as we want a RigidBody not a StaticMesh in the scene.
- For the light, enable its Dynamic properties in the lighting channel and shadow casting sections. No matter what you change and how much you fight with the light and object settings, you won't get a dynamic shadow for the hair. The reason lies in the Material, which is set as translucent. Switching to dynamic lighting means we need to switch to a masked opacity.
- Right-click on the HairTest RigidBody and choose Material | Find in Content Browser. Right-click on it and choose Create a copy. Name the copy YourFolder.Material.HairMasked_Mat and open it up.
- Unhook the feed into the Opacity channel and hook it up instead to the Opacity Mask channel directly below. In the PreviewMaterial properties, set the Blend Mode as BLEND_SoftMasked, and ramp the Opacity Clip Mask Value to 0.2 or so. Notice how the alpha gets chewed away the higher this value is. Find a nice balance for the mask, around 0.12, then save the Material and make sure it remains highlighted.
- Right-click on the RigidBody actor in the scene and choose Material | Assign from Content Browser. Immediately you should see solid, dynamic shadows appear. You can adjust these as in the previous recipe to soften the shadow or generate a penumbra for it. Reduce the darkness of the cast shadow using the color picker in the property Mod Shadow Color, below Lighting Channels.

- In this example, notice the dynamic shadow even affects the SkeletalMesh actors added to the scene. The hair is now a RigidBody, and the D/S is using a Whole Scene Dynamic Shadow Radius of 1024 in its properties.
- The next example shows a similar result using only the light calculation from a StaticMesh whose Material includes an Emissive channel. Emissive lighting was the topic of the first recipe in this chapter. The distance Falloff for the shadow on the hair (a RigidBody) and the SkeletalMesh is set up through the property for each object: Light Environment | Dynamic Light Environment Component | Lighting Bounds Scale, which has been set from 1 to 4. Notice the shadow from the StaticMesh is lighter than the hair's solid dynamic shadow.

As we've discussed, moving objects require their dynamic shadows to use Opacity Mask settings for clip masks, while StaticMesh actors can use the higher quality Translucent settings. Some light types (base PointLights for instance) favor static objects and others (DominantDirectionalLight) favor dynamic objects. For clipping masks, to get the best result, it is useful to consider the resolution of the surface you're casting the shadow against, and also the resolution of the Material itself. Notice how the final images show a few floating or stray endings, because clipping masks use a clipping value to chew into the texture.