
In this recipe we'll shoot at a flying monster. What we'll check for is whether or not the player can shoot the dragon out of the sky in a set time. If they do, then they will get to load the next level. If they haven't the current level will reload. Given the reward of progression, we also discuss the difference between PIE, which is a quick emulation of the game in the editor, and Play on PC mode, which emulates all the features of a cooked, packaged game (see Chapter 1, Heads Up, under the recipe Cooking a map with Unreal Frontend).
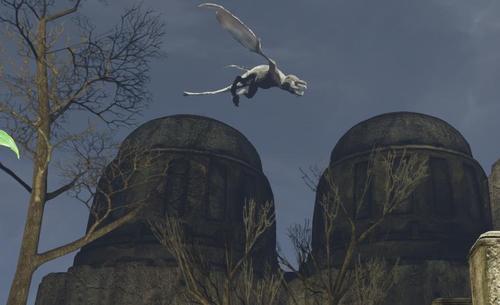
Open the map Packt_04_Comparison_Start.UDK. This scene features an enclosure around which a monstrous creature is circling. PIE to see if you can shoot down the monster with provided rocket launcher. There is a need for deflection shooting, where you aim ahead of the trajectory of the target, to get a hit.
- Once you are competent at shooting down the monster, you may want to inspect the Kismet set up for how this works. In the main sequence there are some results of hitting the monster with a rocket. Actually we don't hit the monster (or its SkeletalMesh), we just hit a Trigger actor attached to it.
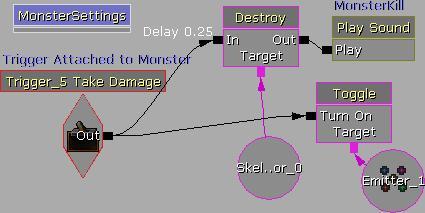
- Unhook the Play Sound MonsterKill and move it off a bit into clear space. Select the Destroy action and its Object Variable and also the Toggle action firing the Object Variable Emitter_0. Create a New Sequence from these, to get them out of the way. Call this Sub-Sequence DestroyMonster.
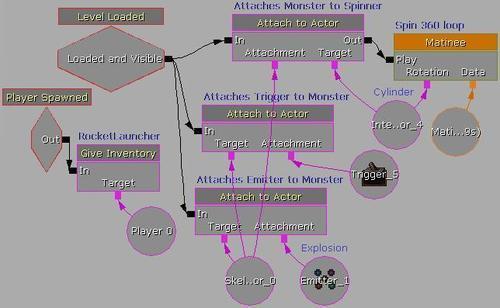
- The Sub-Sequence MonsterSettings is where the attachment of the Trigger to the SkeletalMesh Monster occurs. A particle Emitter actor in the scene is also attached to the Monster when the level loads, and the Monster is attached to a Cylinder that is being rotated 360 by a looping Matinee.
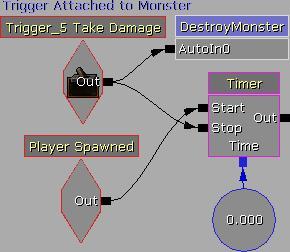
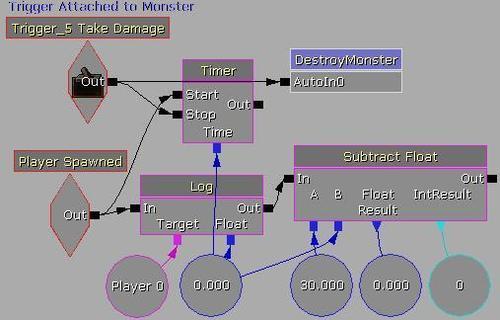
- We'll want to add some results following the shooting besides those provided. We'll focus on setting up a Timer that we can compare against when the player finally shoots the monster out of the sky. To do this, in Kismet, in the main sequence, right-click and add a New Action | Misc | Timer. This simply acts like a stop from when its Start nub is fired to when its Stop nub is fired. Right-click its Time nub and choose New Float Variable.
- Right-click and choose New Event | Player | Spawned, and connect its Out nub to the Start nub of the Timer. Connect the Out nub of the Trigger_5 Take Damage event to the Stop nub of the Timer. From when the player begins running around in the level to when the monster is shot down, the timer will be busy keeping time.
- The timer will work but there's no way to either display the count on screen during PIE or to compare the time against something. To display the Float value on screen would be easy enough; a Log would do fine, but it would count upwards from 1 and would also have decimal places. It would be better to create a countdown from 30, and make sure the number displayed is a whole number (or Integer). To get started on this part, hold L and click to add a Log and hook it up so the Player Spawned event's Out nub feeds the Log node's In nub. Right-click on the Log and choose Expose Variable | Float—Float.
- Set the Float nub to be the same Float Variable that's connected to the Time nub of the Timer action. Set a Player 0 Variable as the Target of the Log, as shown here:

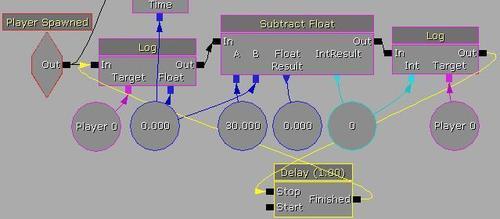
- This Log requires a loop back to keep displaying the Timer action's count through the Float Variable, but we've still got a couple of things to do first. This Log would count up from 0 and we want to count down from 30. So right-click and choose New Action | Math | Subtract Float. The Subtract Float should be connected to the Log, and then the B nub should be connected to the existing Float Variable which is attached to the Timer (and the Log). Under the A nub hold F and click to add a Float Variable. Set its Float Value property to 30. If you want to, give the Float Value more or less than 30 depending on how hard you think it is to shoot the monster and how much time you want to count down. Hold F and click under the Float Result nub and connect the resulting Float Variable to it. Lastly, right-click on the IntResult nub and choose Create New Int Variable. This converts the Float Result, which goes to decimal point precision such as 29.013 or 28.004, to a round number like 30, 29, or 28.
- Hold L and click add another Log, and likewise set its Target as the Player 0 Variable. This time right-click on the Log and choose Expose Variable | Int—Int. Hook the exposed Int nub up to the same Integer Variable added in the previous step to the IntResult nub of the Subtract Float.
- This sequence, from Log to Log should loop, so hold D and click to add a Delay. Hook the Out nub of the Log added in the previous step to the Start nub of the Delay. Hook the Finished nub of the Delay to the In nub of the Log connected to the Player Spawned event, as shown below:
- When the monster is destroyed, or more exactly, when the Trigger_5 Take Damage event occurs, we want to stop the loop which now should be counting down from 30 seconds, second by second. Hold R and click and when prompted enter the Event Name EndLog for a new Remote Event and Activate Remote Event action. Connect the Trigger_5 Take Damage event's Out nub to the In nub of the Activate Remote Event action. Move the Remote Event down by the Delay we added in the last step and hook its Out nub to the Stop nub of the Delay. This completes the looping timer and the time display.
- Now we'll set up a condition for whether you killed or did not kill the monster within 30 seconds. Right-click in some clear space and choose New Condition | Comparison | Compare Int or hold Ctrl + I and click. This node takes its A value and compares it to its B value, and then sends out actions based on whether A == B, A < B, A > B, and so on. Hook the In nub of the Compare Int to the Out nub of the Trigger_5 Take Damage event. Connect the Integer Variable that's the IntResult of the Subtract Float and connect it to the A nub of the Compare Int. Right-click on the B nub and choose Create New Int Variable. The new Integer Variable can be left on 0 since we're counting down from 30 to 0, and so a target of B = 0
works well. - Left hanging in the scene is a Play Sound action MonsterKill. Hook this up to the A > B nub of the Compare Int. If the time we take to shoot down the monster is not 30 seconds or longer we win.
-
In the Content Browser locate PacktKismet.Cue.TooFast_CUE. Back in Kismet, hold S and click next to the existing Play SoundMonsterKill and choose PacktKismet.Cue.TooFast_CUE for the Play Sound entry using the assign icon [
 ]. Connect the Finished nub of Play SoundMonsterKill to the Play nub of Play SoundTooFast. This is an announcer congratulating us on our swift annihilation of the monster.
-
In the Content Browser locate PacktKismet.Cue.TooLate_CUE. Back in Kismet, hold S and click to add a Play Sound and use the assign icon [ ] for the Play Sound property to assign PacktKismet.Cue.TooLate_CUE. Hook up the Play Sound action's Play nub to the
A <= Bnub of the Compare Int. The announcer in this case regrets that we took too long, even though we shot the monster. This will occur if the timer ran down all the way to zero (or more) before it was stopped. - Finally, let's create a concrete result to all this, besides sounds playing. Right-click and choose New Action | Misc | Console Command. Expand its property Commands to reveal the [ 0 ] channel, and in the text field type open Packt_04_RemoteEventDEMO. Don't add .UDK at the end. This lets the player progress on to a new level. Ideally it'd be one that leads on from this one, not an arbitrary one. You could choose any existing map you like as the target of this console command.
- Right-click on the In nub of the Console Command and choose Set Activate Delay. Enter a value of 1.
- Copy and paste the Console Command action. Type open Yourfile_04_ComparisonDEMO in the Commands | [ 0 ] property. Save the map you are working on with that name. The Console Command therefore will simply reload the current level, and the player will have a chance to try again. Here is the final sequence:

-
If you PIE (F8), everything will work except the final Console Command actions. They will only work in Play on PC mode [
 ], which emulates the final packaging of the game, complete with menus. An example scene is provided: Packt_04_Comparison_DEMO.UDK.
In this recipe we covered a lot of ground using the Compare Int action to see whether or not the player shot down the monster within 30 seconds. We rewarded and punished them accordingly with feedback and level loading and reloading. We set up a Timer, and a Math operation to count down 30 seconds, and we logged the result to the screen. We used a Remote Event, which we introduced in the previous recipe to jump from the Take Damage event down to the Log loop's Delay to stop it when required. To visualize the Timer, admittedly, it might be more elegant to create and display a proper 30 second clock animation through a graphic animated in Flash and imported as an .SWF rather than as a trail of numbers ticking off on the side of the screen.