The goal in this recipe will be to achieve a nice resolution shadow with a convincing shadow Falloff. As we've seen, not all of the available lighting solutions support penumbras. If you are not sure what a penumbra is, place the tip of your finger on the table and look at the shadow your hand casts. Around the tip of the finger the shadow will look darker and sharper than it looks as the distance between the table and your hand increases. Hotspots, the bright part of a spotlight, also have a penumbra caused by distance from the light to the surface. What causes the penumbra? Since the source of light is not an absolute point but in fact a surface, the angle of light isn't really coming from one place. Not all of the light is blocked equally around an object's edges, which leads to soft gradients in the shadow.

Before we begin, it is strongly suggested that the initial step when delving into shadow casting in UDK would be to look over the documentation provided by Epic Games at http://udn.epicgames.com/Three/ShadowingReference.html.
There are three main ways by which shadows can be resolved, and the key thing to remember is that lights can move or be static. On top of that, objects can also move or be static, and shadows have to be calculated in the most efficient way possible. It is helpful to keep the following in mind:
- The base class of each light type is a static version. It uses per-object dynamic shadows combined with pre-computed lighting. For instance, a PointLight.
- The movable subclass of that light may be moved at runtime. It uses whole-scene dynamic shadows. For instance, a PointLightMoveable.
- The toggleable subclass of that light may not be moved, but it can change color and brightness at runtime. It uses per-object dynamic shadows combined with shadow maps. For instance, a PointLightToggleable.
- The dominant subclass of that light is similar to Toggleable lights, but distance field shadow maps are available for it. For instance, a DominantPointLight.
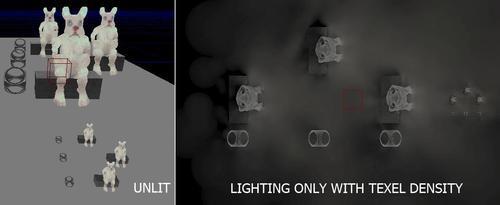
Open up the map Packt_08_Penumbra_Start.UDK. You should have views which show two groups of figures at different scales, including BSP boxes the figures are seated on. The left-hand side screenshot given next shows the unlit scene, and the second shows lighting only that comes from a single spotlight (Alt+ —). For the ground, the density increases on the front side of the characters. At the back of the scene the lighting is sparse, so shadows at the back area will receive less indirect fill.
- Place a regular PointLight on the floor and scale it so its range fits the scene, which is about 5000 units in length. Open its Movement properties and set the light's XYZ location in the world to (X=400.0, Y=3300.0, Z=2000.0).
- In its LightComponent properties set the property: LightComponent | ModShadow | Color | A to 0.7 to make the shadows a little less solid. Set the Light Source Radius to 128, which sets the area light size. Build with the current settings to get a result similar to the following screenshot:

- Set your perspective view to Lit Mode (Alt + 4). The PointLight shadows are reasonable but not spectacular. Note that ambient occlusion has been enabled in the World Properties for this scene. Notice the shadows have fuzzy edges, but uniformly, and also seem uniformly dark, which is not what we're after. We need the base of the shadow to be sharp and dark, then fade and blur as it stretches far away from the object.
- Click on the BSP floor and press F5. In its Surface Properties, the Lightmap Resolution is set to 36. Drop this right down to 2 so shadows falling on it are calculated at a higher resolution. In the next image the BSP floor has been split down the middle; the left half is set to the default 32, and the right half is set to 2 and the shadow there looks a lot more defined. Interestingly, when dealing with StaticMesh actors shadowing rather than BSP, their Lightmap Resolution property requires increased values.
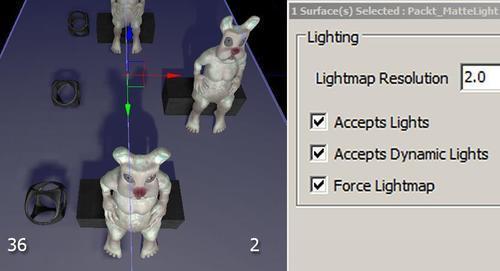
- If you compare the end and the base of the shadow on the more defined side, the top is fuzzy and light as compared to the base. So there's our penumbra.
Convert the spotlight we've been adjusting by right-clicking on it in the view and choosing Convert Light | PointLights | Dominant PointLight. If you rebuild lighting the penumbra effect will be gone, replaced by a somewhat weird but much stronger shadow. The scene build time by now may well have doubled.
Make sure both surfaces for the floor have a Lightmap Resolution of 2. Further down, notice the default Shadow Filter Quality is SFQ_Low. It is usual for 3D applications to have low default settings, to allow good scene performance.

- In the light's properties, confirm that its Light Source Radius is 128. Increase its Brightness to 2.0, and further down set the Shadow Filter Quality from SFQ_Low to SFQ_High. Change the Min and Max Shadow Resolution from 0 to 2048. The result is a bit cleaner, but the penumbra is not convincing, as the base of the object is pretty fuzzy.
- Convert the light again by right-clicking on it and choosing Convert Light | Directional Lights | DirectionalLightToggleable. Rebuilding lighting now will flip all the previously set values for the light properties to defaults, hence the abruptly different shadow, shown here on the left-hand side:

- The new shadows are very solid. This is controlled through the property Light | LightComponent | Lightmass | LightmassSettings | LightSourceAngle, and its default is 1.0 (shown on the left-hand side in the previous screenshot).
- Increase it to 10.0 to force up the angle at which the directional light's Emissive surface extends relative to an object receiving light. That influences penumbra sizes for its cast shadow (shown on the right-hand side in the previous screenshot). The Shadow Exponent property will also contribute to the Falloff of the penumbra.
- The light is still not quite right in terms of its direction. Notice that the shadow comes directly from overhead, even though the light we created was placed well in front of the characters. What's happened is that we've switched from a PointLight to a directional light, so you need to rotate the light to face in a certain direction which by default is downwards. Instead, rotate the light so its small blue direction arrow points towards the figures, at around 33 degrees.

- To finish up, while enduring much slower lighting builds, try changing up some of the values for the Light Source Angle, Shadow Exponent, and Min and Max Shadow Resolution. In the previous screenshot the penumbra is really forced, and the samples are quite clear. The great thing about this penumbra compared to the one from the default PointLight is that it works well even for the small scale models in the foreground. The values were: ShadowExponent = 4.444 and LightSourceAngle 3.333.
- The next screenshot is an example that uses even broader settings: ShadowExponent = 2.0 and LightSourceAngle 10.0.

- A peculiarity of this scene is that the rearmost shadow is noticeably darker than the foremost shadow. This is because the last one isn't receiving any bounce lighting. The light bounces from the last big statue back into the shadow of the first one, making it look less dark. Distance from the light source is irrelevant with directional lights—only direction matters. So, adding a wall at the rear of the scene would help deflect light back to fill the shadow.
Tip
It can be costly in terms of production time to continually test out lighting, because of the build, so use a simple scene to test, and then you can save this scene as a template for high level scenes using copy and paste. Do model layout and play testing in a fast building preview mode. Normally you'd expect to add globals first and then local lights and spotlights.
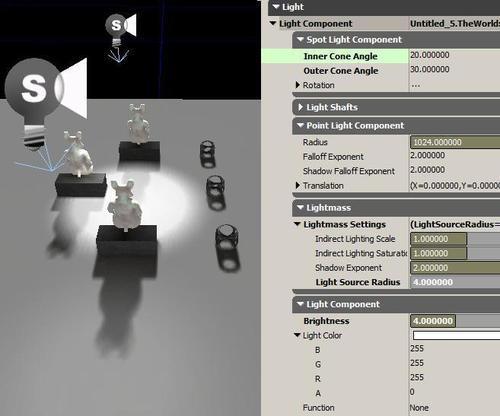
It is quite easy to adjust a hotspot for a spotlight. Simply open its properties and find the Light | LightComponent | SpotLightComponent | InnerConeAngle and adjust it, along with the OuterConeAngle.
In the next screenshot, there are two spotlights. The background one has an InnerConeAngle of 20 and OuterConeAngle of 30. Its Brightness is ramped up to 4.0.
The foreground spotlight is set to a lower intensity and much wider OuterConeAngle to create a very broad, weak hotspot in order to subtly lighten the tail end of the character's cast shadow. Its hotspot is barely noticeable, but the fill it produces in the shadow is, which assists the penumbra effect. In this recipe, the shadow penumbras were from strong directional lights, and the space was wide open. In most lighting situations shadows are filled from many different angles by multiple direct lights or filled by bounced, indirect light dissipating throughout the surroundings or by ambient sky light.