
Changing colors in a particle using a curve is (for some reason) a little tricky to get used to in UDK. The UI design is probably to blame for this. Once you know how to enable curve display for a particular module, this topic can probably be considered rather easy. While we're going to focus on changing particle colors using RGB values, the same approach also works with changing alpha in order to fade visible particles and make them transparent.
- Create a new particle system, YourFolder.Cascade.ColorChanger. In the Required module of this, set the Material to a white one, such as Envy_Effects.flares.Materials.M_EFX_Flare_Burst_01 that comes with UDK.
- We chose that Material because it has a Particle | Vertex Color node that the TextureSample is moderated by through a Multiply node, as shown in the next screenshot. Without it present, the color change we want to make won't work. You can read more information about this in the Vertex Color section of this page: http://udn.epicgames.com/Three/ParticleExamples.html.

- To change the color, in the default settings, we have a Color Over Life module with a [0] Constant XYZ for the emit time and [1] Constant XYZ for the end time. The constant XYZ gives us a Red-Green-Blue channel. 0 values are nothing, values which are 1 are 100%, and values above 1 will produce glows.
- For this Material, set the [0] Constant XYZ to 5,0,0. This should make the particle stream a strong red. Now we want to animate this value.
-
Go to the Color Over Life module and click the green graph icon [
 ] on the right. You might expect this functionality to work through a right-click menu in the Curve Editor itself, but things get a lot easier once you know to click the green graph icon. Its location in the editor merits committing to memory, as there is no control in the Curve Editor to summon this toggle.

- Once the curves are showing in the Curve Editor, you can right-click on them to remove them. It doesn't remove the animation, only the display of the graph. Right-click on the AlphaOverLife curve header, and choose Remove Curve.
-
To navigate the graph, there is a Pan Mode icon [
 ] for moving the view of the graph, and a Zoom Mode icon [
  ] for scaling the view of the graph. A zoom with the LMB will vertically scale the view of the graph, a zoom with the RMB will horizontally scale the view of the graph, and LMB + RMB will uniformly scale.
- To actually modify a curve, Ctrl-drag on the keys or handles on the curve. Drag down on the upper handle of the graph curve, near the value 5 (which we set for
X = Redin the Emitter), as shown here:
- A nice feature of the Color Over Life curve is that the curve in the graph will show the color setting per frame. So the curve, as it starts to cross below zero, tints blue. Notice that we have thus produced three colors with only two keys.
- Animating a change in this curve, to vary the emit or kill color over time, can be done by changing the Distribution type of the Color | Color Over Life property to a DistributionVectorParticleParameter and also adding a Parameter Color module under it. Enter Colorful in the Parameter Color module's Color Param field. The values aren't animated in the Cascade Curve Editor but instead through Matinee, using a New Float Particle Parameter Track, detailed next.
- Now we know what's involved, first, change the particle. Set the particle values as shown below. These values can be altered to give different colors, so experiment with the Min and Max ranges. Make sure the Min values are always less than the Max values. Also, values between 0 and 1 are usually sufficient.
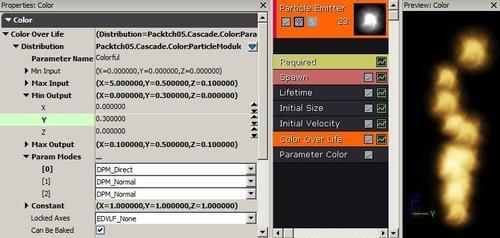
- The downside of this change is that now we cannot set a different start and end color within the particle's life. Notice that there is a Parameter Name field. Type Colorful here. Also notice there are three Param Modes. Change the first to DPM_Direct. If this isn't changed, the colors will not be effected by Matinee.
- Now save your particle system, and create a scene with a ground plane, a light, and a PlayerStart. Add your particle system as an Emitter actor in front of the player start, then open Kismet with the Emitter actor highlighted.
-
In Kismet, add a New Event | Level Loaded and a Matinee (M) hooked up to it. Double-click the Matinee. Right-click on the Matinee Editor in the dark gray space under ALL and choose New Empty Group. Name the track as you like, then right-click on that track and choose New Float Particle Param Track. For this new track, enter in the properties for Param Name that we typed in the Emitter modules just before, the Color Param:Colorful. With the track selected, add a key by pressing Enter or hitting the keyframe icon [
 ] in the top left corner under the File menu. Set keys that change the value of the parameter (which is limited to one value, not an RGB value) over about 12 seconds.

- In Kismet, for the Matinee properties, set Looping on, supposing you have set the 0s and 12s frames for the color change to be the same, as above. Ensure the Emitter actor in the scene is assigned through an Object Variable to the Matinee. An example map is included: Packt_07_ColorChange_DEMO.UDK.

This method exposes a named particle color track Colorful from the particle system to gradual change through keys in a Kismet Matinee. In some ways it seems a limitation that the Parameter method only allows animation of one track. It was pointed out that the VertexColor node in the Material Editor should be used to influence particle colors using the Material. You can additionally drive the Opacity or the Emissive channel of a Material using the Alpha of the Texture Sample, to create fading or dimming particles.