
In this recipe we'll look at revealing and hiding actors in the scene using Trigger events and Kismet actions. One consideration is that even though we can hide an object, that won't prevent it from being there, and it's possible to collide with it even when it isn't visible. We'll use a Change Collision action to handle that, and a Toggle Hidden action to handle the visibility.
Open Packt_04_RevealActors_Start.UDK or continue from where you were in the last recipe if you completed it. In this map the Bot handling is already set up, from previous recipes.
- In the map are four glowing white spheres. With these, we'll create a sequence where one is visible when the level loads, and touching it hides it and reveals another. In many games, this is a core process for collecting objects, though they might as easily be destroyed as hidden. Usually in such cases there is additional feedback to the player to strengthen the illusion of picking up the object.
- The spheres are KActors contained in a collection called a Prefab. Its source in the Content Browser is PacktKismet.Prefab.OrbsPlusTriggers. It also contains Trigger actors that we'll use in the Kismet. Right-click on the Prefab and choose Convert PrefabInstance to Normal Actors. This breaks apart all the items in the Prefab.
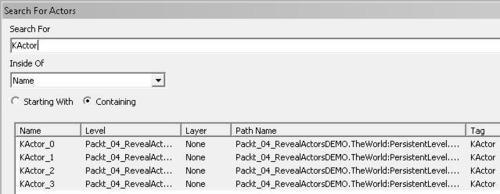
- Go to the Edit menu and choose Find Actors, and type KActor in the search field. Highlight all four in the list and press Go To, which selects them, then open Kismet.
- In Kismet, right-click and choose New Object Vars Using KActor... to bring them all into the sequence.
- Right-click on the Object Variable in Kismet called KActor_0. This will be the first one to set up. Choose Select KActor_0 in level.
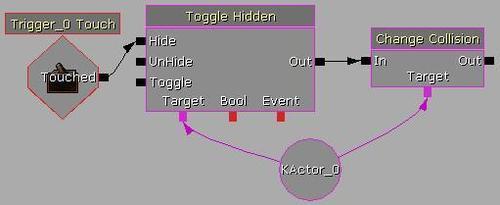
- Overlapping the actor in the scene is a Trigger actor. Select that and in Kismet right-click and choose New Event using Trigger_0 | Touch. This event will fire when you touch the trigger.
- Right-click and choose New Action | Toggle | Toggle Hidden. Connect the Touched nub of the Trigger_0 | Touched event to the Hide nub of the Toggle Hidden action. Assign the Object Variable KActor_0 to the Target nub of the Toggle Hidden action.
- PIE (F8) to verify that when you run up to the sphere it will hide, but you'll still bump into it after that even though it is hidden. Press Esc.
- In Kismet, right-click and choose New Action | Actor | Change Collision. In the Change Collision action's properties, set the Collision Type to COLLIDE_NoCollision. Set the Target nub to the Object Variable KActor_0. Join the Out nub of the Toggle Hidden action to the In nub of the Change Collision action.
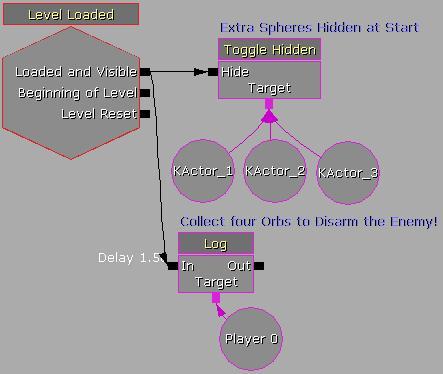
- Next we want to deal with the remaining spheres. They are all visible, so we actually need to tell them to be hidden when the game begins. In Kismet, hold Ctrl + S and click to add a new Level Loaded event. Connect its Loaded and Visible nub to the Hide nub of a new Toggle Hidden action. Connect the Object Variables for KActor_1, KActor_2, and KActor_3 to the Target nub of the added Toggle Hidden action. In the Obj Comment property for the Toggle Hidden, type Extra Spheres Hidden at Start.
- While we're here, you will want to also inform the player what they should do in this level. In Kismet, hold L and click to add a Log action. In its Obj Comment property type Collect four Orbs to Disarm the Enemy! Hook this up as shown in the next screenshot to the Level Loaded event, and add a Set Activate Delay of 1.0. What this does is briefly display the text on the screen after the game begins in a simple way. It also shows above the Log in Kismet. Other ways to give feedback to players are discussed in later recipes.
- Highlight the three spheres together in the scene, then right-click and choose Set Collision Type | No Collision. This prevents us bumping into them before they are revealed.
- So, the spheres are hidden, now we want to reveal them each time you touch a Trigger in the scene. You already dealt with the first sphere, KActor_0, as shown in the next screenshot. Extend from the Out nub of the Change Collision action to a new Toggle Hidden action, into its UnHide nub. Set the variable of this to the Object Variable KActor_1. So now we've revealed one of the three hidden spheres.
- Select the above nodes except the Change Collision action. Also select the extra Toggle Hidden you just added, then press Ctrl + C to copy these. Somewhere below, right-click and choose Paste Here (this is better than just pressing Ctrl + C because it will paste them where the cursor is, not with some arbitrary offset).
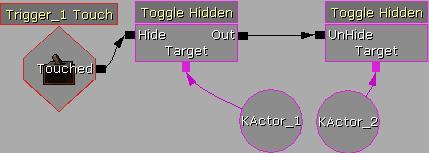
- The pasted nodes need to have the actors assigned to them changed. We can step through this fairly easily. Select the actor Trigger_1 and right-click on the pasted Trigger_0 Touch event and choose Assign Trigger_1 to event(s). Select KActor_1 in the scene and right-click on the pasted Object Variable KActor_0 and press Assign KActor_1 to Object Variable(s). Select KActor_2 in the scene and right-click on the pasted Object Variable KActor_1 and press Assign KActor_2 to Object Variable(s). This is what you'll get after renaming the pasted nodes for this step:
- Seen next is what you'll get for the next repetition of this. Repeat this for the remaining Trigger_3 and Trigger_4 events, and the corresponding KActor variables.

- Having set those up, it's not much good to have all these Trigger Touch events available in gameplay straight away. Only the very first trigger should be available at the start. So we need to disable the other triggers until they're needed. To do so hold T and click to add a Toggle and in its Obj Comment property type T1. Repeat this till you have Toggle actions named T1, T2, and T3.
- From the Touched nub of the Trigger_0 Touch event, connect to the Turn On nub of Toggle T1. From the red Event nub of Toggle T1, drag a wire down to the name label on top of the Trigger_1 Touch event. This is called a Dynamic Binding Event. Once you've done so, right-click on the Toggle T1 and choose Hide Unused Connectors. In the properties of the Trigger_1 Touch event, look for the Sequence Event | Enabled checkbox and turn it off. This means that this Trigger Touch event will only be enabled by the first one.

- Repeat this pattern using both Toggles T2 and T3 until you can reveal the spheres one after the other.
- The next few steps simply provide a result to go at the end of collecting the orbs. When the player collects them all, we want to disarm the enemy and make him vulnerable. We have already used the actions to do this, a Change Collision action and a Give Inventory action which removes his weapon.
- After the Toggle Hidden action effecting KActor_3, add a new Change Collision and assign it to the Object Variable ??? assigned to the Spawned nub of the Actor Factory producing the Bot. Set the Collision Type property of this to COLLIDE_CustomDefault. This means we can hit him.
- After he's spawned, the Bot needs his collision turned off. So copy and paste the same action, and hook the pasted action up to the Finished nub of the Actor Factory instead. This time set the Collision Type property to COLLIDE_NoCollision.
- To disarm him, highlight the Give Inventory action already assigned to the player. It's labeled RocketLauncher. Press Ctrl + C then Ctrl + V and hook it up to the Toggle Hidden effecting the Object Variable KActor_3. It will still be assigned to the Player Variable, so hold Alt and click on its Target nub, then assign the Object Variable ??? that's spawned by the Actor Factory instead. Instead of being given a RocketLauncher, we want to disarm the Bot, so set the Inventory List | [ 0 ] entry to None (and the Obj Comment too).
- PIE to check that when you first fire at the Bot, you can't hit him at all. Then collect the four orbs and try again. You will get a Kismet warning. This is because giving the Bot None as a weapon replacement isn't really a viable option. Change this to UTJumpBoots (which aren't a weapon) instead. Test it again.
- The last steps spread the Kismet out broadly, so it would probably be easiest to check the provided demonstration map Packt_04_RevealActors_DEMO.UDK.
..................Content has been hidden....................
You can't read the all page of ebook, please click here login for view all page.