
Particle collision with the world is a common requirement for realistic effects. Imagine spent shells from a machine gun clattering onto the ground. This kind of interaction is built into Cascade through the Collision module, which can be added to each system from the right-click menu below Color Over Life.
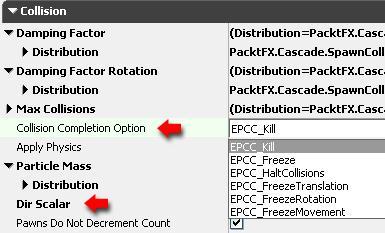
The main property for the Collision module is the Collision Completion Option, shown in the previous screenshot, which provides a roll-out list of possible results to occur upon a collision event. Kill will remove the collided particle. Freeze will stop it in its tracks. HaltCollisions will prevent further collisions. FreezeTranslation, Rotation, and Movement provide finer control over the stopping of the particle.
Another important property is Dir Scalar , further down, which is a value that can help close a gap or reduce overlap between killed particles and spawned particles in some situations. It will crop up in this example, which is going to not only show a particle collision but also spawn new particles at the hit location.
Open the map Packt_07_CollisionSpawn_Start.UDK from the provided content. This includes a ground plane, a tilted cube, lighting and a PlayerStart. Open the Content Browser and search for the particle system PacktFX.Cascade.SpawnCollisionStart which just includes two Emitters with Materials, the first being a red cross and the second a green tick. We won't be setting up the Lifetime, Size, Speed, or Spawn parameters. These have already been set, since otherwise we'd end up repeating the previous recipe all over again. Instead we'll focus on the Collision, Event, and Killing of the particles.
- Double-click on the asset PacktFX.Cascade.SpawnCollisionStart.
- In the Emitter Cross, click under the Size by Life module and choose Event | Event Generator. Right-click again and choose Collision | Collision.
-
Highlight the Event Generator module. In its properties, press the assign icon [
 ] under Events to add an entry. Expand it to show Events | [0] | Type and from the list choose EPET_Collision. This means that when there is a collision it will fire the event. In the list, you will see other types to experiment with. If you were to choose EPET_Any for instance, the event would fire whenever there was a spawn, death, collision or call from Kismet. Further down the properties, enter CollisionEvent in the Event Name field. This sets what to listen for.
- Highlight the Collision module you added to the Emitter Cross, and scroll down the properties to find Collision Completion Option. Choose EPCC_Kill from the list, but also note there are other options to try out. The particles will collide with actors in the scene and simply vanish. This may be okay in many situations, but let's add a result for the collision. We'll change the crosses to ticks.
- In the Emitter Tick, right-click under the Color Over Life module and choose Event | EventRcvr Spawn. In this module's properties set the Spawn | Spawn Count | Distribution | Constant to 2.0 and in the Velocity property turn on Inherit Velocity. Under the Source property set Event Generator Type to EPET_Collision, so the Emitter knows what to listen for, and the Event Name will be CollisionEvent. Now the Emitter Tick can hear the event from the Emitter Cross.
- At the moment, an Emitter actor in the scene based on the particle system asset would fire off Cross particles and when they hit an object they would turn into a stream of Tick particles. Let's add one last change to the system, which will be to adjust the direction of the spawn.
- In the scene, there is already a cube. Drag the Particle System asset you've been making from the Content Browser into the scene, and place and rotate it so the stream of particles flows down from above towards the 45' upward facing side of the box. Check that the emitted Cross particles impact this and change to Ticks.
- Double-click on the Particle System in the browser to re-open Cascade and in the Emitter Tick's EventRcvr Spawn module, set the property Velocity | Inherit Velocity Scale | Distribution | Constant to X=0, Y=90, Z=1. This should force the stream of ticks to appear to deflect into the 45' angled surface.
- A slight problem with the effect is that as the crosses turn to ticks there is a clear gap near the impact point. To adjust this, open the Collision module in the Cross system and for the property Dir Scalar change the default value to 20.0.

This works because the Initial Velocity of the Emitter Cross has a Velocity | Start Velocity | Distribution | Max and Min of X=1, Y=1, Z=90. The 1 is a very small increment for velocity. However, if it was set to 0.0 then we wouldn't be able to multiply it in the Emitter Tick's inherit velocity scalar. The Z=90 provides the downwards speed. In the Emitter Tick's EventRcvr Spawn | Velocity | Inherit Velocity Scale we multiply this Z value by 1.0 so it doesn't change. Then we take the Y value and multiple it by 90. So now we have two axes of speed ZY which gives us a 45' direction for the particles, which just appears to match the box. If, for instance, you rotate the Emitter actor 90' sideways and move it so the particles enter the box from a new angle, those values would not produce the same result. So some care has to be taken to get the conditions right. The screenshot below shows the intended result, and a completed Particle System asset PacktFX.Cascade.SpawnCollisionDemo is used in Packt_07_CollisionSpawn_DEMO.UDK.
One reason to kill particles is to optimize performance. In our current example, the Tick particles probably continue through the rainbow colored floor and continue downwards unseen and unneeded. To stop this, open the Particle System in Cascade and add to the Emitter Tick a Kill | Kill Height module. Set it to so the Absolute property is turned on (so the height is measured in the world), have a Height | Distribution | Constant of 0.0 and the Floor property turned on (so particles will be killed below the height we set). The following screenshot shows the settings required to stop the particles. It works here because the floor geometry happens to be at the given world Z height of 0.0.
