
In this recipe we'll go through the steps to generate a wavy surface in the mesh, which could be used for a variety of effects, including swaying objects such as hanging plants, cloth, or magical effects.
- Start a new scene, and in the Content Browser, search the provided content for PacktKismet.Mesh.MyWavyMesh and right-click on it; choose Create a Copy... and place this to Yourfolder.Mesh.WaveTest. Right-click this and choose Copy Full Name to Clipboard. It is just a thin BSP box that has had its edges split a few times before being converted to a StaticMesh. A BSP itself wouldn't work because it doesn't respond to the vertex offsets we'll be doing to the converted geometry. Place the asset in the scene, above the ground. Right-click on it and choose Convert | StaticMeshActor to Mover.
- In the Content Browser, right-click and choose New Material; name it Yourfolder.Material.Wave_mat and open it up.
- In the Material's PreviewMaterial | Material Interface | Preview Mesh paste the copied mesh name.
- Right-click and choose Coordinates | New World Position. Next to it, hold C and click (to create a Component Mask). In the mask properties, set it so only R is ticked. Hold 1 and click to add a Constant and name it Range. Enter an R value of 0.2. Hold M and click to add a Multiply.
- Connect the Constant Range to the B nub of the Multiply. Connect the R output of the Mask to the A nub.
- Right-click and choose Utility | New Time. Tick on the Time node's Ignore Pause property if you want the effect to continue playing at all times. Hold A and click to insert an Add, then hook the Time into the A nub of the Add node, and the Multiply node's output into the B nub.
- Right-click and choose Math | New Sine, and set its Period property to 6.0 and hook up the Add output into the Sine. The Sine, and the Constant Range together make the frequency of the wave. Next we'll add the amplitude, or height. Hold 3 and click to add a Constant 3 Vector, and set it to R = 0, G = 0, B = 100.
- Name the Constant 3 Vector
Height. Hold M and click to add a Multiply and call itWave. Connect the Sine into Wave's A nub and the Constant Height into the Wave's B nub. Connect Wave to the Material's WorldPositionOffset channel. Compile and assign the Material to the actor that you placed at the start. It should begin to wave like a cloth in a steady wind, or seaweed in a current.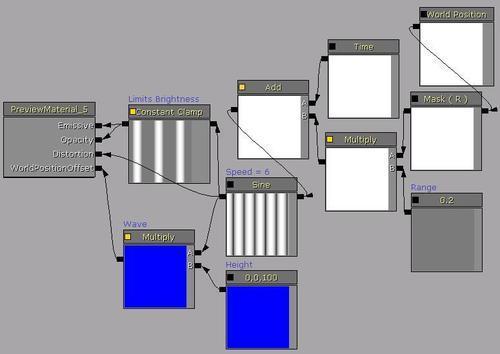
- This is all that's needed. The rest of the process would be adding Opacity and Emissive parameters and such. To give variable speed to the wave, the constant values in the Material could be converted to Parameters and animated in a Matinee.
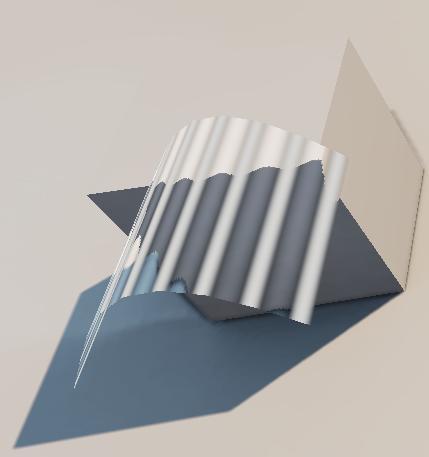
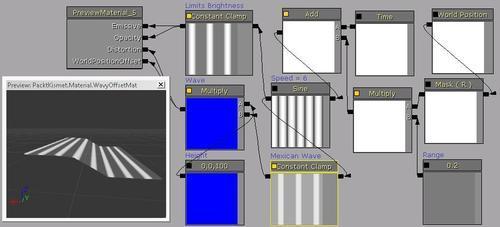
- A final touch could be to make a Mexican wave effect, where the ‘cloth' resembles the flat, rolling wave shown next. Drive a Constant Clamp in between the Sine and the Multiply Wave. You can then change the Min and Max properties in the Constant Clamp to generate flat or stepped waves. Try 0.4 and 0.8.
- Note that when you PIE the mesh will have no collision, and collisions assigned in the StaticMesh asset won't animate with the animated Material. So you'd have to reserve use of the effect to geometry that's visible but not reachable or to objects that are not touchable, like energy fields. An example is in the provided content: Packt_09_WavyCloth_DEMO.UDK.
..................Content has been hidden....................
You can't read the all page of ebook, please click here login for view all page.