
In this recipe we'll go over a way to generate a reasonable glass material. In reality, glass reflects the local environment, which is a tough call in a game environment. In this example we'll fake reflections, while in a later recipe we'll look at recording reflection maps from the actual scene too.
- In the Content Browser, right-click and choose New Material. Name it Yourfolder.Material.Quickglass_mat.
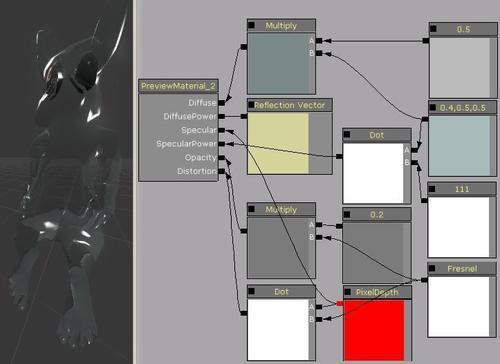
- In the Material PreviewMaterial properties, set the Blend Mode to BLEND_Translucent and also turn on Two Sided.
- It's good to preview this kind of Material on a complex model, so highlight Packt.Mesh.Statue in the Content Browser. Right-click and choose Copy Full Name to Clipboard. In the PreviewMaterial properties, expand Material Interface and paste into the field the mesh name. Note that the eyes, which have their own Material, won't be affected, just the statue body.
- In the Material Editor, hold 1 and click to add a Constant and set its R value to 0.5. Press Ctrl + C with the node highlighted, then Ctrl + V till you have four.
- Right-click and choose VectorOps | New Fresnel, then hold M and click to add a Multiply. Hook one of the Constants to the A nub of the Multiply, and the Fresnel to the B nub of the Multiply. Hook the Multiply to the Opacity channel.
- Hook one Constant to the Diffuse channel. If you want, Multiply this by a Constant 3 Vector so you can tint the glass.
- Hook one Constant to the Specular Power channel. The higher its value is, the glossier it will look. Test out values such as 1, 11, 111, 1111.
- Try a Depth | PixelDepth for the Specular channel.
- Hook the Pixel Depth and the Fresnel that we already have to a VectorOps | New DotProduct, then hook that up to the Distortion channel to produce an illusion of refraction. Compare the result of changing the A and B order of the incoming nodes.
- Right-click and choose Vector | New ReflectionVector and hook this up to the DiffusePower channel. You may want to unhook and hook it up a couple of times to see the difference that it makes. Compile the Material and save your package. Note that in the Content Browser this Material will just look gray.
- Also test the Material on a StaticMesh in any scene with surroundings. In the Material Editor there is only a black background, which influences the appearance of the object. Sometimes a transparent object in the preview looks okay but in a scene looks too transparent.
..................Content has been hidden....................
You can't read the all page of ebook, please click here login for view all page.