
Our model can have different reactions to hit impacts based on a mask component in its Material which defines areas with different surface properties, such as metal or skin. Most often, Physical Materials are used to control what sound effect will play following a hit impact on a given part of the body.
- Right-click in the Content Browser and choose Create New PhysicalMaterial. Name it MyCharPhysBlack. Create another called MyCharPhysWhite.
- A Physical Material is assigned to an object inside the properties of the PreviewMaterial_0, the main node everything flows into in the Material Editor. Therefore, in the Content Browser, right-click and Create a Copy of the Material for Packt_Character, which is Packt_CharMat. Name the copy MyCharMat_Phys.
- Open MyCharMat_Phys and click on the Material_0 node, look to its properties, and expand PhysicalMaterial.
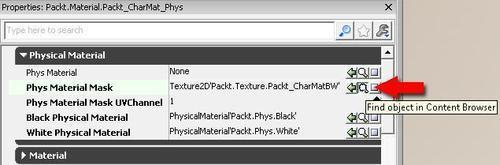
The Phys Material Mask in this case is the image file: Packt_CharMatBW1.BMP. This black and white image was derived from Packt_Female_Diffuse.TGA and it defines the clothes as black and the skin as white. It was painted directly on the model using the 3ds Max 2011 Viewport Canvas tool. The pure black and white tone range was obtained using the Legacy Brightness and Contrast in Photoshop. Then the Image | Mode was changed first from RGB to Greyscale and then to Bitmap. Saving the result as .BMP allows 1bit compression.
Tip
According to the UDN documentation on 1bit masks, their compression can handle information in images with more than straight black and white values, it will just squeeze the values higher than half of 255 as white and those lower than half of 255 as black. However, it may help to ensure that this procedure is done according to your own image processing, rather than computed, unless you really trust your computer.
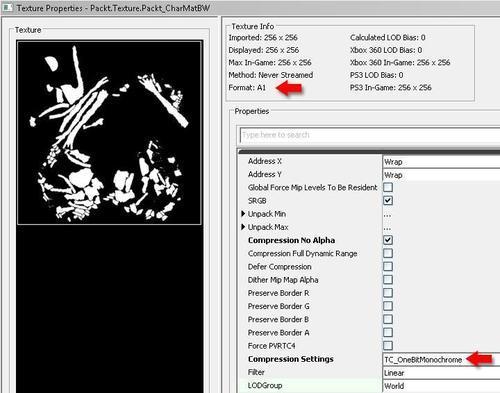
- Right-click in the Packt folder of the Content Browser and choose Import then select Packt_CharMatBW.BMP. Set the texture name as Yourfolder.Texture.CharMask. Unlike the usual import of a texture, here we need to set the texture compression option upon import to TC_1bitMonochrome.
- On import, or by double-clicking the imported .BMP texture, you can access texture properties and set this, and it is very important to check that the Format result of the compression says A1, rather than, for instance, DXT1. Anything other than A1 will not produce a result for the Physical Material Mask. The Format: A1 feedback has been marked in the previous screenshot.
-
Highlight the imported texture then assign [
 ] this to the Phys Material Mask channel in the properties of MyCharMat_Phys's PreviewMaterial_0 node. You should end up with a result similar to what you see in the screenshot after step 3, using your imported texture.
- In the same way, assign MyCharPhysMat_Black to Black Physical Material, and MyCharPhysMat_White to White Physical Material.
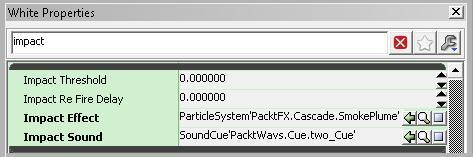
- In the browser, double-click on MyCharPhysMat_White and type impact in the search field to isolate the relevant properties, as shown in the next screenshot. Assign the particle system SmokePlume in the channel Impact Effect (this is just a random particle system so we can see the effect). In the Impact Sound channel assign PacktWavs.Cue.one_Cue, so we have a distinct audio to check whether the Physical Material mask will work.
- Likewise, in the browser, double-click on MyCharPhysMat_Black and assign the particle system Beam in the channel Impact Effect (another random particle system). In the Impact Sound channel assign PacktWavs.Cue.two_Cue. So now we have two different hit impact effects that the Physical Material mask will expose depending on where the character takes damage, on their skin or on their clothes.
-
Click the green tick [
 ] in the Material Editor to compile the changes.
- Drag Packt_Character as a SkeletalMesh into a scene. Make sure that, in her properties (F4) that Skeletal Mesh Actor | Damage Applies Impulse is turned on. This will ensure that she'll react to physics collisions and the Physical Material will activate.
- Likewise, for any character to which a Physical Material is assigned, in its properties (F4) the setting Skeletal Mesh Actor | Skeletal Mesh Component | Skeletal Mesh Component | Physics | Notify Rigid Body Collision must be turned on. A SkeletalMesh dragged into the scene will also need Collide: Block All set as well.
- PIE and scroll the mouse to cycle to the PhysicsGun (since we need a physics impulse). Hit her to see whether or not the Physical Material Mask gives us a different style hit off the Black and White components.
The Physical Material Mask won't work by default with the LinkGun as a weapon, since that doesn't apply a physics impulse, so scroll the mouse wheel to set the physics gun active then left-click to poke the model in the scene.
Tip
The example we've made is based on a Physical Material setting for the Packt_CharMat Material. An example map showing a rigid body ball with a masked Physical Material is included in the provided content: Packt_09_PhysMatMask_DEMO.UDK. It shows a bare scene with rigid bodies that one can hit with the physics gun, which should help clarify the intended result. You should be able to drag any SkeletalMesh using Packt_CharMat or the example that you've set up into the scene and test the Physical Material in the same way.
Given that a Material appears on just about every geometric asset in a level, there are many examples of Materials which you can look at in the UDK content. For more discussions of Materials for special effects see: Chapter 7, Hi, I'm Eye Candy! look at the recipe Making animated textures using particle systems.