
To interact with UI assets in UDK, the player needs to jump from targeting using the camera to clicking on menu items. This is done by gaining control of the XY screen space using a cursor. In this recipe, we'll provide a bare bones procedure for getting a simple cursor working while also giving an overview of how ActionScript and Kismet communicate. Note that at the time of writing UDK has only just implemented ActionScript 3 support for Scaleform. Also, now Scaleform 4 is out with more bells and whistles. Because this is only a recent development, all the lessons from here on in are written in ActionScript 2, which is still fully supported and an excellent starting point.
First, decide for yourself. Do you want a cursor that has a lot of thematic character or a cursor that is simple and clear? Usually, a simple cursor is less obtrusive than a highly decorative one.
Creating simple cursor art
-
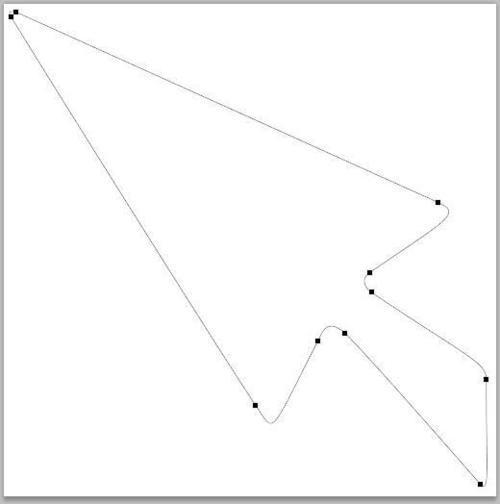
In Photoshop, create a 256x256 document. Click on the Path tool (P), and put down a few points to generate a closed triangle. The shape outline must be closed. Hold the Path tool icon [
 ], to access its variants. Choose the Add Anchor Points tool [
  ] and use it to refine the triangle so it has additional points. Then position them till you start to get a pointer or arrow shape that you like.
-
If you lose focus on the line, Ctrl click it to select it, since just clicking on it may add a point where you don't want it. Try to use as few points as possible and use the Handles to drive the shape curves. If you add too many, use ALT and click on the unwanted points. You can use the Convert Point tool [
 ] to change a corner to a bezier curve, and vice versa. Use as much of the canvas space as you can. The next image shows a clean shape made of just a few points.
- Right-click on the shape and choose Stroke Path using a black, small size brush.
- Create a new layer then right-click on the path again (still with the Path tool (P) or Direct Selection tool (A) active) and choose Make Selection. If it happens to select the inverse, just press Ctrl + Shift + I to flip this. You want the arrow interior only selected. Save the selection as Arrow in the Select | Save Selection menu.
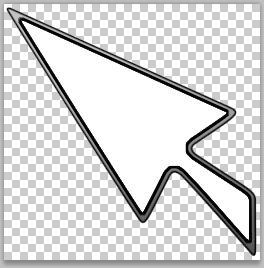
- Pass a black to transparent gradient up the screen. With the Arrow selection showing, choose Select | Modify | Contract by about 6 pixels, and fill the smaller selection with white. Then stroke it with black to outline the white.
- Make sure your content is not on the background layer, and then delete the surrounding white from the image using the magic wand to select it. The arrow should now sit on a transparent layer. Zoom out to 12.5% to see how the result will likely appear when the cursor is set up in Flash. It's better to make large scale art and shrink it down in Flash. Depending on your game, you may want to make different cursor art for things such as 'CPU thinking' and 'dragging' states.
- Save the mouse as
C:UDK~UDKGameFlashYourfolderUIMouseMouse.PNG. In Flash, import this .PNG into your library. You can either use the imported .PNG as the mouse, or create a shape using the vector art tools in Flash, as detailed next. - Create a new Movieclip symbol in your library and name it MouseCursor. Double-click on it to open it up, and you will see a large, blank canvas. If you want to create a vector cursor, you can use the Brush tool (B) or the Rectangle tool (R) with a little adjustment of the corners. Right-click on the vector and choose Distort or Free Transform to alter it so it looks like a pointer. If you want to use the imported Mouse.PNG, drag it from the library onto the stage and place it so that its tip is in the center of the stage, where the "+" shaped marker is.

You can think of this marker as being much like the pivot point of a model; essentially it determines where the "center" of an object is. In this case, though, we want it to be at the end of the mouse cursor so that we can use it to detect where the user is trying to click.
- We're using ActionScript 2, which means that we want to attach our code for making the cursor move directly to the mouse cursor symbol itself. With the MouseCursor symbol still open, look down at the timeline; this timeline is unique to this symbol, separate from everything we do on the main stage. Name the first layer Cursor.
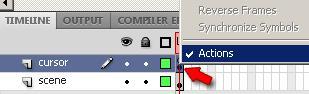
- Right-click on the first frame of the Cursor layer, then click on Actions in the pop-up menu to open up the ActionScript Editor.
- The following cursor script is standard across many of the UI elements you'll build using CLIK components in Flash for Scaleform translation to UDK. In the ActionScript Editor, enter the following , without the
//comments:// this hides the Windows mouse import flash.external.ExternalInterface; Mouse.hide(); //the next line fires up CursorInst when you drag the mouse startDrag("CursorInst", true); //the next line tells us we're going to listen for the mouse var mouseListener:Object = new Object(); //the next function starts to listen and gives the mouse XY values to CursorInst mouseListener.onMouseMove = function() { CursorInst._x = _root._xmouse; CursorInst._y = _root._ymouse; // The next line is a command UDK can understand to hear what we listened for, // which is the mouse XY. It is similar to an FSCommand … but more official. ExternalInterface.call( "ReceiveMouseCoords", _root._xmouse, _root._ymouse ); // and the last lines keeps updating all this updateAfterEvent(); } Mouse.addListener(mouseListener);
- As we said, that goes on frame0 of the Cursor layer. Now select the MouseCursor symbol and press F9 to open its script and enter:
onClipEvent(enterFrame) { _X = _root._xmouse; _y = _root._ymouse; } - Go back to the stage. Click-and-drag a copy of the MouseCursor symbol from the library onto the stage, and name its layer Mouse Cursor.
- Save your Flash scene (Mouse.FLA) and export your (Mouse.SWF) both to
C:UDK~UDKGameFlashUIMouse. - This mouse cursor would not do anything in the game except move around on the screen, if invoked. Instead, it's handy as a template. Copy the Cursor layer (to do so right-click frame0 and choose Copy Frames), and paste it into other Flash scenes which contain your menu or whatever UI you want to have in your game. You can use it over and over again. Indeed, we use it again, next. In fact, if you have some troubles getting a cursor working, open PacktSlider.FLA and copy out the cursor layer at keyframe 0 to your own document.