
This recipe shows how to furnish a custom AnimTree with asset link ups that allow our character to preview what will occur in a game and to play animations that reflect its assigned moves.
- In the Content Browser, highlight your folder, right-click amongst the assets, and choose New AnimTree.
- Name it YourFolder.Anims.TestTree. Double-click the newly created AnimTree and it will open in the AnimTree Editor, showing only a base AnimTree node.
- Before adding more nodes, we must set the Properties of the AnimTree node so it understands the assets we'll be using, much as we did with the SkeletalMesh in the previous recipe after we placed the asset in the scene. Let's work down the list, using the next screenshot as a reference:
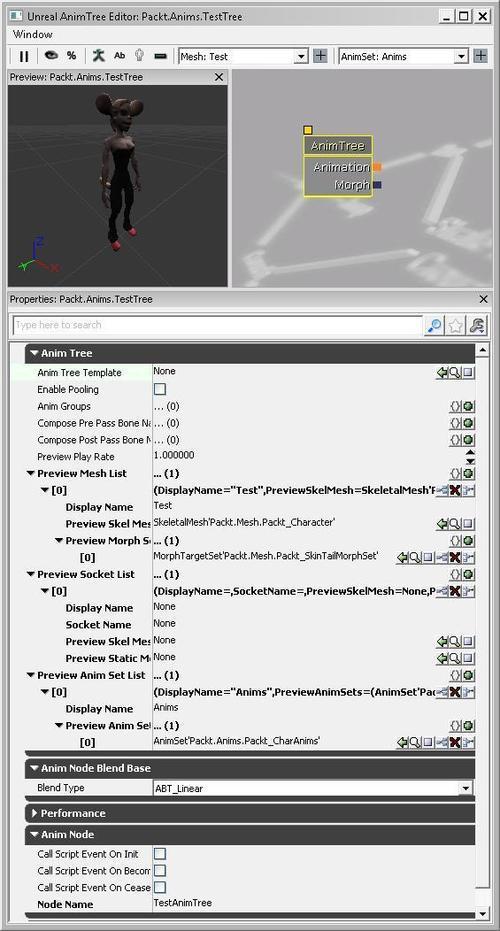
- Expand the Anim Tree section in the properties of the AnimTree node and look at the channel Preview Mesh List. This requires Packt_Character (or another SkeletalMesh) to be added here, which will then show in the preview window.
- If you plan to animate Morphs, you will also need to add at least one asset directly below the Preview Morph Sets channel, such as: Packt.Mesh.Packt_SkinTailMorphSet.
- The Preview Socket List is included for if you want to preview the inclusion of some extra asset attached to a socket. This will be unnecessary here, but you just have to add the SkeletalMesh to use, the StaticMesh to preview, and the socket name the StaticMesh should fix to. You could add the mesh Packt_TopHat to the socket Hat.

- In the next channel, the Preview AnimSet List should be set to Packt.Anims.Packt_SkinTailAnims. Setting this lets us see the moves that belong to the character when active nodes in the AnimTree show their sequences.
- Finally, if your AnimTree will be called by UnrealScript it needs a Node Name, which can be entered further down in Anim Node section | Node Name. You can give this any name, but it is good to choose something sensible and clear.
The AnimTree Editor is rather like Kismet in terms of view navigation in that left mouse will pan, and Ctrl-drag will select and move nodes, while the middle mouse will zoom. It is also similar in structure, involving nodes linked in a visual, branch-like set of connections. Here they serve as switches. The nodes won't show very much without first having assets assigned to the AnimTree for preview purposes. The AnimTree needs to know what your mesh is, what your AnimSet is, what your morphs are, and even what sockets you want to show. The channels for adding these actually allow multiple entries. If you add more than one character mesh for instance, at the top of the AnimTree editor you can choose from the Mesh roll-down list which one will be current.
Still, this set up process does not actually tell the AnimTree how to work in game. For that we'll follow this up with another recipe. Meanwhile, you can compare your results with the next screenshot, which shows the channels filled with the assets mentioned so far.