
Physics assets let you animate your character using forces and impulses such as gravity or hit impacts, using collision calculations between simple geometry objects assigned to your character's bones.
It is relatively easy to provision a SkeletalMesh with a physics asset. It takes some tinkering around to make the initial results more pleasing. The main editor to get used to is the Physics Actor Tool (PhAT).
Previously we created an AnimTree for the SkeletalMesh Packt_Character. To keep the focus of the exercise on the AnimTree, a physics asset was already prepared and included in the script that drives the character. It was just a placeholder. In this exercise we'll make the real physics asset for this model.
We'll start with just the Packt_Character SkeletalMesh, and we'll create and test out some physics attributes in the PhAT Editor. In the Content Browser, make sure the Packt package is fully loaded in the Packages list.
- Right-click on Packt_Character in the browser and choose New Physics Asset. Name it Packt.Mesh.Test_Character_Physics.

- You'll be prompted for some initial conditions, as shown here. The Minimum Bone Size value you set in the dialog will determine how many bones get collision geometry. In this case, entering 1.5 will give us a result on many bones.
Tip
This approach means we'll have to adjust the collision geometry UDK generates. Another approach is to start with no collision geometry by setting a really large Minimum Bone Size so the threshold becomes too high for UDK to generate geometry, then add custom geometry bit by bit to suit your needs. In the end, both ways take about the same amount of work.
- In the dialog, for Collision Geometry choose Sphyl/Sphere, not Box. The Box type is offered by default, but a Sphyl is cheaper in terms of memory and suits an organic character's collision requirements. Having said that, a character's feet would do best with Box geometry, because they have flat soles. Since the geometry assigned can be changed later on, we'll just assign the whole body to Sphyl now.
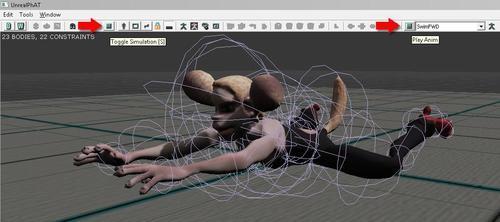
- After your press OK the UnrealPhAT Editor will open, showing the Packt_Character SkeletalMesh covered in wireframe circles.
- Straight away, if you press S to toggle Simulation mode, the character should collapse in an odd, but at least operational kind of way. Press S again to turn this off. You can't select part of the bone hierarchy or geometry when simulations are playing.
-
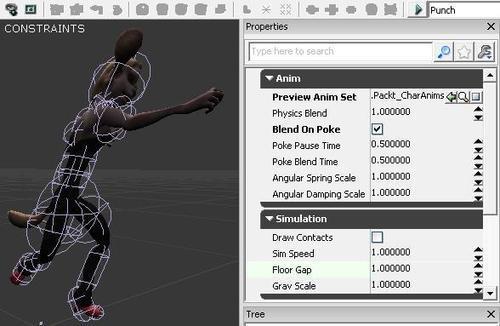
In the right-hand side Properties panel, notice there is a Preview AnimSet channel. To fill it, highlight Packt.Anims.Packt_CharAnims in the content browser, then click the channel's assign icon [
 ].
].
- Underneath Preview AnimSet find the checkbox Blend On Poke and turn it on. Now when you press S nothing will happen until you Poke the character by pressing Ctrl + LMB in the view. Then it will blend from animation mode to physics simulation mode. These are the settings that effect the Poke:
- Poke Strength—how hard you Poke the character
- Poke Pause Time—the time the Poked character will stay lying down
- Poke Blend Time—the time to blend from physics back to animation mode
- Sim Speed—allows you to slow things down
- Floor Gap—an arbitrary offset of the character from the floor
-
To play an animation from the AnimSet, first press S to turn on Simulation mode, or tap its Play icon [
 ]. This will enable the selection of a sequence on the far right side of the icon row through a drop-down list. Here there is another Play button which tells the sequence whether to be playing or just showing its first pose. Make sure Blend on Poke is on.
- Turn off Simulation mode (S). Click on one of the wire frames enclosing the head and notice how the properties panel now refers to the highlighted object. To access the main asset properties at any time just click in the editor view's blank space if a particular object is selected and showing its own properties.
- You can also select geometry objects by clicking on the corresponding bone in the Tree panel under Properties on the right-hand side of the editor. The Tree panel shows a hierarchy of bones in the character, fully expanded. Given our initial value of 1.5 for the Minimum Bone Size that we set in the Physics Asset creation dialog, you should have a hierarchy that extends down to the hands but doesn't include the fingers, as shown here:
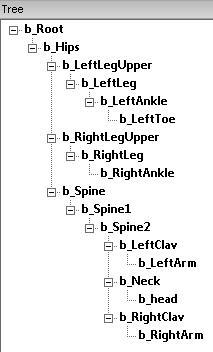
- In the Tree, first click on b_Root then b_Hips and see the corresponding geometry in the view switches too. Highlight b_Root and press W, then E, then R and notice the transform widget changes. You can also use Space to cycle it. The PhAT editor follows the transform hot keys of most 3D applications. Try moving, rotating, and scaling the root.
-
It doesn't matter how much, because then we'll delete it by pressing the DEL key (there is also a Delete Current Primitive icon for this in the icon row [
 ]). It would be strange for the root to collide. You will see a warning dialog about removing the bone and its constraints, but it won't remove the bone, just the collision geometry on it. The b_Root bone in the tree will now be grayed out.
- You will need to select each bone in turn and move, rotate, and scale so it has a snug fit to the geometry. Notice the b_Hips collision geometry includes the tail. For this recipe, let's ignore the mesh area of the tail completely, and make the pelvis a smaller sphere containing only the hips.
-
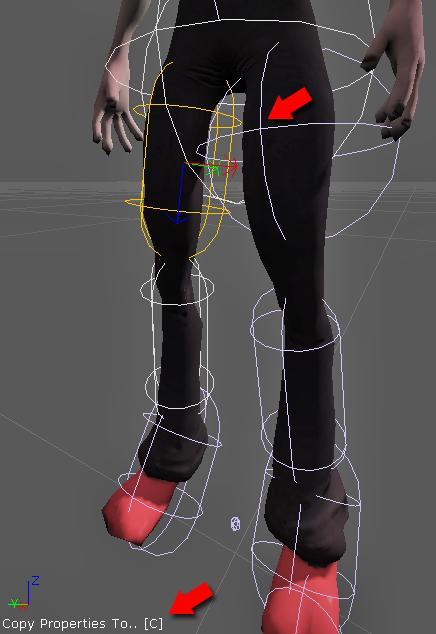
The thighs have large spheres where stretched Sphyls will probably be better. Select b_LeftLegUpper, then use the Add Sphyl icon [
 ] to add a replacement. Select and delete the original sphere. You will have to rotate and scale the new Sphyl to fit the leg well. Press Space to cycle transforms. Don't worry about overlap with surrounding collision geometry.
- Rather than adjusting the upper-right leg the same way, select the b_LeftLegUpper bone's Sphyl and press C to copy its transforms, then just click on the existing geometry for b_RightLegUpper. The transforms will be immediately pasted across.
-
The lower legs are probably okay, but the feet may be better suited to have Box collision. First delete the collision geometry on the two toe bones. Then add a Box [
 ] to the foot (b_RightAnkle) and rotate it so it is aligned to the floor and scale it so it fits the shoe of the character. Delete the previous primitive the foot had. You can then simply press C then click on b_LeftAnkle to swap out the left foot's sphere for a box automatically. This copy-and-paste approach can also allow you to swap a thin Sphyl onto the forearms too, off of the leg. The spine and neck can be dealt with by scaling them down to hug the figure better.
-
The head, given its odd shape, needs three sphere objects rather than one, so you can add and position two more to each side. Note you can't copy and paste transforms across different primitives belonging to the same bone, but you can use the Duplicate Current Primitive icon [
 ].
].
-
For our character, the b_LeftClav and b_RightClav bones don't appear to need collision geometry because they are absorbed in the larger spine bone. However, removing their collision causes the arms to disconnect and stretch when simulation occurs. Delete the collision geometry on the Clav bones and press S. Poke the character and notice her arms appear to be free in the physics simulation. Once you take away collision from a bone in the Tree you can use the Add New Body icon [
 ] to re-include it. Clicking the icon will expose the entire tree, and you can click on the bone you want to add. Available choices will display in bold type. Then you'll be prompted, as at the start, to define the geometry type, and for the Clavs that were deleted, choose Sphyl | Sphere.
-
In the case of Packt_Character it would probably be advantageous to weld the Clav collision geometry to the b_Spine2 bone to simplify its physics calculations. Select b_Spine2 and use the Weld To This Body... icon [
 ] to include b_RightClav's collision in its own set. You can also press D, so use D to join in b_LeftClav's collision to the spine also. Remember to start from the bone to be welded to, then click on the bones to weld to it.
- If you Poke (Ctrl + RMB) the character now it will behave differently than the first time, but it still isn't ready yet. This is because none of the joints have limits which set how much they can rotate, so the limbs flop all over the place. But we've reached the end of this stage, so now would be a good time to save the asset. Now you can either continue the next recipe from where you are or switch over to the example Packt.Mesh.Packt_CharPhysicsLimitsStart.
Epic Games' technical animator Jeremy Ernst provides a great video on these stages in the official documentation at http://udn.epicgames.com/Three/VideoTutorials.html and there is also technical reference in the Physics Actor User Guide online at http://udn.epicgames.com/Three/PhATUserGuide.html.