
In this recipe we'll compare setting Morph target values on a pawn through UnrealScript with doing so on a SkeletalMeshMAT using Matinee. This will bridge us between the previous lesson and the next one, which is also about character handling in Matinee. Both the examples in this lesson use the MorphTargets included in the FBX SkeletalMesh asset, which in the case of Packt_SkinTailFBX, our character, shrink each of her rather large ears.
Load the scene Packt_03_MatineeMorph_Start.UDK. This already includes a placed SkeletalMesh asset, and its preview assets have already been added to save time, since we already did similar steps in the recipe Attachments to SkeletalMeshes without using sockets.
- In the scene, select the actor SkeletalMeshMAT_0. This is a special instance of a SkeletalMesh asset which has been added using the right-click command: Add SkeletalMeshMAT: Packt_SkinTailFBX. Press Ctrl + B to highlight the asset in the browser and try assigning another one the same way.
- We'll keep with the actor already in the scene, since it has been scaled up 1.25 times bigger, and also has its properties provisioned. Select it and press F4.
-
Note that the SkeletalMeshComponent has an Anim Tree Template, a Physics Asset, an Anim Set, and a Morph Set asset assigned to it. Find the Morph Set by expanding Morph Sets>[0] and pressing the magnifying glass icon [
 ].
].
- Now double-click the highlighted asset Packt_SkinTailMorphSet and double-click it. The AnimSet Editor will open, showing the SkeletalMesh Packt_SkinTailFBX. On the left panel you will see sliders for the MorphTargets. Make sure the ears on the model shrink when the sliders are set to 1. These are preview sliders only. The real control for the Morphs come from the AnimTree.
- In the Browser, highlight Packt_CharTreeLookAt, right-click on it and choose Create A Copy. Call the copy Yourfolder.Anims.MyCharTreeMorph. This already has nodes that create controls for the ear morph targets. Adjust the sliders under the nodes EarR and EarL to ensure they work. Click on the node EarShrink_R (which references the morph target in the Morph Target Set). In its properties, in the Morph Node Base | Node Name type EarRight. Likewise, click on the node EarShrink_L and in its property Morph Node Base | Node Name type EarLeft. These are strings that will be used by both Matinee and UnrealScript to drive the target weights.
-
Save the AnimTree, and open Kismet [
 ]. Here you will see a Level Loaded event. Next to it hold M and click to add a new Matinee. Open the Matinee editor by double-clicking on the Matinee.
-
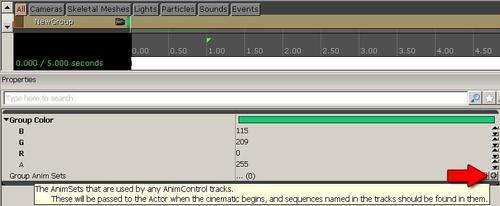
In the dark gray panel on the left-hand side, right-click and choose Add New Empty Group. With the track NewGroup highlighted, look at its properties panel, and notice a channel there for Group Anim Sets. Press Add a New Item [
 ] with the AnimSet Packt.Anims.Packt_SkinTailAnims highlighted in the Content Browser. This morph example doesn't require AnimSets, but it is good to add the AnimSet because later it's easy to forget if you start increasing the Matinee tracks. With the NewGroup track highlighted, right-click and choose Add New Morph Weight. This sets a track we can add keyframes to.
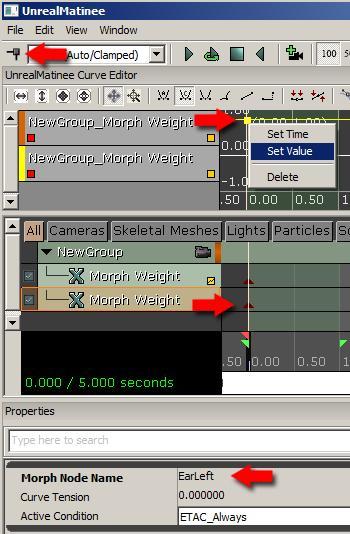
- Highlight the new track, and in its Properties, in the Morph Node Name channel enter EarRight.
- Add another Morph Weight track, and this time give it a Morph Node Name of EarLeft.
-
Key both the tracks at 0s by selecting each and pressing Enter or the icon [
 ], then right-click on the keyframe and set a value of 1.0, as in the above screenshot.
- At the moment, the SkeletalMeshMAT ears should always be small. If you like, you can key different values along the Morph Weight tracks to obtain animation of the ears.
- Close the Matinee Editor and connect the Level Loaded event to the Matinee action's Play nub. In the Matinee properties tick the checkbox for Looping. PIE to check it.
- Note this method will only work on a SkeletalMeshMAT, not a spawned pawn.
Driving morph targets on a pawn in UnrealScript
- You've seen how the AnimTree Node Name is called on in the Morph Weight track in Matinee for the SkeletalMeshMAT assigned to it. This is really what we'll leverage in UnrealScript now for the pawn.
- Close UDK and open ConTEXT. There, open
C:UDK~DevelopmentSrcMyGameClassesMyPawnLookAt.UC(or use MyPawnLookAt.UC from the provided content if you have not yet done the previous recipe). - Rename a copy of it MyPawnLookAtMorph.UC in the same folder.
- Within the existing code we need to enter three things. First, change the first line to the following, so the new class name matches the file name.
class MyPawnLookAtMorph extends UTPawn;
- Second, so we can make the code talk to the morph targets specifically, under the line below starting with
var SkelControlLookAt...type the following:var MorphNodeWeight EarRightMorphNode; var MorphNodeWeight EarLeftMorphNode;
- Third, above the code starting with
simulated event Destroyed()type the following:simulated function FindMorphNode() { //Notice the reference below to EarRight, the node name we set in the AnimTree. EarRightMorphNode == MorphNodeWeight(Mesh.FindMorphNode('EarRight')); if(EarRightMorphNode == none) { } EarRightMorphNode.SetNodeWeight(1.0f); //Notice the reference below to EarLeft, the node name we set in the AnimTree. EarLeftMorphNode == MorphNodeWeight(Mesh.FindMorphNode('EarLeft')); if(EarLeftMorphNode == none) { } EarLeftMorphNode.SetNodeWeight(1.0f); } - Press Ctrl + R, the Replace tool. In the Find field type SkeletalMeshLookAt and in the Replace field type SkeletalMeshLookAtMorph. Press Replace All. This will avoid a class mismatch with the existing class MyPawnLookAt, which also uses SkeletalMeshLookAt.
- There is one extra step. At the moment the class is using a Packt AnimTree, not the one you copied and adjusted to include Morph Node Names referenced in the code. So in the
DefaultPropertiespart of the code replace the lineAnimTreeTemplate=AnimTree'Packt.Anims.Packt_CharTreeLookAt'withAnimTreeTemplate=AnimTree'Yourfolder.Anims.MyCharTreeMorph', being careful to match the asset name of the AnimTree you edited in UDK before. -
Save the new class, and compile the changes by restarting UDK. Sparing typos, you should be able to reload the map Packt_03_MatineeMorphDEMO.UDK. Open Kismet and look in the properties of the Actor Factory already there. In its Factory | Pawn Class access the class list [
 ] and replace the current entry MyPawnLookAt with MyPawnLookAtMorph. Then PIE to test it out.
- In this lesson we handled Morphs through Matinee and through code. In the next lesson, we will direct AnimTree sequences from within Matinee.
..................Content has been hidden....................
You can't read the all page of ebook, please click here login for view all page.