
In this recipe we'll animate PointLights associated with a lamp asset, a model with a flickering texture, so that the light emitted in the scene also appears to flicker. We'll do this using Matinee, and in particular the Constant interpolation mode of a set of noisily keyed values.
Open the map Packt_04_MatineeFlicker_Start.UDK. This progresses on from the previous recipes on toggling materials and toggling lights. Notice that that functionality has been compacted into a Sub-Sequence ToggleableLighting.
- In the previous screenshot, you can see the Kismet for the entire sequence. Notice the importance of the highlighted Level Loaded event to set initial conditions. We can drive a Matinee for the light flicker straight from the Level Loaded event because the animation will just loop whether or not the lights involved are toggled on or off.
- In Kismet hold M and click to add a Matinee next to the Sub-Sequence ToggleableLighting and type Flicker in its Obj Comment property. Also tick on the checkbox for Looping.
- Hook up the Matinee action's Play input to the Out nub of the Sub-Sequence ToggleableLighting.
- In the scene, select both PointLightToggleable actors and return to Kismet. Right-click and choose New Matinee.
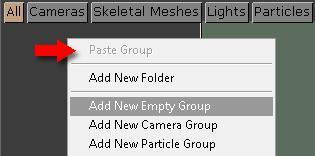
- Double-click on the Matinee to open it, and position the editor window to suit. Right-click in the dark gray space, and choose Add New Empty Group. At the prompt, name it Flicker.
- Make sure the PointLight actors are what is actually assigned to the Flicker track by checking in the Kismet Editor. If you don't see them attached to the Flicker nub of the Matinee action, select them in the scene and right-click on the new Flicker nub and add them both with the New Object Vars using the PointLight... command.
- Right-click on the Flicker track in the Matinee Editor and choose New Float Property Track and at the prompt choose PointLightComponent.Brightness. This will not work unless the PointLights are already properly assigned to the Matinee action.
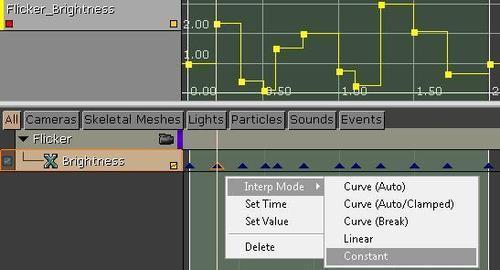
- The period of the lamp's emissive flicker is driven by a panning noise map in the Material, so we have to more or less guess the key framing of the flicker. It will be a loop, over about two seconds. In the Matinee Editor, highlight the Brightness track and press Enter. This will create a key frame on frame 0, or at 0.00 seconds.
- Drag the sequence time slider to 0.50 (it is a black bar with a white line above it, currently at 0.00s and a bit hard to spot). At 0.50 press Enter again to create a new key frame. This time, select the new key frame by right-clicking on it and choose Set Value and change the number to 2.
-
Use the mouse scroll wheel to zoom out the time range of the sequence until you see a red marker at 5.00s and move this to 2.00s instead. If you want to hit exactly 2.00s you may need to turn on the Snap tool (the magnet icon [
 ] in the Matinee Editor icon bar). It defaults to 0.50 increments
- After setting the animation range, turn Snap off again. Between 0.00 and 2.00 add as many key frames as you want values varying between 0.3 and 2.33 or so. Don't go all the way to 0 for the brightness value and don't raise it too high, as a value of 1 is quite bright anyway.
-
Now select all the keys by using Ctrl + Alt + LMB and drag to define a marquee around them, and then right-click. Change their interpolation type to Constant by right-clicking on the time line keys as shown next. Drag the time slider, and in the viewport you should see the lights faithfully following their keyed animation. To see a better playback, extend the green arrows on the time line to fit from 0.00 to 2.00 and press Loop Section [
 ] in the Matinee Editor icon bar.
- You may decide the flicker is too slow and stuttery. Rather than add more keys, in Kismet open the Matinee action's Seq Act_Interp properties, locate Play Rate and set it to 2, for example.
- Your scene may still be quite dark around the locally lit lamps. Clone a new PointLightToggleable in the scene and place it over the gap in the floor after the two switches. Scale it up, but also change its Brightness property (F4) to 0.5 in order to make it seem like a fill light. In Kismet create a New Action | Toggle | Toggle and assign the fill light to its target. Then hook the Used outputs of both Trigger | Used Events to the Toggle's Turn On input. Don't forget to ensure it is turned off when the level loads.
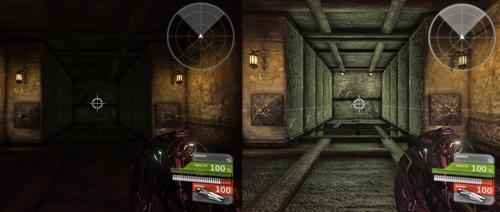
- An example scene is included in the available content: Packt_04_KismetLighting_Demo.UDK and the following screenshot shows the before and after difference for the toggled lights:
..................Content has been hidden....................
You can't read the all page of ebook, please click here login for view all page.