
In this recipe we continue from the previous lesson where we created and placed cameras in their initial positions and assigned variables for them in the Kismet. This time we'll animate those cameras to embellish the level with some cut scenes. One is an introduction and the other highlights a key event in the gameplay.
- In Kismet, next to a Player Spawned event, hold M and click to add a Matinee action. Right-click on the Object Variable WideCam and choose Select Actor in Level. Then double-click the Matinee action. It's useful to have the actor you want to animate already selected when you open the Matinee Editor so that it is automatically assigned the Groups you create tracks for. Some tracks are only available to certain kinds of actors.
- In the Matinee Editor, under All in the dark gray tracks panel, right-click and choose New Camera Group. Call this WideCam. Notice a Movement Track is added automatically. This lets us animate the position of the camera. The additional FOVAngle Track can also be animated, but we don't really need to do that now.
- Back in the Kismet, right-click on the Object Variable CaveCam and choose Select Actor in Level. In the Matinee Editor, create a New Camera Group again, and call this one CaveCam. Make sure the Matinee action shows the new nub CaveCam and has the Object Variable CaveCam connected to it.
- Right-click under the two group tracks you've added and choose Add New Director Group, as shown here:
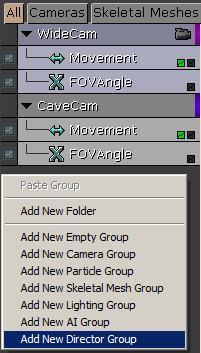
-
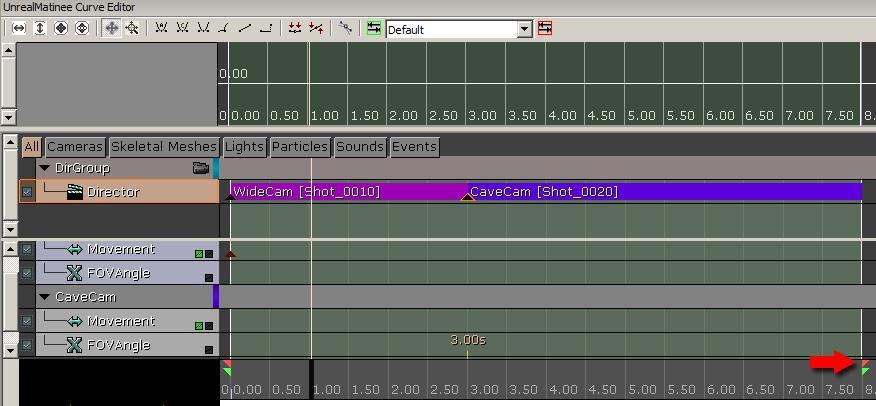
A DirGroup is added above. The Director Track lets you set keys to switch to a given camera in the scene. Since we've added two Camera Groups, we can choose either of these when we keyframe the Director Track. Highlight the
Director Track, and at frame 0.0s, press Enter or the key icon [
 ].
].
- You'll be prompted to choose which camera to use at frame 0.0s. Choose WideCam.
-
Move the time slider to 3.0s and, with the Director Track selected, press Enter or the key icon [ ] again. Extend the range of the time line to 8.0s by dragging the pink out point range handle shown in the next screenshot. You can scroll with the mouse wheel to zoom the time line in and out. Also move the green triangle icon, which sets the internal play loop range.
- WideCam won't be animated, but it will have a Fade Track added to it. Right-click on the Director Track under DirGroup and choose New Fade Track. Highlight this and at frame 0.0s, press Enter. Right-click on the key that is created and choose Set Value. Enter 1. This means the view is fully faded, so don't be alarmed if the view goes black. There is a small checkbox to the left-hand side of tracks in the Matinee Editor that lets you disable them, which is handy for Fade Tracks at times, to temporarily prevent blacking the view.
-
Drag the time slider to frame 2.0s and press Enter again. This key has a value of 0 by default, which means we now have a fade in over 2 seconds. You can visualize this by pressing the show curves icon [
 ] at the end of the Fade Track. It will turn yellow, and in the Curve Editor a curve representing the fade will display. Make sure you can see the entire track by pressing the Fit View to All icon [
  ].
].
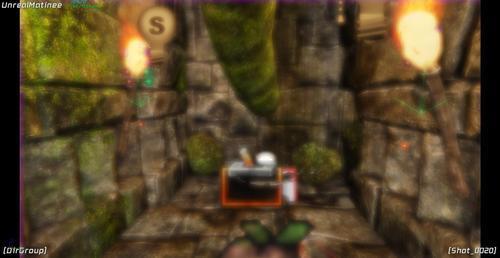
- Now we need to create some camera motion for the second camera in the Director Track. We'll drive the camera inside the cave to reveal one of the level goals. Highlight the Movement Track for the Camera Group CaveCam. At 4.0s on the time line, when the Director Track swaps from the first camera to this one, press Enter. Then drag the time line to 8.0s and press Enter again. With the new key at 8.0s highlighted, move CameraActor_1 into the back of the cave. You can use toggle the show view through camera icon, shown here, which is at the end of the CaveCam Group, to show its current view.

- The view should track forward if you scrub the timeline. Your last key should look similar to the next screenshot. In between the key at frame 3.0s and the key at 8.0s you may need to insert another key to help adjust the camera's in between motion. To add a key you can press Ctrl + LMB on its curve on the time line and to move it you can Ctrl-drag on keys that are highlighted. Close the Matinee Editor when finished.
- If you want to, add further keys to the Fade Track to make the sequence fade out at the end.
- Since the player has already been spawned into the level while this Matinee action is playing, we need the use of a Toggle Cinematic Mode action in Kismet to prevent the player running around until the introduction movie ends. In Kismet, right-click and choose New Action | Toggle | Toggle Cinematic Mode.
- The Toggle Cinematic Mode action needs to be connected as shown here. Don't forget to add the Player 0 Variable as its Target.
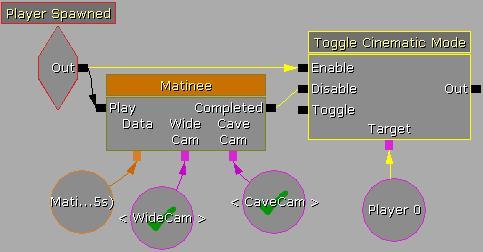
- In the properties of the Toggle Cinematic Mode turn off Hide Player (since we want to see ourselves) and turn off Disable Turning. Turning and movement are disabled by default by this action, but let's allow the player to spin on the spot even though we don't want them to run around—this can be good to let the character feel they're still active in the game world while the cinematic plays. The HUD is also hidden by default, since removing all the gameplay feedback can help sell the film-like quality of a cinematic. Turn off Disable Input. This allows the player to skip the cinematic if that functionality has been enabled for this map. In the properties of the Matinee action, check on Is Skippable. When this is enabled it lets you skip the playing Matinee action if the command CANCELMATINEE is entered by the player. For the player to input this command, it has to map a Console Command to a keystroke. Adding such a keystroke is discussed in Chapter 6, Under the Hood.
- Now we'll create one more Matinee action for the GateShot camera, which simply cuts in to show the SlidingGate Prefab when it opens just in case the player were to be off somewhere else and miss this important event. In the section commented Globals, right-click on the Object Variable GateCam and choose Select CameraActor_2 in Level.
-
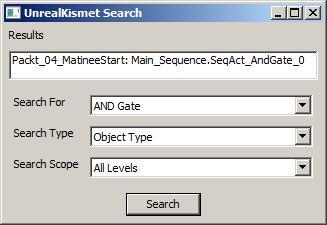
In Kismet, use the search tool [
 ] to locate the AND Gate action that, when its two conditions are both met, fires the GateShot sequence which opens the Gate.
- From the Out nub of the AND Gate, connect to the Play nub of a new Matinee action.
- Double-click on it and add a New Camera Group called GateCam. Also add a new Director Group and at 0.0s set GateCam to play by keying the Director Track and assigning GateCam to the keyframe. The camera itself doesn't need to move but we can add a Camera Shake at 0.0s by adding an Event Track, and keying that at 0.0s too. You'll be prompted to enter a new Event Name for the key. Call it Shake. This adds a nub to this Matinee action. Note that the default Matinee Editor time line length is 5.0s, which is about how long we want this Matinee action to play.
Tip
Music and sound make a big impact during a cinematic sequence. You can use an Event Track to set keys for outputs that let you fire Play Sound nodes. Or you can right click on the Director Group and choose New Sound Track so you can assign audio to play internally from the Matinee action. When designing for mobile devices an alternative option for having a Sound Track is to use the console command:
mobile PlaySong SONGNAMEalong withmobile StopSong. An example is inC:UDK~UDKGameContentMapsMobileEpicCitadel.UDK. The file must be placed into your game's music directory, such as:C:UDK~UDKGameBuildIPhoneResourcesMusicMySong.MP3. - Given there is an action New Action | Camera | Camera Shake, you might think it is the choice to try out. Unfortunately, it's not working. Instead we can use a New Action | Camera | Play Camera Animation.
- Close the Matinee Editor, right-click, and choose New Action | Camera | Camera Shake. Hook the Matinee action's new Shake nub to the Start nub of the Play Camera Animation action. Hook the Completed nub of the Matinee action to the Finish nub of the Play Camera Animation action.
- In the properties of the Play Camera Animation action, to set its motion, we need to set a Camera Animation asset. For this, you can use PacktKismet.Anims.Shake which you can search for in the Content Browser using the filter All Types | Camera Animations.
-
Use the assign icon [
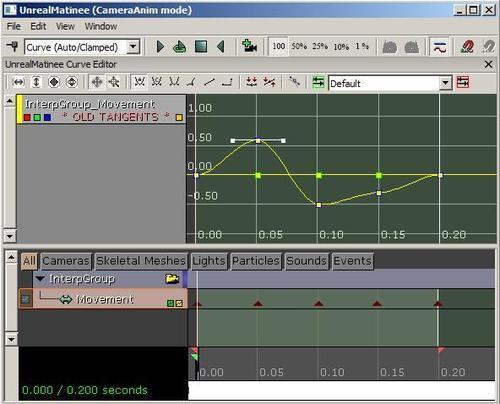
 ] in the Play Anim property of the Play Camera Animation with the asset PacktKismet.Anims.Shake selected in the Content Browser. If you prefer to make your own, you can right-click in the Content Browser and choose New Camera Animation, name it Yourfolder.Anims.MyCameraAnim and double-click on it to open it for editing. A special mode of the Matinee Editor will open with an InterpGroup_Movement curve already supplied that let's you animate a jiggle in XYZ. We want a three second shake. You can get a taste for this by opening existing UDK Camera Animation assets.
- The next screenshot depicts the Kismet for placing the Play Camera Animation action. Note the properties include a value 1.5 for the Intensity of the shake, so you can adjust how it performs without having to edit the keys again.
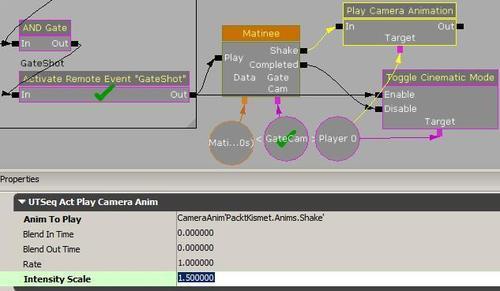
- Copy the Toggle Cinematic Mode action you made earlier, right-click by the current Matinee action that we're working on and then press Paste Here. Hook it up as shown in the previous screenshot.
- Play on PC to see how it goes. An example is in the provided content Packt_04_Matinee_DEMO.UDK.
The way Matinee actions work within the Kismet network makes them useful for animating any actor from models to particles to Bot skeletal controls. A cinematic camera briefly taking control from the player can be used in an enormous number of ways and this lesson is only a sampling of some essential features. From the September 2011 version of UDK, the documentation includes steps required to capture video and audio playback of a cinematic (for conversion to a highly compressed .BIK movie or perhaps just to let you take a fly through of a scene to a video editing application). The documentation for this is available at http://udn.epicgames.com/Three/CapturingCinematicsAndGameplay.html. For more information on using Matinee actions to create cinematics, and some Matinee Editor control hotkeys, check out http://udn.epicgames.com/Three/CreatingCinematics.html.