
UTGame comes with a PhysicsGun that lets you pick up RigidBody actors and hoist and throw them around. Sometimes however, you may want a controlled system to pick up objects and carry them around. The steps in this lesson provide a mechanic where you carry objects in front of you and uses shooting at the object to capture and release it. It uses an integer value comparison of the kind we've already covered, a switch for capture and release behavior, and offset triggers attached to the player to set a carrying location.
Load the scene Packt_05_Carrying_Start.UDK.
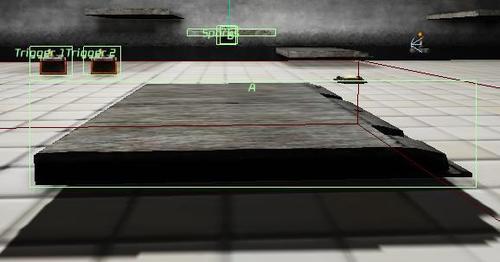
First examine the scene, noting the stair by the wall that has a missing step. Actually it is visible, but it will be hidden at level load. Select this and convert it to a Mover, so that it can be hidden. There is also another block like it lying on the ground nearby, shown in the next screenshot. Select this and convert it to a KActor. Our goal will be to place the KActor where the Mover is, with the Mover starting out hidden then being revealed by the KActor.
Press K so you can see actors in the screen get a green boundary to show they are being referenced in Kismet, as shown here. At first there will be none showing, since we have to add the objects one by one.
Setting up guides that follow the player:
- The brief for this example is to have the carried object float in front of the player. To start out, we need to have a Trigger linked to the player. Select Trigger_0, Trigger_1 and Trigger_2 and open Kismet. Right-click and choose New Object Vars using Triggers... so we can refer to these in Kismet.

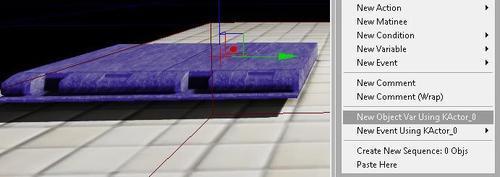
- While we are setting up the scene elements, also select the block on the floor in the scene, the block that you converted to a KActor. In Kismet, right-click and choose New Object Variable using KActor. For this, set its Var Name property as A.
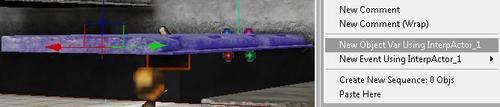
- In the level, select the block against the wall that you converted to a Mover and in Kismet right-click and choose New Object Variable using InterpActor. For this, set its Var Name property as B.
- Hold Ctrl + L and click to add a Level Loaded, and hook up its Level Loaded and Visible to a new Teleport action. Set the Target for the Teleport to be the Object Variable Trigger_2.
- Hold P and click to add a Player Variable and turn off its All Players property. Hook this up to the Destination nub of the Teleport. Extend from the Teleport a new Attach to Actor action. Set the Target as the Player Variable you just made, then set the Attachment variable using Trigger_1.
- It is important to include an offset for the actor Trigger_1 so the block floats ahead of the player and is a bit above ground so as not to block the view. In the Attach to Actor's properties turn on Use Relative Offset, and set the Relative offset value to
X = 400andZ = 90. The Z value comes from the height of the player, which is about 96 units, so the object will float just above the player's eye level. - Hold D and click to add a Delay action. In its properties set its Duration to 0.001 and wire it so the Out nub of the Teleport action feeds its Start nub. Feed its Finished nub to the In nub of the Teleport. This creates a rapid loop back which will constantly situate the Trigger_2 on the player.
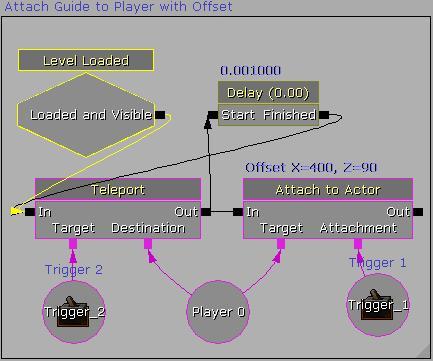
- Comment the sequence starting from the Level Loaded event as Attach Guides to Player with Offset.
-
To see Trigger_1 during play testing, right-click on the Object VariableTrigger_1 in Kismet and choose Select Trigger_1 in the level, then press F4 in the scene to view the actor properties for Trigger_1. Go to Display and set Hidden off. When you confirm things are working, the Trigger may be hidden again. Build All [
 ] then press F8 to PIE to check the result.
Handling Block A
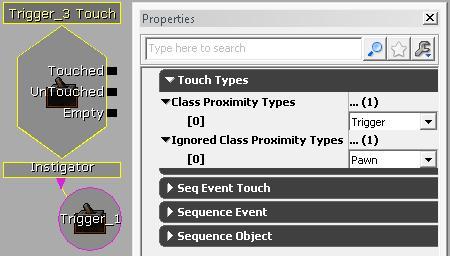
- In the scene, near the Mover you set earlier (the block against the wall), there is another Trigger actor. Select this Trigger and in Kismet right-click and choose New Event Using Trigger_0 | Touched. In the properties of this event set the Class Proximity Types as KActor instead of Pawn. Turn off Player Only and set the Max Trigger Count to 0. Turn on the checkbox for Use Instigator then set the Object Variable Trigger_1 (which already exists in the Kismet) as the Instigator as in the following screenshot:
- In Kismet, add a new Teleport action and set the Target for this to Trigger_0 and the Destination as Trigger_1. Note where the actual Trigger actor Trigger_1 is in the scene, by the steps.
- Right-click on the Object Variable KActor_2 under the Trigger | Touched event. Choose Select KActor_2 in level. Now right-click in Kismet and choose New event using KActor_2 | Take Damage. Set its Max Trigger Count property to 0. Hook its Out nub to the In nub of the Teleport action created in the previous step.
-
In the KActor Take Damage event's properties, set the Min Damage Amount to 0.0 and the Damage Threshold to 1. Also specify the Damage Types filter to be UTDmgType_Rocket using the add entry icon [
 ] and then choosing from the [0] list.
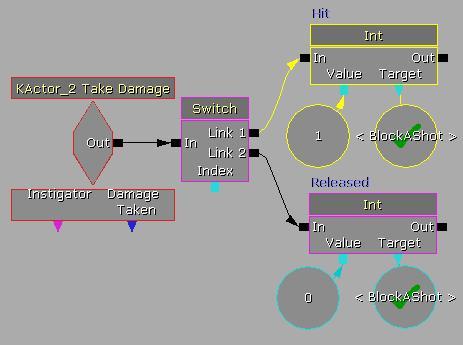
- From the Take Damage event extend an additional wire from its Out nub to a new Switch action. Assign to the Switch, in its properties, a Link Count of 2. Also set it Looping.
- In Kismet, right-click and choose New Action | Set Variable | Int. Comment this as Hit. Right-click on the Value nub and choose Create New Int Variable. In its properties set its Seq Var_Int value to 1. Next to it, hold N and click to add a Named Variable and set its Find Var Name property to BlockAShot. Hold I and click to create a new Integer Variable. Set its Var Name property to BlockAShot. The setting of this BlockAShot to 1 occurs when our KActor block takes damage, and BlockAShot will be subject to a comparison in the sequence later.
- Connect the Int action Hit so its In nub goes to Link 1 of the Switch. Copy the action Hit and its variable and paste them below. Change the action Hit so its Obj Comment field says Released. Also change the Int Variable connected to the Value nub so its value is 0 not 1 as shown here:
Creating Physics changes for the KActor
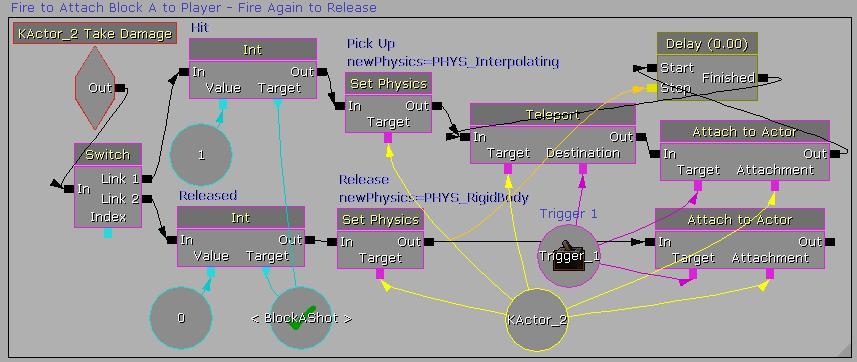
- Add a New Action | Physics | Set Physics then press Ctrl + C and Ctrl + V so you have two of these. Comment the first as Pick Up and the second as Release.
- For the Set Physics action Pick Up, set the new Physics property as PHYS_Interpolating. For the Set Physics action Release, set the new Physics property as PHYS_RigidBody. The Target for both actions will be an Object Variable using KActor_2 (you can copy and paste it from the one already there in the sequence). What we now have is a way for the block to respond when picked up and released. Since it is a rigid body, when we release it we want to fall to the ground. While we are holding it, it should just follow the trigger, which is what we'll set up next.
- Add a new Teleport action after the Set Physics action Pick Up. Make the Teleport action's Target the Object Variable KActor_2. Make its Destination the Object Variable Trigger_1. Both of these already exist in the sequence. Add a new Attach to Actor action extending from the Teleport action. Set the Teleport action's Target as the Object Variable Trigger_1, and its Attachment as the Object Variable KActor_2, which also exists in the scene and can be copied and pasted.
- For the Attach to Actor action, edit its properties so Use Relative Offset is on, and there is a Relative Offset of
X=100andY=100. - Copy and paste the Attach to Actor action and right-click on the pasted one and choose Break All Connections. Hook its In nub to the Out nub of the Set Physics action Release. For its Target set the Object Variable Trigger_1 and the Attachment as the Object Variable KActor_2.
- Hold D and click to add a Delay and hook the Start nub to the Out nub of the Attach to Actor action which extends from the Teleport action. Set the Delay action's Finished nub to the In nub of the Teleport action, creating a loopback. Set the Delay action's Duration to 0.000001 (the smallest possible number UDK will allow you to input). This means that when you pick up the block, it follows smoothly.
Tip
UDK actually measures time in Ticks, which occur many times per second. The time a Tick takes depends on your CPU and scene complexity. The idea is that for every Tick the sequence at hand is evaluated. Frames, and seconds, by comparison are really massive giants in comparison to Ticks. But a 0.000001 delay is pretty fast. So the important thing is just to be sure that you don't need your sequence to have a Tick rate faster than the actual tick rate. In code, Tick is written as
event Tick (float DeltaTime)whereDeltaTimeis the time since the last time Tick was actually called or given.Next time someone says they'll be back in a tick, you'd better not blink.
- From the Set Physics action Release, drag a wire to the Stop nub of the Delay. This means that when the block is shot again, the following loop back will end. This is highlighted in the next illustration.
- If you wish, comment the Kismet from the KActor | Take Damage event as Fire to Attach Block A to Player – Fire Again to Release.
- We've handled Block A but still need to handle Block B. Also we've set a Hit integer of 1 (True) for Block A, but we need to set a Not Hit integer of 0 (false) for Block A at the start of the level. Therefore, copy the Int action Released, and its two variables. Paste it nearby, then hook the pasted Int to a Level Loaded event.
Handling Block B and the Comparison Check
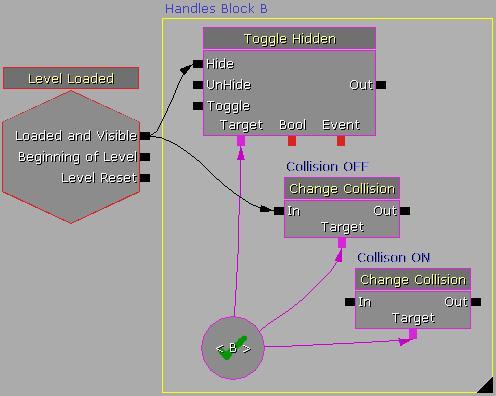
- In Kismet, using the same Level Loaded you added before, add a new Toggle Hidden. Wire its Hide nub to the Loaded and Visible nub of the Level Loaded event. Its UnHide nub will be set later.
- Set the Target of the Toggle Hidden as the Named Variable B.
- Right-click and choose New Action | Actor | Change Collision. Highlight the action, press Ctrl + C, then Ctrl + V to paste a copy. Both need their Target set to the Named Variable B. For the first, comment it as Collision OFF. Hook the In nub of this up to the Level Loaded event. For the second, comment it as Collision ON. We will hook this up next. The property to set for Collision OFF is Collision Type: COLLIDE_No Collision. The property to set for Collision ON is Collision Type: COLLIDE_BlockAll.
- We already set earlier an event Trigger_3 | Touch. Now it is time to set it to work. Near it, press and hold Ctrl + I and click to add a Compare Int. Hook the event's Touched nub to the In nub of the Compare Int.
- The Compare Int we just added needs variables. For the A nub, hold N, then click and set a Named Variable with a Find Var Name property BlockAShot. For the B nub, right-click on it, and choose Create New Int Variable. Set the new variable's Int Value property to 1.
- From the Compare Int, extend a new wire to a new Switch action. Set its Link Count property to 2. Make sure that Looping is off. This is a one time only switch. For Link 2 there will be no output. Near the Switch hold T and click to add a new Toggle and hold S and click to add a new Play Sound. The purpose of using a Switch here is so this part cannot recur after Trigger_3 is touched. We are placing a block of concrete where it needs to go. Once it has happened, we're done.
- Select in the scene Emitter_0 which is a particle that gives a spark fizzle suitable to indicate that some kind of weld has occurred. You can press Ctrl + B to locate and check it in the Content Browser.
- In Kismet, right-click the Target nub of the Toggle and choose New Object Variable Using Emitter_0. Ensure that the Switch action's Link 1 wire goes to the Turn On of the Toggle.
- Hold D and click to add a Delay after the Toggle. Set its Duration to 3.0 and wire the Out nub of the Toggle to the Start nub of the Delay. Then wire the Finished nub of the Delay to the Turn Off nub of the Toggle.
-
Press Ctrl + Shift + F to open the Content Browser. Here, search for Armor_Chest_Cue and highlight the resulting asset. Assign this in the Play Sound property of the Play Sound action in Kismet, using the assign icon [
 ]. Set the Volume Multiplier property to 5.0 and make sure the Play nub of the Play Sound is hooked up to the Link 1 nub of the Switch.
- Hold P and click to add a Player Variable. Turn off its All Players property, and hook it up to the Play Sound action's Target nub.
- From the Compare Int action's A == B nub, hook up a new Destroy action. Set the Target of this to use Object Variables based on KActor_2 and Trigger_1. These variables already exist in the Kismet, so you can copy and paste them. The following screenshot shows the result so far:
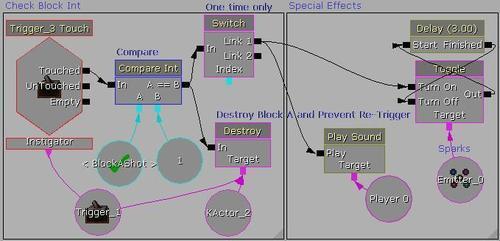
- Now you need to connect the Compare Int up to other actions set earlier. Connect the A == B nub up to the UnHide nub of the Toggle Hidden action with its Target nub connected to the Named Variable B. Also connect A == B to the In of the Change Collision action Collision ON, which also has the Named Variable B connected to its Target nub.
The provided scene Packt_05_Carrying_DEMO.UDK shows the working scene. In essence, a trigger is attached to the player and enabled to make contact with only the block we want to carry and the destination where we want to place it. Since the block is a KActor (kinematics actor) it can work under physics, so if we shoot it it'll go pinging off into space. Changing its physics to PHYS_Interpolating and using a teleporting loop makes it follow the trigger, and changing its physics to PHYS_RigidBody, and breaking the teleport loop lets us drop it if desired. We use the Integer comparison at the end to verify if the block is currently being carried so that when the Trigger we use to carry the block around on (by an attachment and teleport loop) touches the destination, it will gives us the end results.