
There are many reasons why a designer may want to get the current value of the player's health. One reason might be to increment damage up to a certain point and no more, or to limit the aggression of opponents based on the health of the player. In this lesson we will log the player's health to an Integer and use that as a multiplier to create a regenerative, but temporary shield. There are many ways to build game mechanics around health, including damage to health based on distance, time, or number of hits. The method here is driven by Kismet. Often anything related to player properties is handled in code by a developer rather than in the level by a gamer, and not surprisingly this exception is fairly scene specific, not a generalized method to effect the player all the time. To provision permanent effects on player health, creating a class is better.
Load the scene from the provided content Packt05_Health_Start.UDK and familiarize yourself with its content. This scene is set in the World Properties to use UTGame as its GameType for PIE. The Kismet is functionally quite complete. There is already a Bot, and already a timer and all the multipliers we need are there to handle the damage. We are only going to look at a mechanism for capturing the value of the player's health.
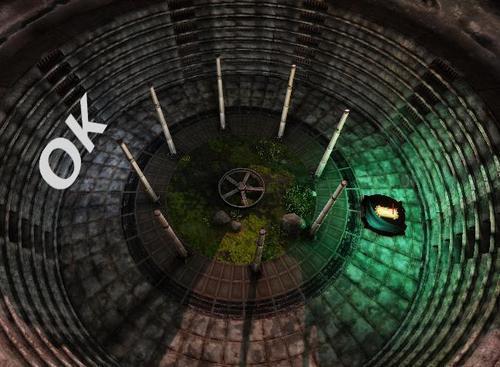
This scene has the text 'OK' on one side. Once the player presses E to use a Trigger attached to them, the text 'OK' turns to a timer for 10 seconds. This timer marks a shield activation that protects the player from harm. The player is not armed, so to destroy the Bot they must fire off the Trigger opposite the OK once their shield has deactivated and they have visited that location. If they don't, the trigger is not ready and the Bot isn't destroyed, and the player takes damage normally. Open Kismet and note that all the Global Variables for objects in the level are placed already. Likewise, a lot of the basic Kismet we have handled in previous recipes is already set up. You may want to examine the Sub-sequence SpawnBot to see how once spawned it is given a weapon and then commences firing at you and chasing you.
- In the scene, use the menu command Edit | Find Actors to search for and then select Trigger_0. In Kismet choose New event using Trigger_0 | Touched. The properties for this are default.
- In the scene, select Trigger_1 and in Kismet choose New event using Trigger_1 | Used. Turn off its Aim to Interact property.
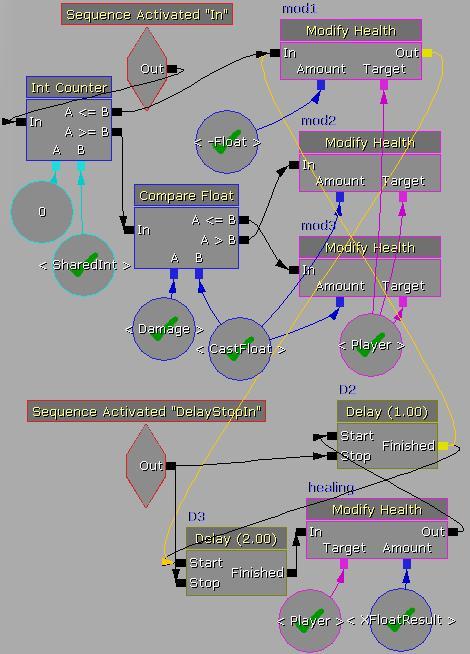
- Set the Named Variable Player as the Instigator for the Trigger_1 Used event. Extend from the Trigger_1 Used event's Used nub the Sub-sequence CountDown, the details of which are shown here:
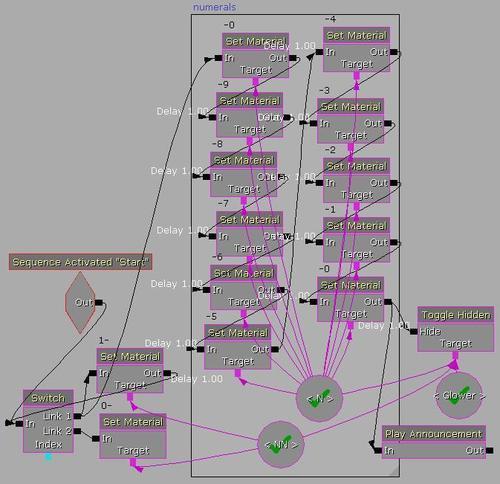
- In the given screenshot, NN handles double digit numbers and N handles single digit numbers.
- Also from the Trigger_1 Used extend a wire to the existing Modify Property ON action, which is set up to enable a PostProcess Volume in the scene. Notice that a wire from the Player Spawned event to the Modify Property OFF action already handles the off state of the same PostProcess Volume.
- Hold D and click to add a Delay and hook up its Start nub to the Used nub of Trigger_1 Used. Set its Duration to 10.0. Extend its Finished nub to a new Toggle (hold T and click) to the right of it, into the Turn On nub. The Turn Off nub of this Toggle should wire up to the Used nub of the Trigger_1 Used. Its Event nub should extend to the top bar of the Trigger_1 Used event. For the Toggle, in its properties add the Obj Comment Trigger Trip. Trigger Trip's Out nub should also hook up to the existing sound effect chain Play Sound Shield Off then Play Sound Thunder.
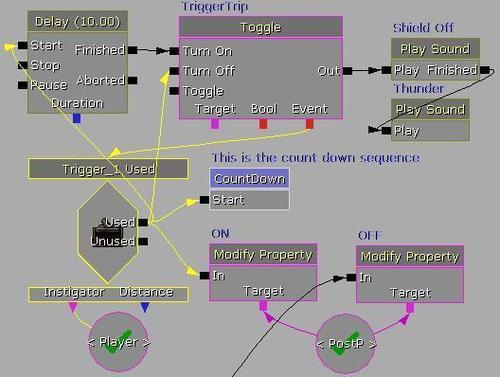
- Hold T and click to add another Toggle. Comment this one as Shields Depleted. Extend a wire from the Finished nub of the 10 second Delay we made into the Turn On nub of the Toggle Shield Depleted.
- Send a wire back from the Turn Off nub to the Used nub of Trigger_1 Used, and also to the Out nub of the existing Player Spawned event. The Target for this Toggle will be a PointLightToggleable_0 in the center of the scene. This light creates a flash when the shields deplete. The Turn Off nub should also extend to a New Event | Remote Event with the Event Name TurnOff. This should go green as it is activated by the actions in the existing Sub-sequence Ending.
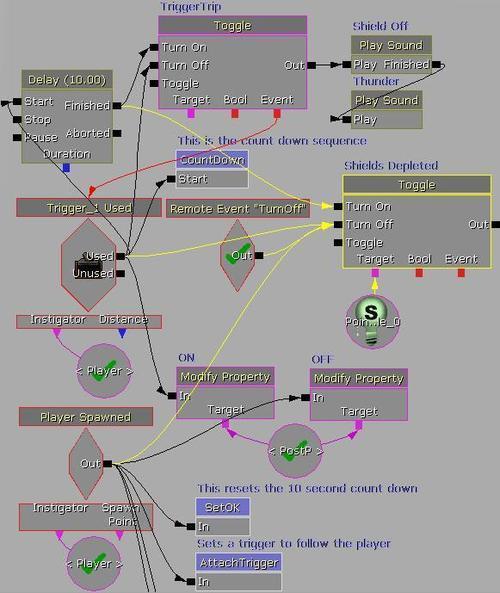
- The Player Spawned event must also feed the Sub-sequences SetOK, AttachTrigger, and SpawnBot. This sets initial conditions for the Bot and triggers that follow the player, and the counter's start point.
- Hold G and click to add a Gate. Comment it as Gate1 and set its property Seq Act | Gate | Open off, so it starts with bOpen=False. Send a wire from the In nub of this to the Trigger_1 Used event's Used nub that we've been using a lot so far. Send a wire from the Open nub to the Damaged output nub of the Sub-sequence DamageValue. Extend the Out nub of Gate1 to the In nub of the Sub-sequence ModifyHealth. Drag the Sub-Sequence Modify Health to the right of Gate1, so it sits nicely.
- Copy and paste Gate1 and name it Gate2. Add a new Switch action and give it two links. Ignore the Link 1 nub, which should remain empty, and instead from the Link 2 nub extend a wire to the In nub of Gate2. Extend the Out nub of Gate2 into the In nub of the Sub-sequence Ending. Drag Ending over by Gate2. The Switch action's In nub should be fed by the Trigger_1 | Used event.
- From the Trigger_0 Touch event we added earlier which so far has been left alone, extend the Touched nub to the Close nub of Gate1. Hold Shift + G and click to add a new AND Gate, then feed the Touched nub to the AND Gate action's In nub, and then from the Out nub to the Open nub of Gate2. The AND Gate is just an in-out conduit through which the flow will only pass if all the incoming nodes have already been fired. For this case, we also need the Out nub of the Toggle Trigger Trip to extend to the In nub of the AND Gate. Lastly, give the Out nub of the AND Gate another wire out, this time to the DelayStopIn nub of the Sub-sequence ModifyHealth.

When the player is spawned an enemy Bot is also spawned. A trigger is attached to the player which is the activator for the shield when used. A timer counts down when the trigger is used, during which time the player is shielded. Be sure to check out the Sub-sequences in the demonstration, particularly the Sub-sequence ModifyHealth, which is a test for the amount of damage taken, and a healing result at a certain threshold, until the Delay stops this loop after 10 seconds in the main sequence. The Modify Health actions Mod1, Mod2, and Mod3 do not have a Damage Amount property set, instead drawing on Float Variables assigned as Named Variables that call back and forth to keep the player's health balanced during the shielding period.
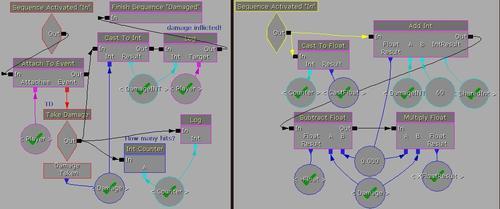
The actual math is done in the Sub-sequences Damage Taken Math and AddSubtractMultiply. When the player takes damage, the Damage Taken float value from the event is sent to an integer and logged. An Int Counter tracks the number of times the player has been hit, and logs it as an integer too. These two integers are then blended through an expression (where each action either subtracts the incoming target value, adds to it, or multiplies it by another value). That gives us a XFloatResult and this is compared in the Sub-sequence Modify Health. In the following screenshot Damage Taken Math is on the left and AddSubtractMultiply is on the right:
The shield is not completely impervious. If you stand in a rapid stream of bullets it will inevitably deplete, but if you get a moment to rest your health will bounce all the way back up.
You can review the entire sequence in the provided content Packt_05_Health_DEMO.UDK.
Tip
You will notice in the illustration that all the nodes have had their unused nubs hidden, except for the Switch, because of its empty Link 1. To hide nubs, or expose hidden nubs, you can right-click on the node and access the item Hide Unused Connectors or Show All Connectors. If you want to expose a specific hidden nub, try Expose Variable and choose from the list which expands from it.
The PostProcess effect and the light shafts that are toggled when we trigger the shield are discussed in detail in Chapter 8, Then There Was Light!