
With your user account set up and Project Professional connected successfully to the project server, you’re ready to get down to business and start creating enterprise projects. You can save a new project to the project server or import an existing local project to the project server. Either way, your new enterprise project is associated with the enterprise global template, which sets the project management standards for your organization.
You manage your enterprise project files in specific ways. You check out a project from the server, work on it, and then check it back in again. You can save your project file to the server as much as you like and only publish the project when you are ready to make the information available to assigned resources and other Project Web Access users.
After your enterprise projects are in place on the server, you can carry out your day-to-day project management tasks. With a project checked out, you can add new tasks, modify existing tasks, work with resources, update progress tracking information, review and add information in custom enterprise fields, generate reports, and more.
You can choose one of two methods for creating an enterprise project. One way is to start a new project plan in Project Professional, make sure you’re connected to the project server, and then save the project plan to the server. The other way is to open an existing local project and import it to the project server.
As soon as either type of project is saved to the project server, the enterprise global template is applied to the project, and accordingly, the enterprise standards apply.
To create a brand new enterprise project, follow these steps:
Start Microsoft Office Project Professional 2007 and connect to the project server.
Click File, New.
In the New Project task pane, click Blank Project or the name of the existing project or template you want to use as the basis for the new project.
Enter tasks or adapt information for your new project.
Note
For more information about creating a new project, see the section titled Creating a Project File in Chapter 3.
Click File, Save As.
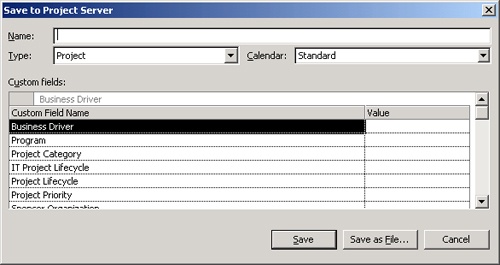
The Save To Project Server dialog box appears (see Figure 22-8).
In the Name box, type the project file name.
In the Calendar box, specify the base calendar being used as the project calendar.
This project calendar is the one specified in the Project Information dialog box.
Enter the value for any of the custom enterprise project fields listed in the Custom Fields table. These are fields that have been created for your organization to create standards and points of comparison among multiple projects.
Click Save.
Your new project is saved as a new enterprise project on the project server.
Note
If you want to save the project but do not want to save it to the project server just yet, in the Save To Project Server dialog box, click Save As File then click OK. In the Save As dialog box, enter the file name and select the location on your hard drive where you want to save the project. Click Save. Later when you’re ready, you can import the project to the server.
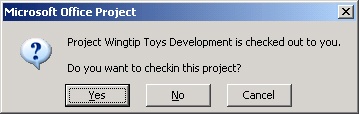
As you begin the process of closing the new enterprise project, a message appears asking if you want to check the project in to the server. Click Yes to check the project in. Click No to keep the project checked out to you.
To import an existing local nonenterprise project to your project server, follow these steps:
Make sure that Microsoft Office Project Professional 2007 is connected to the project server.
The project you’re importing may or may not be open; it doesn’t matter to the process.
Click Tools, Enterprise Options, Import Project To Enterprise.
The Open dialog box appears.
Navigate to the drive and folder containing the project you want to import to the project server. Click the name of the project and then click Open.
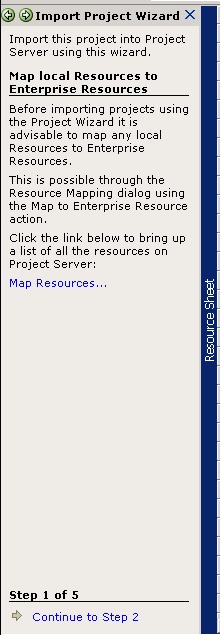
The Import Project Wizard task pane appears (see Figure 22-9).
If there are local resources to match with the enterprise resource pool, click the Map Resources link. Read the Map Project Resources Onto Enterprise Resources dialog box.
You can map your local resources to enterprise resources if you know that the resources have already been added to the enterprise resource pool. For each resource name that you want to map, click in the Action On Import field and then click Map To Enterprise Resource. In the Calendar Or Enterprise Resource field, click the down arrow and then select the name of the corresponding enterprise resource.
If you don’t want to map or import the resource to the enterprise, retain the Action On Import field default of Keep Local With Base Calendar. If necessary, in the Action On Import field, click the name of the base calendar.
When finished mapping resources, click OK.
Note
When in doubt, don’t import a resource to the enterprise resource pool. That is, if you’re not sure whether certain resources belong in the enterprise resource pool or whether they’re already there, bypass step 4 for now. Once a resource has been added to the enterprise resource pool, it’s there semi-permanently. It can be deactivated, but only a database administrator can actually delete an erroneously added resource from the enterprise resource pool.
As long as you have the proper permissions, you can always add a resource later.
In the Import Project Wizard task pane, click Continue To Step 2.
Review and resolve any errors that are listed in the Import Resource view. To resolve an error, double-click the resource to open the Resource Information dialog box. If you change any resource information, click the Validate Resources button to make sure you have cleared the errors.
When all resource import errors have been resolved, click Continue To Step 3.
Click the Map Task Fields link. This page shows any custom fields, such as Cost1 or Text3, that you might have defined in the local project. You can map these custom fields to any corresponding enterprise fields that might have been defined for your organization.
Click the arrow in the From: Task Field field and then select the first field on the task sheet you are importing. Click the arrow in the corresponding To: Enterprise Task Field field and then select the field that is to map to the selected field. When finished mapping the custom fields, click OK.
Click Continue To Step 4.
Review and resolve any errors listed in the Import Task view. To resolve errors, double-click the task and then make the necessary changes in the Task Information dialog box.
When all task import errors have been resolved, click Continue To Step 5.
Click the Save As link. In the Save To Project Server dialog box, enter the name of the project in the Name box. Specify the calendar in the Calendar box and enter any values needed in the Custom Field Name table. When finished, click Save.
The project is saved to the project server.
Click the Save And Finish link at the bottom of the Import Project Wizard task pane.
You need to be aware of three aspects of file management on the project server as you open, close, and save your project files:
Project file checkout and check-in
Saving changes in a project file
Publishing project information to the project server
As soon as you give the command to save a project to the project server, it is saved and checked out to you. When you close the project, you are asked whether you want to check in the project.
It’s good practice to check a project out of the server when you want to work on it and check it back in when you’re done for the day
To check out an enterprise project, follow these steps:
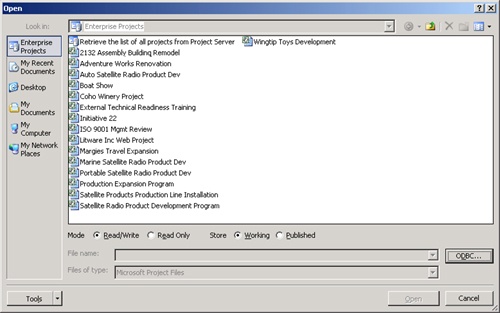
With Microsoft Office Project Professional 2007 connected to the project server, click File, Open.
The Open dialog box appears, showing the list of enterprise projects that have previously been opened on this computer and now have a copy in the local active cache (see Figure 22-10).
Click the name of the project you want to check out.
If the project you are looking for is not listed, double-click Retrieve The List Of All Projects From Project Server at the top of the list of files. The Group By control appears, and you can click the arrow in the Group By box to choose a property by which to categorize the projects so that you can more quickly find what you’re looking for. Any project you open in Project Professional is copied into your active cache.
Make sure that the project you want to check out is not already checked out by someone else.
A project can be checked out by only one user at a time. To see whether a project is checked out, click Details in the Open dialog box.
Make sure that the Read/Write option is selected, which is the default.
If someone else has checked out the project you want, you can still open it if you select the Read Only option.
To see the list of published projects, select the Published option. To see the list of published as well as draft (nonpublished) projects to which you have access, select the Working option. The Working option is selected by default.
Click the project you want, and then click Open.
The project opens. The enterprise global template is attached to the template, and the enterprise resource pool is available for use in the project.
Whenever you save an enterprise project file, those changes are saved to the project server. Until you give the command to publish the project, it is considered a working draft, and no one but you can see it or work with it. You can build your draft project using the enterprise global template and the enterprise resource pool, but it’s all your own business and no one else’s...yet. The project is not listed in the Project Center, and assignments have not yet gone to their resources.
To create a working draft version of a project, simply click File, Save to save it to the project server.
When your project is ready for public consumption and scrutiny by the rest of your organization, it’s ready to be published to the project server.
As soon as you publish a new project, it is listed in the Project Center. Any task assignments are made available to the assigned resources. By default, a Web-based workspace is created to view the details of the newly published project.
Note
The workspace is a new feature in Project 2007 based on Windows SharePoint Services. In the workspace, team members and other project stakeholders can read announcements or calendar information. You can see any documents, issues, or risks associated with the project. You can view and participate in discussions about the project. To open a project workspace, from the Project Details page, click Go To, Project Workspace. The workspace opens in a separate Web browser.
To publish a project for the first time, follow these steps:
Make sure that Microsoft Office Project Professional 2007 is connected to the server.
Click File, Save to save the project to the server.
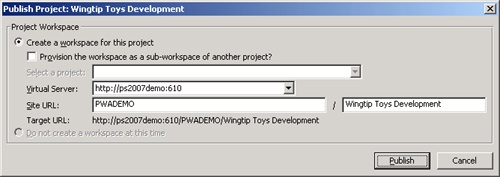
Click File, Publish.
Review the Publish Project dialog box to make sure all the specifications are as they should be (see Figure 22-11).
Click Publish.
The project is now published to the project server and is available to other Project Web Access users.
Even after you first publish your project to the server, the changes you save and check in to the server are not automatically seen by other users. You always have choices as to whether any new changes you save are published to the server. To publish recent changes on an already-published project, click File, Publish. The latest version of your project is now made available to others viewing details about your project on Project Web Access.
When you finish working with your enterprise project for the time being, you check it back in to the project server. Your organization might have specific rules for when you need to check in your projects.
To check in an enterprise project, follow these steps:
Make sure that Microsoft Office Project Professional 2007 is connected to the project server.
Click File, Save to save your final changes.
Click File, Close.
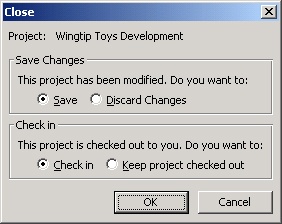
If you have made additional changes since the last time you saved the file, the Close dialog box appears, giving you the choice not only to save or discard your changes, but also to check in the file or not.
If the file is saved, a message asks if you want to check in the project.
If you had not saved final changes, the Save And Check-In dialog box appears. Click Save Any Changes And Then Check-In. If you want to discard your changes, click Check-In Only.
Note
If there are any required custom enterprise fields whose values you have not completed, you’ll see a prompt reminding you to do this. You must complete these fields before you can successfully check the project back in.
Note
See the section titled Working with Custom Enterprise Fields later in this chapter for more information.
After you check in your project, if it is published, other project server users with the proper permissions can edit it.
You don’t always need to be connected to the project server to work with projects. And you don’t always need to work with enterprise projects when connected to the project server. Working offline is particularly helpful if you’re traveling or in some other situation without easy Internet access and need to continue to work on your project files. This can also be handy if you want to try some contingency scenarios with an enterprise project.
The following is a list of possible ways you can work offline with an enterprise project:
You can check out an enterprise project and then work offline. Click File, Work Offline. When ready to connect to the project server again, click File, Work Offline again to turn the offline mode off.
You can be connected to the project server but also open a local nonenterprise project. To do this, click File, Open. In the Open dialog box, in the Look In box, click My Documents, My Computer, or another location that contains your local project. Browse to and select the local project and then click Open.
You can open Project Professional without connecting to the project server, and open and work with a local nonenterprise project. To do this, you need to have Project Professional set up for manual connection. In the Login dialog box, click Computer in the Profile box and then click OK. Or click the name of the project server and then click Work Offline.
Now that your projects are stored on the project server, you can work with them as enterprise projects. What does that mean to you?
Essentially, it means that you’re now using the enterprise global template, which contains any standard project elements that have been defined for your organization, including macros, views, toolbars, and so on. You also have access to enterprise resources and tools for working efficiently with those resources.
In the wider view, your enterprise projects can be reviewed and analyzed by others so that they can see the big picture of all projects taking place throughout the organization.
When you start Project Professional and connect to your project server, the latest update of the enterprise global template is automatically attached. The enterprise global template is akin to a global template or the "global global" over the standard project global template. The enterprise global template dictates standards being enforced and customizations made available to Project interface elements in projects throughout the enterprise. These standards provide for customization and consistency across all projects in an organization. The standards propagated through the enterprise global template also make it possible for project information throughout the enterprise to be compared and analyzed in meaningful ways.
By default, the portfolio manager and project server administrator are the only users with permission to modify the enterprise global template. However, project managers have permission to view the enterprise global template, so you can see the controls behind your individual enterprise projects. The following list details the project elements that can be modified and propagated as standards via the enterprise global template:
Filters
Formulas
Forms
Groups
Import and export maps
Macros
Reports
Tables
Toolbars
Microsoft Visual Basic for Applications (VBA) modules
Views
To review the enterprise global template and see the specific changes that are being enforced for your organization, follow these steps:
Make sure that Microsoft Office Project Professional 2007 is connected to the project server.
As soon as you connect to the project server, the enterprise global template is loaded into memory for use with your enterprise projects.
Click Tools, Enterprise Options, Open Enterprise Global.
A project plan, which appears to be empty, is displayed (see Figure 22-12).
Figure 22-12. Review features in the enterprise global template to see your organization’s standards.
Using the default project manager permissions, the enterprise global template is not checked out to you in the sense that you can make changes to it; but rather that you’re using it as the foundation structure to your own checked-out enterprise projects.
You can browse around the various interface features—such as the view definitions, filter definitions, custom toolbars, and so on—to see how the enterprise global template has been customized.
When finished reviewing the enterprise global template, close it.
Although you can inadvertently enter data in the enterprise global template, it is not saved when you close it. Only specific elements (views, macros, currency, and so on) are saved. Tasks or assignments are never saved with the enterprise global template.
The global standards are still present in any enterprise projects you have currently checked out. In fact, if you browse the interface elements in your own enterprise project, you’ll see that the same customizations are present there that are in the enterprise global template.
If the enterprise global template changes after you connect to the project server, you only see those changes after you close Project Professional and reconnect.
It’s likely that your organization has a system—whether formal or informal—for project managers to suggest changes to the enterprise global template. Find out from the project server administrator or portfolio manager how you can suggest changes you want to see implemented. When the enterprise global template is updated, you see the changes take effect the next time you check out an enterprise project.
Even though the enterprise global template affects all your enterprise projects, this doesn’t mean that you can’t still use your own project global template, which is active on projects on your own computer. As long as there’s no conflict between elements in the project global template and elements in the enterprise global template, you can create your own sets of standards for all your own projects. For example, you can create and use your own custom toolbar as long as it has a different name from any custom toolbars provided in the enterprise global template.
Note
For more information about working with the project global template, see Chapter 28.
Finally, you can change interface elements to apply to an individual project without it being a part of the enterprise global template or your own project global template.
Custom enterprise fields often constitute a major area of customization and standardization implemented via the enterprise global template. Custom fields can be designed to store a specific category of numbers, durations, or text not provided by built-in Microsoft Project 2007 fields. Different data types of custom fields are available for assignments, tasks, and entire projects. The portfolio manager or project server administrator defines these fields as part of the enterprise global template, and then they become part of your project.
Custom enterprise fields include the following:
Custom enterprise project fields, such as Enterprise Project Cost or Enterprise Project Duration
Custom enterprise task fields, such as Enterprise Date or Enterprise Flag
Custom enterprise resource fields, such as Enterprise Text or Enterprise Number
Although local nonenterprise projects impose a limit on the number of custom fields you can create, new in Project Server 2007 is the ability to create an unlimited number of custom fields for each field type.
To add a custom enterprise field to your enterprise project, follow these steps:
With Microsoft Office Project Professional 2007 connected to the project server, check out the enterprise project to which you want to add the custom enterprise field.
Display the sheet view and table to which you want to add the custom enterprise field.
If you’re adding an enterprise task field, display a task view. If it’s an assignment field, display the Task Usage or Resource Usage view.
If you’re adding an enterprise resource field, display a resource view.
If you’re adding an enterprise project field, display the project summary row. To do this, first display a task view. Click Tools, Options and then click the View tab. Select the Show Project Summary Task check box.
Right-click the column heading next to where you want the custom enterprise field to be inserted. Click Insert Column on the shortcut menu.
In the Field Name box, find and click the custom enterprise field.
You’ll know the name of the field from information you’ve received from your portfolio manager or project server administrator.
You’ll also know the name of the custom field because the word (Enterprise) appears after the field name, as in Project Cost Status (Enterprise).
In the Insert Column dialog box, click OK.
A column containing the selected custom enterprise field appears in the sheet view.
Some custom fields are set up to be calculated from values in other fields in your project. If you added such a calculated field, it might already contain values.
Other custom fields are set up for you to simply add the appropriate data. For such entered fields, you might just type in data freeform. Entered fields can also be designed to contain a value list for you to choose from. If this is the case, click in the field. Click the arrow and select the appropriate choice for the task, resource, assignment, or project.
You can insert one enterprise project into another to create a master project-subproject relationship between projects. Using this technique, you can model a program, reflecting all projects being implemented under a specific program in your organization. The overarching program can be represented as the master project, with all the projects within that program set up as subprojects within the master project. Therefore, as implemented through Project Server 2007, a program is a set of related projects that are often set up in a hierarchical relationship.
Note
For more information about inserting one project into another, see the section titled Structuring Master Projects with Subprojects in Chapter 14.
By contrast, a portfolio is simply a collection of enterprise projects being implemented by an organization as reflected in the project server. They might or might not be related to one another, and they might or might be set up in a hierarchical relationship.
All enterprise projects are listed on the Project Center page in Project Web Access, whether they are part of a program, and whether they are a master project or a subproject.
Setting up programs in Project Server through the use of master projects and subprojects supports large organizations implementing a number of large projects and subprojects, often taking place at various locations around the world.
When you open a master project, all the subprojects are listed (and checked out) as tasks in any task view. You can then drill down by clicking one of the subprojects to see the tasks within that project.
If you want to be able to distinguish between master projects and subprojects on the Project Center page, work with your project server administrator or portfolio manager to create and add a custom field to the table on the Project Center page. For example, a text field called "Master-Subproject" could be created in which project managers could indicate whether a project is a master project, a subproject, or neither. That field could then be added to a Project Center view. Another field for subprojects could specify the name of the master project.
You can set up dependencies and deliverables, or commitments, between the projects within a program, providing the visibility needed to know when a key deliverable that affects related project is coming due.
The program hierarchy can be maintained and statused in reports that are generated on the Data Analysis page using an OLAP cube.
New in Project Server 2007 is the ability to manage dependencies on deliverables among projects in your organization. By managing dependencies on deliverables in other projects, you can keep an eye on commitments in other projects without necessarily affecting the scheduling of your project.
Of course, you can still create links—task dependencies—from one project to another. This is still necessary when there is a true relationship between tasks, such as the common finish-to-start task relationship in which a task in one project cannot begin until a task in another project has been completed. This type of structure does affect scheduling, because if the predecessor task slips, the successor task slips as well.
Note
For information about linking tasks between projects, see the section titled Linking Information Between Project Plans in Chapter 15.
However, if you’re working in an enterprise project management environment, and you want to be alerted to the status of deliverables in one enterprise project that affect the outcome, but not necessarily the scheduling, of another enterprise project, then you might consider setting up deliverable dependencies.
To set up a dependency on a deliverable, follow these steps:
Make sure that Microsoft Office Project Professional 2007 is connected to your project server.
Open the enterprise project that is dependent on a deliverable in another enterprise project.
If you want to link a task to the deliverable in the other project, select the task.
Click Collaborate, Manage Dependencies On Deliverables.
The Dependency task pane appears.
Click Add New Dependency.
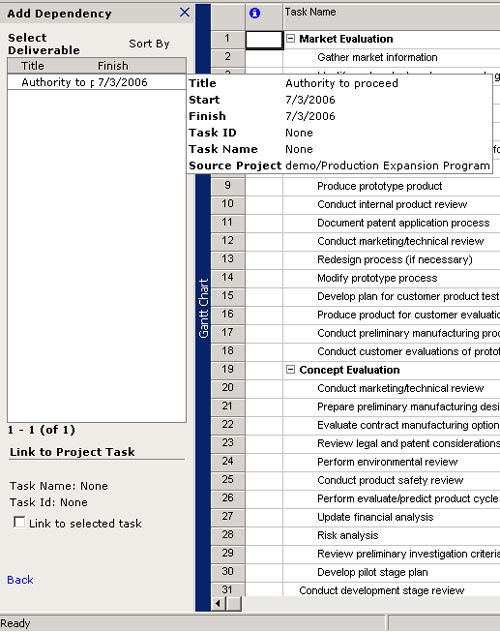
In the Select Project box, click the name of the project that contains the deliverable.
The Select Deliverable pane appears. As you roll your mouse over each deliverable task, a pop-up shows the full name of the deliverable and its start and finish dates (see Figure 22-13).
Click the name of the deliverable you want to include as a dependency with the current project.
If you want to create a link (task dependency) with the deliverable, select the Link To Selected Task check box.
Click Done.
To see an update about a deliverable, follow these steps:
Make sure that Microsoft Office Project Professional 2007 is connected to your project server.
Open the enterprise project that is dependent on a deliverable in another enterprise project.
Click Collaborate, Manage Dependencies On Deliverables.
The Dependency task pane appears, showing the names of the deliverables in other projects you have set up.
At the bottom of the Dependency task pane, click Accept All Server Changes if it’s present. Also click Get Updates.
Information about the deliverable’s finish date is updated in the task pane.
In addition to creating dependencies to deliverables in other projects, you can create deliverables in your own projects. To do this, follow these steps.
Make sure that Microsoft Office Project Professional 2007 is connected to your project server and then open the enterprise project that is to contain the deliverable.
If the deliverable is a particular task, or if you want to associate a deliverable with a task in your project, select that task. However, the deliverable can be independent of any task in the project, associated only with the project as a whole.
Click Collaborate, Manage Deliverables.
The Deliverables task pane appears.
Click Add New Deliverable.
Complete the fields in the Add Deliverable task pane.
If you are associating the deliverable with a selected task, select the Link To Selected Task check box.
The fields under Deliverable Details are filled in with information from the selected task (see Figure 22-14).
If the deliverable is to be associated with the project but not a particular task, enter a title for the deliverable, as well as a start and finish date.
Click Done.
