
As a project manager using Microsoft Office Project 2007, you have probably created projects, assigned resources, tracked progress, and generated your fair share of reports. If you’re working with enterprise project management and collaborating with your project team through Microsoft Office Project Professional 2007, Microsoft Office Project Server 2007, and Microsoft Office Project Web Access, there are differences in how you work with your project and resources. This chapter covers these differences as they pertain specifically to the project manager.
Note
Project server administrators and portfolio managers should see Chapter 21. Resources can refer to Chapter 23. Managing stakeholders can find pertinent information in Chapter 24.
Note
Chapter 23 and Chapter 24 are also provided as standalone e-chapters on the Bonus Content tab of the Companion CD.
Office Project 2007 enterprise project management coordinates multiple project managers in an organization, dealing with potentially hundreds of projects and thousands of resources. Different stakeholders can plug into the organization’s project server to obtain whatever high-level or detailed view of project information they need for their varied functions. But at the heart of this system is the individual project plan—created and controlled by the individual project manager using Office Project Professional 2007.
To start using the Microsoft Office Project 2007 enterprise features, you log on to your project server, either from Project Professional 2007 or Office Project Web Access. Once you’re logged on to one of these, you can go right into the other without having to log on again.
After your setup is configured and you can connect, you can create new enterprise projects or import existing projects to the project server. You can make full use of the enterprise resource pool to build your project team and assign those resources to the proper tasks based on their skills and availability. As you track progress, you can be in constant communication with your project resources, exchanging assignment and progress information through Office Project Server 2007. New in Project Server 2007 is the ability to create project proposals, activity plans, and resource plans.
Note
There are a variety of ways to review your project information in Project Web Access through the use of project workspaces, views, and filters. Project Web Access also provides new ways to generate reports. These methods are covered in the section titled Analyzing and Reporting on Project Information in Chapter 24.
Note
Your project server administrator is responsible for setting up the enterprise resource pool, the associated resource breakdown structure, and any other organizational customizations for project management. This should be done before you, as the project manager, start publishing any of your own projects to your project server.
For more information about starting to create enterprise projects, talk with your project server administrator to learn more about your organization’s processes and standards in implementing enterprise project management. Refer also to Chapter 21.
After your project server administrator adds you as a user with project manager permissions in your project server, you can configure your installation of Project Professional to connect to the server. Then you have all the allowed enterprise project management features at your disposal.
The first thing you need to do to get started with enterprise project management is make sure that the project server administrator has added you as a project server user. Then, set up your project server account in Project Professional by following these steps:
Start Microsoft Office Project Professional 2007.
Click Tools, Enterprise Options, Microsoft Office Project Server Accounts.
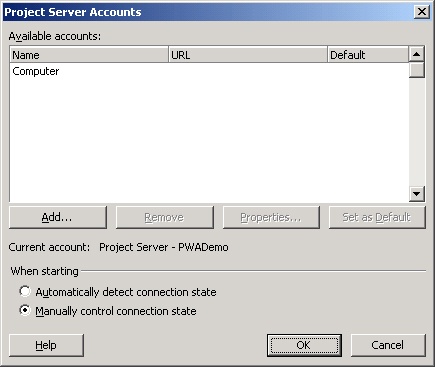
The Project Server Accounts dialog box appears (see Figure 22-1).
In the Project Server Accounts dialog box, click Add.
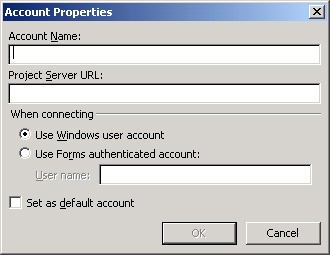
The Account Properties dialog box appears (see Figure 22-2).
In the Account Name box, enter the "friendly" name by which you want to identify the project server, for example, "Project Server" or "Corporate Group Project Server."
In the Project Server URL box, enter the address of your organization’s project server, in the format of http://servername/projectserver.
Obtain this address from your project server administrator.
Under When Connecting, specify whether you will be using your Windows account or Forms-authenticated account.
This account needs to match the way your project server administrator has already set up your user information. Find out from your project server administrator which type of authentication you are to use.
With Windows authentication, you can log on to Project Web Access using the same user ID and password you use to log on to your organization’s Windows network.
With Forms authentication, you can log on to Project Web Access using the user ID the project server administrator has set up. If you will be using Forms authentication, enter the user name your project server administrator has set up for you.
Select the Set As Default Account check box if you want this account to be automatically selected for connection whenever you start Project Professional.
Setting the default account does not necessarily log you into this account when you start Project Professional; it’s simply the account that’s selected for logon.
Click OK.
The Project Server Accounts dialog box appears again, listing your new account in the Available Accounts box.
Under When Starting, specify whether you want to automatically connect to the server running Project Server as soon as you start Project Professional.
If you select Automatically Detect Connect State, upon startup, Project Professional will connect to the account you set as the default, which can be convenient if you know that you will always want to connect to a single project server and will rarely work offline.
If you select Manually Control Connection State, a dialog box will appear upon startup that gives you the choice of which account you want to use for this Project Professional session. This might the most appropriate choice if you sometimes expect to work offline. It is also the right choice if this computer is a shared network computer used by multiple users who have different user names and permissions.
When finished, click OK.
At this point, you are set up to log on to your project server through Project Professional. If you want to log on immediately, exit Project Professional and then start it up again.
If you specified in the Project Server Accounts dialog box that you want to automatically connect to your project server, all you need to do to log on to your project server from Project Professional is to simply start Project Professional. The specified project server location is found, and Project Professional logs you on immediately.
Your user account must be set up by the project server administrator before you can successfully log on to the project server. If you have problems logging on, check with your administrator.
Note
For more information about adding server accounts, see the section titled Creating a New User Account in Chapter 21.
If you specified that you want to manually connect to the project server, follow these steps:
Start Microsoft Office Project Professional 2007.
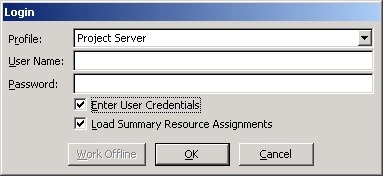
If you are using forms authentication, the Login dialog box appears (see Figure 22-3).
In the Profile box, click the project server account you want to log on to.
If you are set up to use your Windows account to log on, and your profile indicates to automatically connect without having to enter user credentials, then as soon as you select the project server and click OK, you are immediately authenticated and connected to the project server.
If you are set up to use a Forms authentication account to log on, select the project server, enter your user name and password, and then click OK.
If you ever want to work offline, or if there’s a problem logging on to the project server, click the Computer account and then click Work Offline.
Many of your project management responsibilities are best carried out within your familiar Project Professional window. But other responsibilities are best done from within Project Web Access. Many tasks can be done in either place, and it’s just a matter of which is more convenient at the time or which method you find more efficient.
As soon as you log on to the project server from Project Professional, you are automatically authenticated to work in Project Web Access without needing to log on again. Likewise, if you happen to log on to Project Web Access first, you can open Project Professional without needing to log on again there.
To log on to Project Web Access, follow these steps:
Start Internet Explorer.
In the Address box, enter the URL for your project server and then click Go.
This is the same URL you entered in the Account Properties dialog box in Project Professional. However, you do not need to have the account set up in Project Professional to log on to Project Web Access directly using Internet Explorer.
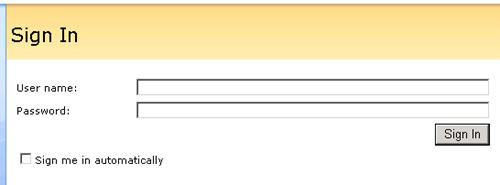
If you are set up for forms authentication, the Project Web Access Sign In page appears (see Figure 22-4).
Enter your user name and password as set up by the project server administrator and then click Sign In.
This is the Forms account information set up by your project server administrator.
If you are set up for Windows authentication, the Sign In page does not appear, and you are immediately connected to the project server.
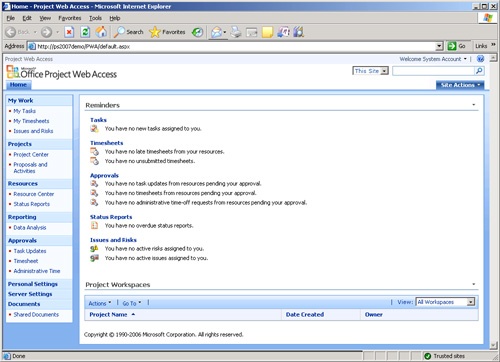
Your Project Web Access home page appears (see Figure 22-5). You can carry out many project management activities from within Project Web Access, and these responsibilities are described throughout the rest of this chapter.
Once you’re signed on to Project Web Access, take a moment to click around and orient yourself to the content and controls. If you have used Microsoft Windows SharePoint Services, much of Project Web Access will feel familiar to you.
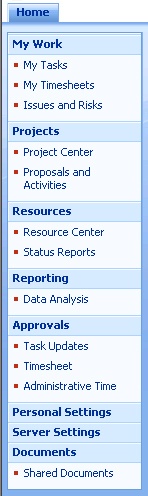
The Project Web Access home page and other major pages show the Quick Launch task bar on the left side of the screen (see Figure 22-6). The Quick Launch task bar includes a list of links to all the major areas and functions throughout Project Web Access, for example, the Project Center, the Resource Center, and Shared Documents. Simply click a link on the Quick Launch task bar, and the page changes to show the item you clicked.
The home page is the first Project Web Access page you see when you log on. By default, it includes a list of items that need your attention, for example, approvals you need to process or status reports that are coming due. It also lists the Web-based workspaces for the projects that have been set up for your enterprise. Your project server administrator can set up your home page to include the content most appropriate for your organization.
All pages throughout Project Web Access have certain standard controls, as follows:
Welcome button. In the upper-right corner of every page is a button that starts with Welcome. Click this button to see a menu that includes My Settings, Sign In As Different User, Sign Out, and Personalize This Page.
Help button. Next to the Welcome button is the Help button. If you ever need assistance while using Project Web Access, click the Help button. The Project Server Help window appears. A Help topic pertaining to the current page appears, but you can find other Help topics by typing a phrase or question in the Search For box or by clicking the Home button and then browsing through the Contents.
Enter Search Words. Under the Welcome and Help buttons is the Enter Search Words box. If your implementation of Project Web Access and Windows SharePoint Services has been indexed with keywords, you can search the site for a word or phrase. Type the word or phrase and then click the Go Search button.
Site Actions. The Site Actions tab is visible on every page and provides a menu for creating or editing Web pages or managing settings on the Project Web Access site. This is typically used by project server administrators or portfolio managers to customize Project Web Access.
Home. The Home tab is visible on every page. Click this tab to quickly move from an inside page on the Project Web Access site to the home page.
Most pages, such as the Project Center or Resource Center, have additional standard controls, as follows:
Select a view. Click the arrow in the View box to see a list of views. Views are different versions or layouts of content related to the current page. Some pages have just a single view, whereas others might have seven or eight views.
Filter. Click Settings, Filter to show filter controls above the toolbar. You can create a custom filter and add it to the Filter box. You can also apply the Auto Filter to filter by a particular value in a field in the table on the current page.
Group. Click Settings, Group. Grouping controls appear above the toolbar. You can group up to three levels by fields. Groups are separated by a colored band in the table on the current page.
Search. Click Settings, Search to show the search controls above the toolbar. The search tool finds information you specify in the table on the current page.

Several pages throughout Project Web Access include a grid, or table, which lists information such as projects, tasks, or resources (see Figure 22-7).
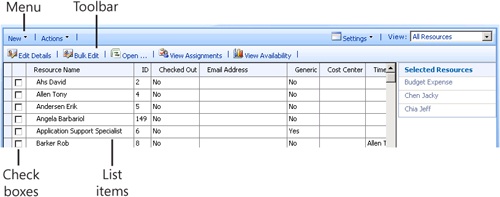
Figure 22-7. You use tables throughout Project Web Access to view and edit project-related information.
The following elements are present in most tables:
List items. The main feature of a table is the list of items. In most cases, you can click an item to drill down to see more information, whether it’s project or task details or resource information.
Check boxes. Some tables include check boxes next to each listed item. Clicking the check box selects the item for further action, typically with a menu item. Items that are selected can be viewed to the right of the table. To select all items in the table, click the Actions menu and then click the Select All command. To clear all selected items, click the Actions menu and then click the Clear All command.
Menus. Typically two or three menus are above a table. Click the menu name to view the drop-down menu of commands.
Toolbar. Several buttons are on a toolbar directly above the table. Typically, these are frequently used commands that are also available on a menu.
Print the table. You can print the My Tasks, Gantt view, Timesheet, Project Center, and Project Details pages, among others. Click Actions, Print Grid. A printable version of the table appears. Click Print Grid.
Export the table to Excel. You can export tables to Microsoft Office Excel 2007. On the page with the table, click Actions, Export Grid To Excel. The contents of the table appears in an Office Excel 2007 spreadsheet. Save the spreadsheet.