
Sometimes you make a simple change to your project schedule, for example, you might increase a duration, change a task dependency, or add a date constraint, and something unexpected happens to the scheduling of the selected task. Sometimes there are several ripple-effect changes throughout the schedule. This can be a source of frustration for project managers, especially those new to Microsoft Project.
It’s important to understand that one of the primary responsibilities of Microsoft Project is to handle all the schedule calculations so you don’t have to. However, as the project manager, it’s also important that Microsoft Project provide you with needed information when such recalculations are made or when you have choices as to how a change is to be interpreted in your schedule.
This is where Microsoft Project feedback information comes in handy. The new change highlighting and Task Drivers pane provide information to help you see exactly what is changing in your schedule and to help you make the decisions appropriate for your project.
Note
For more information about changing your schedule, see Chapter 9.
When you change a duration in a task that is in the middle of a series of linked finish-to-start tasks, for example, that one task’s change in duration is going to affect the start and finish dates for all of its successor tasks.
Likewise, other changes you might make to a task’s schedule—such as a task dependency or a start date constraint—can affect other tasks that are linked with a dependency to this task. To make sure you see the impact of these kinds of changes on the rest of your schedule, by default, the changed cells are temporarily filled with a background color (see Figure 5-25).
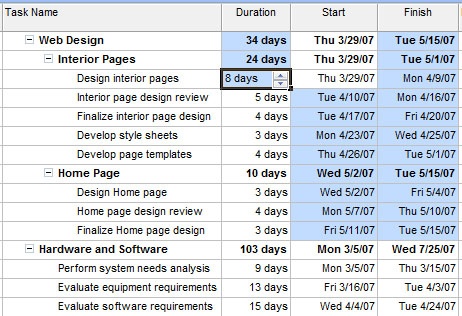
Figure 5-25. See the ripple effects of scheduling changes you make by reviewing the highlighted cells in a task sheet.
New to Microsoft Office Project 2007, this change highlighting only shows in sheet views such as the Gantt Chart, the Task Usage view, or the Resource Sheet. There is no change highlighting for graphically oriented task views such as the Calendar view or Network Diagram.
The change highlighting remains in effect only until you make the next edit that affects scheduling, at which time the highlighting shifts to those cells affected by the new change. The last set of change highlighting is also cleared when you save the project.
By default, change highlighting is light blue in the Gantt Chart or Task Sheet, and light green in the Task Usage view and Tracking Gantt. To change the color of change highlighting, follow these steps:
Display the view whose change highlighting color you want to change.
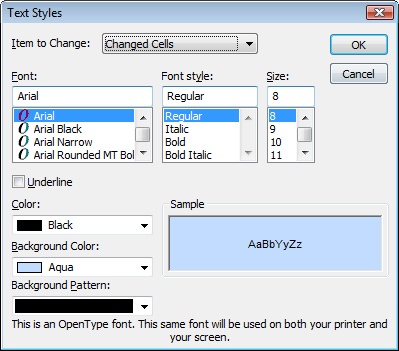
Click Format, Text Styles.
In the Item To Change box, click Changed Cells (see Figure 5-26).
In the Background Color box, select the change highlighting color you want.
If you also want to change the background pattern, in the Background Pattern box, select the pattern you want.
Click OK.
If you don’t want to use change highlighting, you can turn it off by clicking Hide Change Highlighting on the View menu. To turn it back on again, click View, Show Change Highlighting.
When you first create your project schedule, you start by entering a project start date and setting up a project working times calendar. Then as you enter tasks to the project, you add scheduling information about those tasks such as task duration, dependencies, constraints, and task calendars.
Microsoft Project takes all this scheduling information and calculates the schedule of each task to ultimately build the full project schedule, complete with start dates and finish dates. Because you’ve entered this other information, you’re freed up from having to figure out the start dates of each task yourself.
If you’re contemplating a change to a task schedule, particularly if you’re trying to shorten the schedule of a particular task, a group of tasks, or the entire project schedule, it’s tremendously helpful to understand which of these scheduling factors were instrumental in determining the start date of the tasks. You can now see this easily by reviewing the Task Drivers pane.
New in Microsoft Office Project 2007, the Task Drivers pane shows you the specific factors responsible for setting the start date of the selected task (see Figure 5-27).
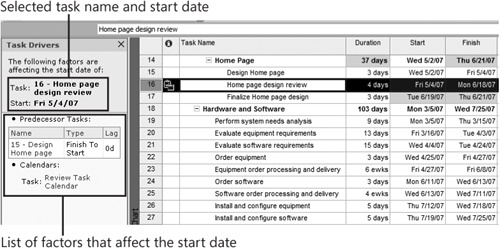
Figure 5-27. Show the Task Drivers pane to see a list of the factors responsible for setting a selected task’s start date.
You can view the task driver for any task in your project. A task might have just a single task driver, or it might have three or four. Examples of common task drivers are:
Project start date
Project calendar
Predecessor tasks
Constraint date
Resource calendar
Task calendar
Actual start date
To show the Task Drivers pane, follow these steps:
Display any task view, such as the Gantt Chart, Task Usage view, or Network Diagram.
Click Project, Task Drivers. Or, click Task Drivers on the Standard toolbar.
The Task Drivers pane appears to the left of the view. The upper portion of the Task Drivers pane lists the name of the selected task and its start date. The lower portion lists the task drivers.
You can click the name of a predecessor task to go to that task in the view and to see the task drivers for that task. You can click the name of a calendar listed in the Task Drivers pane to open that calendar in the Change Working Time dialog box.
Keep the Task Drivers pane open while you click different tasks and review their task drivers. When you’re finished with the Task Drivers pane, click the X in the upper-right corner of the pane to close it.
Seeing Scheduling Feedback on Assigned Tasks
Another source of feedback in Microsoft Project is Microsoft Office Smart Tags technology. Microsoft Project Smart Tags appear only when you edit tasks that have resources assigned. When you make certain kinds of scheduling changes, a green triangle might appear in the corner of the edited cell of a sheet view such as the Gantt Chart or Task Usage view.
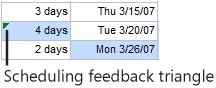
When you move your mouse pointer over the cell containing the feedback indicator, the Smart Tag icon appears.
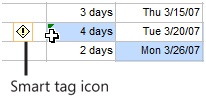
Click the Smart Tag icon. A message explains the scheduling ramifications of your edit. The message usually gives you the opportunity to change the edit so that the result is closer to your expectation.
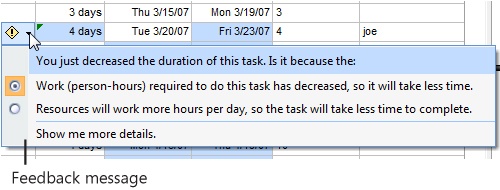
A Smart Tag usually appears after a potentially ambiguous edit and provides choices to ensure that you understand the schedule ramifications of the change you’re making.
Note
For more information about using Smart Tags for scheduling feedback, see the section titled Changing Resource Assignments in Chapter 7.