In previous versions of Microsoft Office Project, if you wanted to compare your planned costs in your project plan against your budget numbers for certain categories, you had to take numbers out of Microsoft Project, categorize them in ways that match your budget categories, calculate them, and then compare them. Much of this was likely done outside of Microsoft Project.
In Project 2007, there is a strategy to set up and enter values for budget categories within your project plan by using the new Budget Cost and Budget Work fields. You can identify which resources belong under which budget category. You can then group the resources by budget category and compare them against your budget amounts.
Although the initial setup is somewhat involved, you only have to do the setup once. After that, you can easily compare cost amounts against your budget amounts anytime you like.
Create budget resources that correspond with the budget line items you want to track and compare in your project. Examples of budget categories that might apply to a project plan include Employees, Vendors, Outside Services, Equipment Purchase, Equipment Rental, Materials Inventory, Travel Expenses, and Fees and Licensing. The majority of your costs will come from your resources: human, equipment, material, and cost resources.
Note
Some costs will come from fixed costs on tasks. This budget process does not factor in fixed costs.
To create budget resources, follow these steps:
Click View, Resource Sheet.
In the next available blank row, enter the name of the budget resource in the Resource Name field.
Be sure to make the name of the budget resource easily distinguishable from the other resources. You might use all caps, for example, EMPLOYEES, if all other resource names are in lowercase letters or initial caps. You might use a budget number as a prefix to the budget resource name, for example, 6220-Vendors. Or, you can use Budget as part of the budget resource name, for example, "Budget-Equipment." This differentiation will become important later when you’re looking at a view that compares the rolled-up numbers in your budget resources next to the numbers for the individual resources.
In the Type field, specify whether the budget resource is for work, material, or cost resources.
For work resources, you will eventually express the target budget by the number of hours worked. For cost resources, you will express the target budget by the cost amount.
If you are creating a material budget resource, specify the unit of measurement in the Material Label field, for example, packages, pounds, or sets.
For material resources, you will eventually express the target budget by the number of units. Because of this, create a different budget resource for each different material resource that you want to track against the budget.
Double-click the name of the new budget resource.
On the General tab of the Resource Information dialog box, select the Budget check box.
Selecting this check box transforms a regular resource into the special budget resource.
Repeat steps 2–6 to create all the budget resources you intend to use with your project.
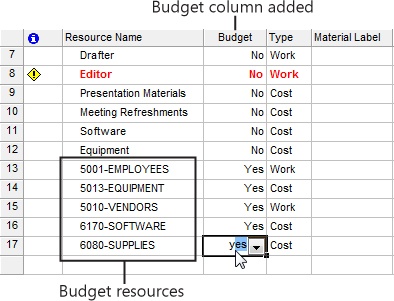
The Budget check box is not available in the Multiple Resource Information dialog box. However, if you have many budget resources, designate them more quickly by inserting the Budget column. To do this, follow these steps:
With the Resource Sheet showing, right-click the column heading to the right of where you want to insert the Budget column and then click Insert Column on the shortcut menu.
In the Field Name box of the Column Definition dialog box, type bu to quickly move to the Budget field.
Click the Budget field and then click OK.
For each of the budget resources, change the No in the Budget field to Yes. You can click in the field, type y, then move to the next field, type y again, and so on, until all the budget resources are so designated (see Figure 8-16).
After you have designated all your budget resources using the Budget column, you can hide the column. Right-click the Budget column heading and then click Hide Column on the shortcut menu.
After you have created your budget resources, assign them all to your project summary task. The project summary task is the only task to which budget resources can be assigned. To assign budget resources to your project summary task, follow these steps:
Switch to the Gantt Chart or other task sheet.
Click Tools, Options and then click the View tab.
Under Outline Options, select the Show Project Summary Task check box and then click OK.
The project summary task now appears at the Task 0 position at the top of the sheet view.
Select the project summary task.
On the Standard toolbar, click the Assign Resources button.
Hold down the Ctrl key and click each of your budget resources. If necessary, scroll down through the list of resources to find them all.
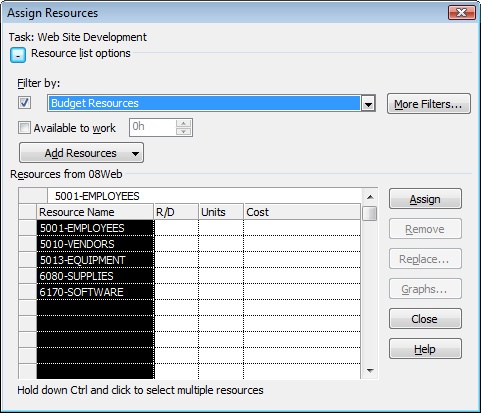
If the list of resources is very long, you can click the + Resource List Options button to show the filter options. Click the check box under Filter By and then in the drop-down list, click Budget Resources. Make sure that all the budget resources are selected (see Figure 8-17).
Click the Assign button and then click the Close button.
Now that the budget resources are all assigned to the project summary task, you can enter the budget work amounts for work and material resources and budget cost amounts for cost resources. These values represent the cost targets against which you will be comparing project work and costs. To do this, follow these steps:
Switch to the Task Usage view or the Resource Usage view.
Right-click the column to the right of where you want to insert the Budget Cost column and then click Insert Column on the shortcut menu.
In the Field Name box of the Column Definition dialog box, type bu to quickly find the field.
Click the Budget Cost field and then click OK.
Repeat steps 2–4 to add the Budget Work field to the view.
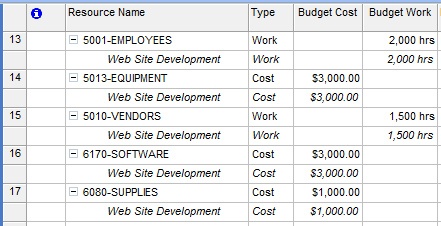
In an assignment row, enter the work or cost value in the Budget Work or Budget Cost field.
For a budget resource designated as a work resource, express the budget value as a work amount, that is, a number of hours, in the Budget Work field.
For a budget resource designated as a material resource, also use the Budget Work field, but express the value according to the material label, for example, tons, board feet, yards, and so on.
For a budget resource designated as a cost resource, express the budget value as a cost amount in the Budget Cost field (see Figure 8-18).
If you need to designate a certain budget within a specific period of time, for example, a month or a quarter, you can do so by adding the Budget Cost and Budget Work fields to the timephased portion of the Task Usage or Resource Usage view. To do this, follow these steps:
In the Task Usage or Resource Usage view, click Format, Detail Styles.
Under Available Fields, scroll down and click Budget Cost. Hold down the Shift or Ctrl key and also click Budget Work.
Both fields are selected.
Click the Show button to add the two selected fields to the Show These Fields box.
Click OK. In the timephased portion of the view, double-click the right edge of the Details column heading to widen the column so you can see the full field names.
On the Standard toolbar, click the Zoom Out or Zoom In button to see the time unit for which you want to enter timephased budget values.
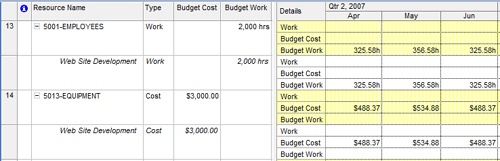
In the assignment row under the budget resource for which you want to enter timephased budget values, enter the work or cost value in the Budget Work or Budget Cost field under the appropriate unit of time (see Figure 8-19).
In this step of the process, you categorize the resources whose costs you want to compare with the budget resource values. You can use an existing text field that isn’t doing anything else, such as the Group or Code field already in the Resource Sheet. Or, you can create a custom text field. Either way, you create your budget categories and then categorize the resources using the text field, including the budget resources themselves.
To create a custom text field for your budget categories, follow these steps:
Switch to the Resource Sheet.
Click Tools, Customize, Fields.
Under Field, be sure that the Resource option is selected.
In the Type box, select Text.
In the Field box, select the custom text field you want to use, for example, Text1 or Text2.
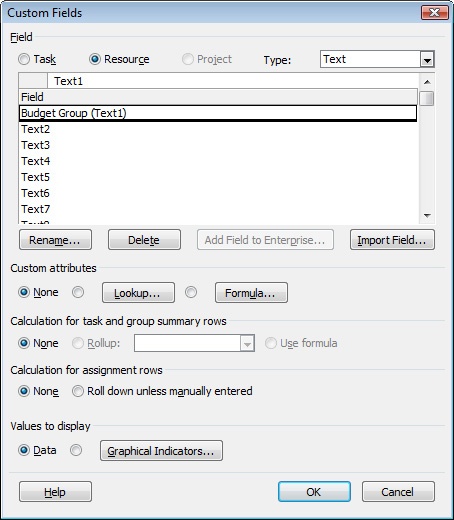
Click the Rename button and type the name you want for this field, for example, Budget Category or Budget Group. Click OK.
The renamed field appears in the Field box (see Figure 8-20).
Under Calculation For Assignment Rows, select the Roll Down Unless Manually Entered option. Click OK.
This option, new in Microsoft Office Project 2007, specifies that the contents of your budget category field should be distributed across assignments in the Task Usage view or Resource Usage view unless you manually enter information in an assignment row.
To add your new text field to the resource sheet, follow these steps:
Right-click the column heading to the right of where you want to insert the text field and then click Insert Column on the shortcut menu.
In the Field Name box of the Column Definition dialog box, type tex or the first two or three letters of the name you gave to the text field to quickly find that field in the list.
Click the field name and then click OK.
The text field appears in the Resource Sheet.
Now go down the list of resources and type a budget category for each resource you want to track against the budget. Be sure to also enter a budget category for the budget resources themselves (see Figure 8-21). The category names can be whatever you choose, for example, Employees, Vendors, or Equipment. Just be sure to use exactly the same names and same spelling for the same category. This will become important when you group the resources by their category names in the next step of the process.
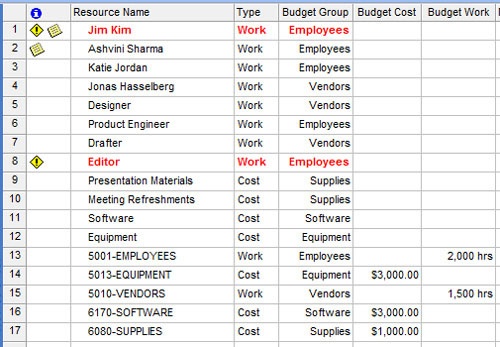
Figure 8-21. Specify the budget category for each resource you want to track against your budget—possibly all your resources.
Create a Lookup Table for Your Budget Types
You can enter your budget categories in a lookup table so that you can pick categories from a list rather than having to enter them for each resource. If you have a long list of resources you need to categorize, this can save you a lot of time. To create a lookup table for the custom text field you already created, follow these steps:
Click Tools, Customize, Fields.
Under Field, be sure that the Resource option is selected.
In the Type box, be sure that Text is selected.
In the Field box, select the custom text field you created previously.
Under Custom Attributes, click the Lookup button.
In the first row of the lookup table, type the first budget category name you want to use and then press Enter.
In the second row, type the second budget category name and press Enter.
Continue entering budget category names in different rows of the Value column, until all your categories are entered.
When finished, click Close. Click OK in the Custom Fields dialog box.
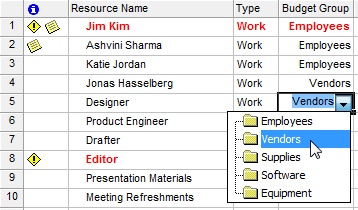
Now you can click in your custom text field, click the arrow that appears, and select a budget category from the list.
Note
For more information about working with custom fields and lookup tables, see the section titled Customizing Fields in Chapter 25.
Note
If you’re not using the Group or Code field on the Resource Sheet for any other purpose, you can use either of those fields to categorize your resources instead of going to the trouble of creating a custom text field. Like a custom text field, you can enter any information in the Group or Code field.
At this point, you’ve completed all the steps necessary for the initial setup of budget resources. Unless you find that you need new budget resources or new resources that you want to track against the budget resources, you’re all set to compare project costs against your budget.
Now you can compare your resource costs against the values you’ve identified for your budget resources and see where you stand. This is useful in the planning stage. This will also be useful later when your project is in the monitoring stage, when tasks are being completed and actual costs are being incurred.
Switch to the Resource Usage view.
If they’re not already showing, add the Budget Work, Budget Cost, Work, and Cost fields to the table (see Figure 8-22). Right-click the column to the right of where you want to insert the column and then click Insert Column on the shortcut menu. In the Field Name box, scroll to and select the field and then click OK.
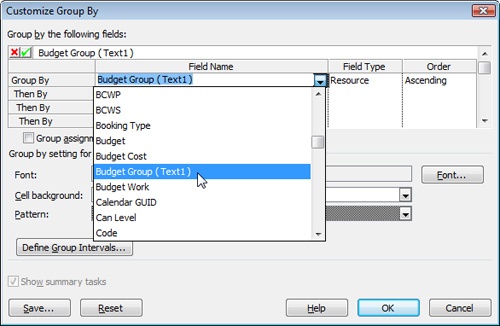
Click Project, Group By, Customize Group By.
In the Group By field under Field Name, select the name of your custom text field (or Code or Group) that you used to categorize your resources (see Figure 8-23).
Click OK.
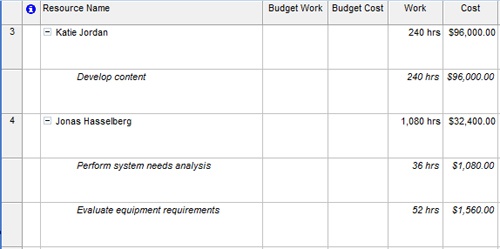
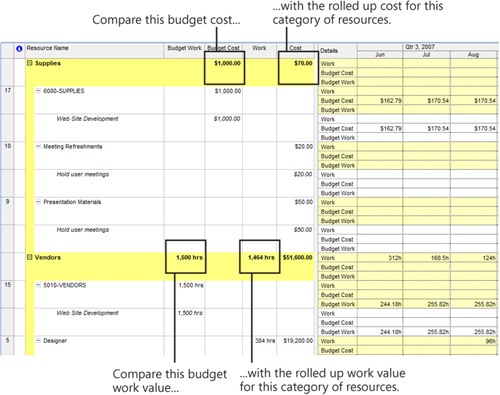
The resources in your project are grouped by the budget categories you assigned (see Figure 8-24). Each grouping includes one budget resource. The figures for the budget resource appear in the Budget Cost and Budget Work fields. The figures for all other resources appear in the Cost and Work fields. The total costs for the resources are rolled up in the grouping bar. Compare those rolled up values against the values for the budget resources to see how the costs in your project are faring against the budget for that category.
Figure 8-24. When you group your resources by their budget categories, you can quickly compare the planned costs and planned work for the resources against the budgeted costs and work as shown by the budget resources.
Note
Your resources initially appear in the order in which they were entered in the project. If you want, click Project, Sort, By Name. It’s easiest to analyze your budget performance if the budget resource appears at the top of each grouping, either because of its name or its ID, which reflects the order in which it was entered.
To ungroup the Resource Usage view, click Project, Group By, No Group. Or, on the Standard toolbar, in the Group By tool, click No Group.