
By now, you’ve completed the planning phase of your project. The scope is set, along with the project goals and objectives. The tasks and deliverables are scheduled. The budget is approved, and you’ve procured the necessary human, equipment, and material resources. Your project plan reflects all these details and has been signed off by upper management or by your customers.
After all this, you’re ready to charge forward with your team and actually start doing the work prescribed by the project. You are now leaving the planning phase and entering the execution phase.
The execution phase consists of four major activities:
Tracking. You track progress on tasks so you know when tasks are actually completed by their assigned resources.
Analyzing. You examine any differences between your original plan and how it’s actually progressing. You monitor the differences in schedule or cost to anticipate any potential problems.
Controlling. You take any necessary corrective actions to keep the project on a steady course toward completion by its deadline and on its budget.
Reporting. You keep stakeholders informed. Whether you’re providing the big picture to your team members or presenting high-level progress information to executives, you regularly report various aspects of project information.
You used Microsoft Office Project 2007 in the planning phase to organize, schedule, and budget your project. Now you can use it in the execution phase to enter progress information, analyze performance, and generate status reports. With a close eye on progress and performance, you can adjust the project plan as necessary to ensure that your scope, schedule, costs, and resources are all balanced the way you need.
To execute your project with Office Project 2007, do two things:
Set baseline information on your project as planned.
Enter progress information as your resources complete their assigned tasks.
With both baseline and progress information in hand, you can use the power of Microsoft Project to execute your project toward a successful outcome.
The project plan, having been adjusted to perfection, is considered your baseline. Think of it as your original plan. It represents the most ideal balance between scope, schedule, and cost.
The project plan, at this point in time, is also your scheduled plan. Think of it as your current plan. This is the only point in the project when the original plan and the current plan are exactly the same.
They’re identical only at this time because the current project plan is fluid. As soon as you enter progress information, such as one task’s actual start date or another task’s percentage complete, your project plan is recalculated and adjusted to reflect the new information from those actuals.
For example, suppose that Task A has a scheduled finish date of May 3. It’s linked with a finish-to-start task dependency to Task B, so Task B’s scheduled start date is also May 3. However, Task A finishes 2 days early on May 1. So after entering the actual finish date of Task A, the scheduled start date of Task B, which has the default ASAP constraint, changes to May 1. The scheduled start dates of any other successor tasks are recalculated as well.
This constant recalculation is essential for you to always know where your project stands in the current reality. But what if you want to know what your original start dates were? What if you want to compare the original baseline plan with the current schedule to analyze your progress and performance?
The answer is to save baseline information. By setting a baseline, you’re basically taking a snapshot of key scheduling and cost information in your project plan at that point in time; that is, before you enter your first actuals and the scheduled plan begins to diverge from the original baseline plan. With fixed baseline information saved, you’ll have a basis for comparing the current or actual project plan against your original baseline plan.
The difference between baseline and current scheduled information is called a variance. Baselines, actuals, and variances are used in a variety of ways, including earned value analyses, to monitor project schedule and cost performance. In fact, you cannot perform earned value analyses at all unless you have first set a baseline.
Saving a baseline is not the same as saving the entire project plan. When you set a baseline, you copy the contents of the following specific fields for all tasks, resources, and assignments into their corresponding baseline fields:
Cost, in the Baseline Cost field
Duration, in the Baseline Duration field
Finish, in the Baseline Finish field
Start, in the Baseline Start field
Work, in the Baseline Work field
These are the fields that will give you a good basis for schedule and budget performance as you execute your project.
New in Microsoft Office Project 2007 are additional baseline fields for specialized purposes, as shown in Table 10-1.
Table 10-1. New Baseline Fields in Project 2007
Then baseline information is copied here... | For more information, see... | |
|---|---|---|
Project budget resources that use the Budget Cost and Budget Work fields | Baseline Budget CostBaseline Budget Work | The section titled Setting Up and Reviewing a Project Budget in Chapter 8 |
Deliverables with linked projects | Baseline Deliverable FinishBaseline Deliverable Start | The section titled Depending on Deliverables in Other Projects in Chapter 22 |
Fixed costs on any tasks | Baseline Fixed CostBaseline Fixed Cost Accrual | The section titled Planning Fixed Task Costs in Chapter 8 |
To save the first set of baseline information for your project plan, follow these steps:
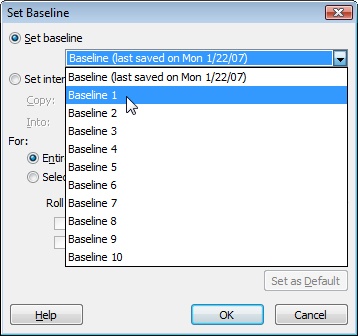
Click Tools, Tracking, Set Baseline.
The Set Baseline dialog box appears (see Figure 10-1).
Make sure that the Set Baseline option is selected.
In the box under the Set Baseline option, make sure that Baseline (not Baseline 1 or Baseline 2) is selected.
Under For, make sure that the Entire Project option is selected.
Click OK.
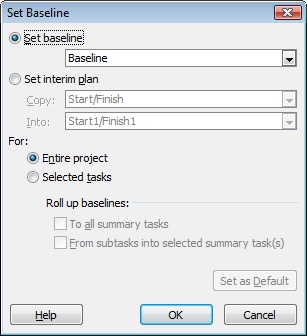
Although nothing appears to happen, as soon as you click OK, all your scheduled fields are copied into their corresponding baseline fields. The value stored in the Cost field is copied into the Baseline Cost field. The value stored in the Work field is copied into the Baseline Work field, and so on.
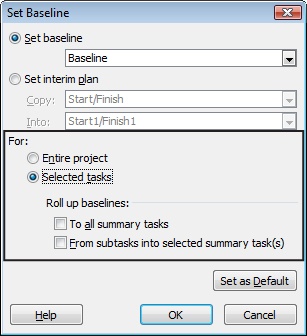
But what if you set a baseline and later add another set of additional tasks? Even after you initially set the baseline, you can still add tasks to it, as follows:
In the Gantt Chart or another task sheet, select the tasks that you want to add to the baseline.
Click Tools, Tracking, Set Baseline to display the Set Baseline dialog box. Make sure that the Set Baseline option is selected.
Under the Set Baseline option, make sure that Baseline is selected.
The Baseline box lists the date you last set the baseline. If you want to add tasks to a different baseline, for example, Baseline 1 or Baseline 2, click that baseline in the list.
Under For, select the Selected Tasks option.
When you select the Selected Tasks option, the Roll Up Baselines check boxes become available (see Figure 10-2). This option ensures that the summarized baseline data shown in summary tasks is accurate and rolled up the way you expect.
Select the check box that reflects how you want the baseline information of the selected task to be rolled up to summary tasks.
By default, after the initial baseline is set, a summary task is not updated when a subtask is modified, added, or deleted.
If you want the selected tasks to be rolled up to all associated summary tasks, select the To All Summary Tasks check box.
If you want the selected tasks to be rolled up only to a selected summary task, select the From Subtasks Into Selected Summary Task(s) check box.
Click OK and then click Yes to confirm that you want to change the existing baseline.
Note
When setting a baseline, click the name of the baseline that has a Last Saved date. Under For, select Entire Project or Selected Tasks to specify whether you want to overwrite the baseline information of the entire project or only of selected tasks. The current schedule information in your project plan overwrites the baseline information in the selected baseline.
After you save baseline information, you can review it in various ways. Initially, baseline information is identical to the scheduled information. As your team starts to complete work on the project, the two might diverge. It is this deviation, and the amount of it, that you’ll be interested in as you monitor and control the project.
The following lists methods of reviewing baseline information:
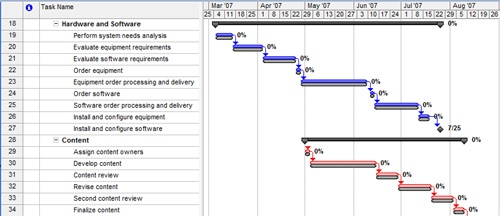
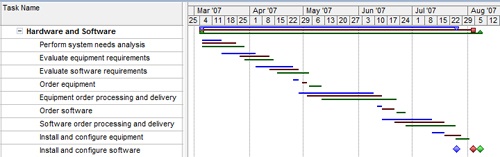
Apply the Tracking Gantt. Click View, Tracking Gantt. The Tracking Gantt shows the baseline Gantt bars underneath the scheduled Gantt bars (see Figure 10-3).
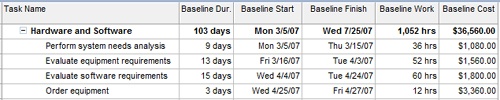
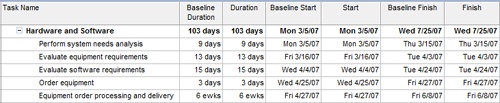
Apply the Baseline table to a task sheet. Click View, Table, More Tables. Click Baseline and then click Apply. This table shows baseline information for duration, start, finish, work, and cost (see Figure 10-4). This table is also useful if you ever need to edit baseline information.
Note
Technically, a baseline field should never be edited. The baseline information is a snapshot of the project plan information at a particular point in time. When you change a baseline field, you’re probably changing a variance or results of an earned value analysis.
If you need different values in baseline fields because of changed circumstances, set a new baseline, for example, Baseline 1 or Baseline 2. You can retain the values in your original baseline and choose which baseline is to be used for earned value analyses.
Add baseline fields to an existing table. You might like to add a baseline field next to the equivalent scheduled field in the Entry table, for example (see Figure 10-5). You can add the Baseline Duration field next to the Duration field and the Baseline Start field next to the Start field. Click Insert, Column. In the Field Name box, click the baseline field you want to add. The names of all baseline fields begin with the word Baseline.
Sometimes, you track your project for a period of time and then a big change occurs. Maybe your company undergoes a major shift in priorities. Maybe an emergency project comes up that takes you and your resources away from this project. Maybe funding was stalled and then started up again. In such cases, your original baseline might not be as useful a tool as it once was. And although you don’t want to replace it entirely, you want to use another more up-to-date baseline for your everyday tracking requirements.
Even if nothing catastrophic happened to your project, you might still have good uses for multiple baselines. In addition to taking that snapshot at the beginning of your execution phase, you might want to take another snapshot at the end of each month or each quarter. This snapshot can show more exact periods of time when you experienced greater variances between baseline and scheduled information.
You can save up to 11 different baselines. If you use earned value analyses, you can select any of 11 saved baselines for the earned value calculations.
To set an additional baseline, do the following:
Click Tools, Tracking, Set Baseline.
Make sure that the Set Baseline option is selected.
In the Set Baseline list, click Baseline 1, for example (see Figure 10-6).
If a baseline has a Last Saved date after it, you already saved information in that baseline. If you select a baseline with a Last Saved date, you’ll overwrite the previous baseline information with current schedule information.
Under For, make sure that the Entire Project option is selected.
To review the contents of additional baseline fields, click Insert, Column in a task sheet. In the Field Name box, click the name of the additional baseline field you want to add to the table, for example, Baseline1 Duration or Baseline5 Start. The column and the contents of the field for each task are displayed in the table.
Using the Multiple Baselines Gantt, you can view Gantt bars reflecting different baselines. Showing stacked and differentiated Gantt bars for all the baselines you’ve set provides you with a visual representation of schedule changes from one set of baseline information to another.
Click View, More Views and then click Multiple Baselines Gantt. Each baseline is represented as a different color Gantt bar (see Figure 10-7).
When you set a baseline, remember that it saves duration, work, and cost information, as well as the start and finish information for each task. Because of this, be aware that each baseline you save significantly increases the size of your project file. Setting the first baseline can nearly double the file size. Setting the second baseline can add another third on top of that.
If you have certain situations in which you don’t need to save the entire baseline, but could just use a quick snapshot of your start and finish fields at a certain point in time, consider saving an interim plan instead. An interim plan is similar to a baseline plan in that it saves task information at a certain point in time for you to use for comparison purposes later. It differs from a baseline in that it saves only the start and finish fields, and therefore doesn’t create such a big hit on your project file size.
You can save up to 10 different sets of start and finish dates with 10 different interim plans. Think of these interim plans as mini-baselines. An interim plan saves the current start and finish dates and stores them in the custom Start1-10 and Finish1-10 fields.
An interim plan is best used as a quick tool for seeing the effects of a series of changes, for example, a set of progress updates or adjustments to bring in the project finish date. Save an interim plan just before making such changes. Make the changes you want, and then set up a Gantt chart view showing the current start and finish Gantt bars with the Start1 and Finish1 Gantt bars so you can easily see the differences your changes made to the task dates.
To set an interim plan, follow these steps:
Click Tools, Tracking, Set Baseline.
Select the Set Interim Plan option.
By default, the Copy box displays Start/ Finish.
This display indicates that the dates in the currently scheduled Start and Finish fields will be saved as this interim plan. You can copy from a different set of Start and Finish fields. In the Copy list, click the set you want.
By default, the Into box displays Start1/ Finish1.
This display specifies where the start and finish dates of this interim plan will be stored. You can copy the Start and Finish fields into a different set of Start and Finish fields. In the Into box, click the set you want.
Under For, click Entire Project or Selected Tasks.
You can copy start and finish dates from other baselines into an interim plan. This process can be useful if you have an old baseline you want to reuse, but you want to retain the start and finish dates. To do this, click the old baseline in the Copy list and then click the set of Start and Finish fields in the Into list.
You can also copy start and finish dates from an interim plan to one of the baselines, which can be useful if you used interim plans as a substitute for baselines in the past. Now that multiple baselines are available, you can take advantage of them by using your interim plan information. To do this, click the interim plan containing the start and finish dates in the Copy list. Then in the Into list, click the baseline to which you want the information to be moved.
Rename the Fields Used in Your Interim Plan
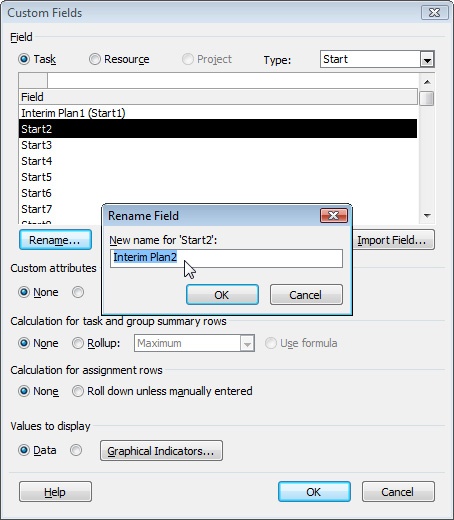
If you set an interim plan using the Start1 and Finish1 fields, for example, remember that you cannot then use the Start1 and Finish1 fields for any other purpose. It’s a good idea to give the fields a name so you don’t forget and create another use for them. To name the custom fields used in an interim plan, follow these steps:
Click Tools, Customize, Fields.
In the Type field, click Finish.
In the Field list, click the custom finish field, for example Finish1 or Finish4, that you are using for your interim plan.
Click the Rename button and then enter a name for the custom finish field, for example, Interim Plan2 (see Figure 10-8).
Click OK in the Rename Field dialog box.
In the Type field, click Start.
Repeat steps 3–5 for the custom start field you are using for your interim plan.
You can clear baseline and interim plan fields, as follows:
Click Tools, Tracking, Clear Baseline.
The Clear Baseline dialog box appears.
Select the Clear Baseline Plan or Clear Interim Plan option.
In the corresponding box, click the name of the sets of fields you want to clear; for example, Baseline 3, or Start5/Finish5.
Select the Entire Project or Selected Tasks option.
Click OK.
The selected fields are cleared.