You can exchange data in Microsoft Office Project 2007 with other applications. This capability can save everyone involved an immense amount of time and effort and can also provide for the flexibility of information so essential in an efficient project.
For example, you might want to provide a set of data from your project plan to a stakeholder who doesn’t have access to Office Project 2007 but does have another compatible application such as Microsoft Office Excel 2007 or Microsoft Office Word 2007.
You might want to send project data to a spreadsheet or database application to manipulate the information in ways that those applications specialize in.
In the same way, you can easily bring information into Microsoft Project from other applications. If someone has a list of tasks or resources along with associated information that you need in your project plan, copying or importing this information can save you from rekeying existing data.
Note
When referring to the exchange of data between applications, we use the terms source and target to mean the originating application and the receiving application, respectively.
There are several techniques for exchanging information between applications. The method you use depends on what you’re trying to accomplish with the information. Table 16-1 provides some basic guidelines.
Table 16-1. Appropriate Methods for Information Exchange
To do this | Use this method |
|---|---|
Copy static text or numbers between Microsoft Project and another application. The information usually appears as if it were created originally in the target application. | Copy |
Copy pictures between Microsoft Project and another application. | Copy Picture |
Add data along with its source application to another program. When you double-click the embedded information, the source application opens and you can work with it there. | Embed |
Create a dynamic connection between the information in the source and target applications. When the information is updated in one, it’s updated in the other as well. | Link |
Reference a document at its source, whether it’s a Web site or file location. Clicking the hyperlink finds and launches the document in its native application. | Hyperlink |
Bring information into Microsoft Project from another application or another file format, making the information appear as if it were created in Microsoft Project to begin with. Similar to copying, but typically used with entire files. | Import |
Convert Microsoft Project information into a file format able to be used by another application, making the information appear as if it were created in that other application to begin with. Similar to copying, but typically used with entire files. | Export |
Convert Microsoft Project information into XML format for use in Web pages or any other application that reads or is based on XML. | Export Microsoft Project data as XML |
It’s important to keep in mind that some methods of exchanging data move the data and then freeze it, so the information transferred cannot be altered after the exchange. Other methods move the data into the other application and allow it to be dynamically manipulated.
Note
Microsoft Project has particularly robust methods for exchanging information with Office Excel 2007, Microsoft Office Outlook 2007, and Microsoft Office Visio 2007.
These methods are covered in their own chapters: Chapter 17; Chapter 18; and Chapter 19.
You can copy textual as well as graphical data between Microsoft Project and other applications. With one method, you simply use the Copy and Paste commands. With another method, you use a wizard.
You can copy field information, such as from a task sheet or resource sheet, to another application, such as Office Word 2007 or Microsoft Office Access 2007. When you need a subset of project information in another application, the best transfer method is usually to simply copy and paste. To copy and paste data from Microsoft Project to another application, follow these steps:
In Microsoft Project, display the view and table that contains the information you want to copy. If necessary, insert other columns of information by clicking Insert, Column.
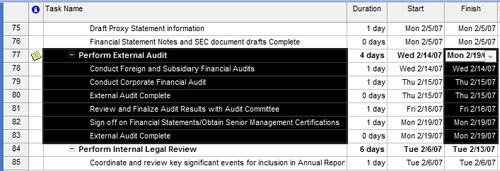
Select the data you want to copy to the other application (see Figure 16-1). You can drag across adjacent items (columns, rows, or fields) or hold Ctrl while clicking multiple nonadjacent items.
On the Standard toolbar, click Copy Cell.
A copy of the selected data is placed on the Clipboard.
Open the application into which you want to paste the project information. Select the area in which you want the data to begin being inserted.
In the target application, click the application’s Paste command.
If you are pasting into a Microsoft Office 2007 application that uses the Ribbon, on the Home tab, in the Clipboard group, click Paste.
Your copied data is inserted at the selection.
If the workspace of the target application is laid out in columns and rows like the Microsoft Project tables, as is the case with spreadsheet applications, the pasted project information flows easily into columns and rows.
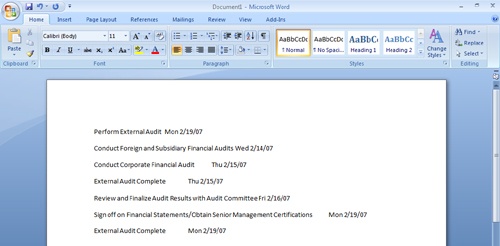
However, if the workspace is open, as in a word processing program, the incoming project information comes in looking like a jumbled mess (see Figure 16-2). The information is tab-delimited, though, so it should be fairly easy to switch to a table format.
In such an application, you need to reformat the text to restore the columns and rows of your project data. To convert column and row information from Microsoft Project to a table in Word, follow these steps:
In Word, select the project data.
Click Table, Convert, Text To Table.
If you are using Microsoft Office Word 2007, on the Insert tab, in the Tables group, click the arrow under Table and then click Convert Text To Table. In the dialog box, specify the number of columns and the separator.
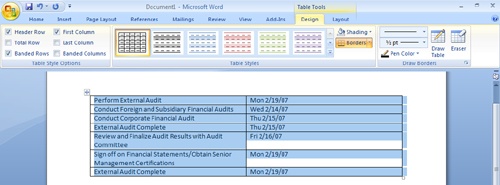
The project information is converted to a table, with the columns and rows separated as they were in Microsoft Project (see Figure 16-3).
You can copy table-based or listed information from another application—for example, Office Access 2007 or Word—and insert it into Microsoft Project. You select and copy the source data, select the cell in Microsoft Project in which you want the data to start being inserted, and then paste the data. This is a good way to get project-related information that was created by others in another application into your Microsoft Project file. For example, suppose that you asked your manufacturing manager to put together a detailed task list of the process that will be used to manufacture your new product. He completes the list, including tasks and resource assignments, using Access.
If you are copying multiple columns or tabs of information, you do need to be mindful of the order in which data is being pasted and inserted into the project table. The type of data you’re pasting must match the field type in which the data is being pasted, or you’ll get a series of error messages. For example, if you copy a column of text next to a column of numbers, in Microsoft Project the columns must be pasted into a text field column that’s next to a number field column. To make sure the fields match, you can either set up the source information in the proper order or you can rearrange columns in a Microsoft Project table.
To copy table or list information from another application into Microsoft Project, follow these steps:
Open the source application and file.
Select the rows or columns you want to copy and then click the application’s Copy command.
If you are copying in a Microsoft Office 2007 application that uses the Ribbon, on the Home tab, in the Clipboard group, click Copy.
Open Microsoft Project and the project plan in which you want to insert the copied information.
Apply the view and table that represent the closest match to the types of information you’ll be pasting.
If you need to add any columns to match the incoming information, click the column to the left of where you want to insert the new field. Click Insert, Column. In the Field Name list, click the name of the field you want and then click OK.
Click the cell in which you want the incoming information to begin to be pasted.
On the Standard toolbar, click Paste.
The copied information is pasted into the columns you’ve prepared.
Pasting data into Microsoft Project overwrites data in the target cells. If this is not your intention, insert the appropriate number of empty rows in the sheet before selecting the Paste command.
Based on the newly inserted information, other project data might be automatically populated and calculated. Review other fields on this and other tables. Make any necessary adjustments to ensure that your project data is accurate.
Note
Any information that can be moved to the Clipboard by using the Copy command can be pasted into Microsoft Project, but not all views accept all types of data. For example, you can paste objects such as pictures only into the chart portion of the Gantt Chart. Nothing can be pasted into the Network Diagram.
Troubleshooting
Data doesn’t paste into the target file correctly
When you use the Copy and Paste commands to exchange data, it’s important to remember that fields and columns of data will stay in the order and format of their source file. Before you paste data from another application into your project file, first set up the columns in the source file in the order of the corresponding columns into which they’ll be pasted in your project file.
Also be careful that data formats, particularly numbers and dates, are the same in the source file as in your project file. If you want to copy and paste data from another application into a project file that has no project field equivalent, insert columns of generic custom fields (for example, Text1 or Number1) to hold the new type of data. These extra columns must match the column order in the source file. This matching of compatible columns is called manual data mapping and must be done before you select the Paste command. If you paste inappropriate data into Microsoft Project fields, a pasting error message alerts you that a mismatch has occurred.
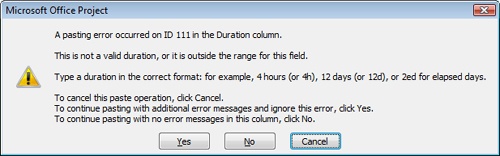
You’ll repeatedly see a separate pasting error for every mismatched field in the paste operation.
For information about copying information from Excel to Microsoft Project, see the section titled Copying Information from Excel in Chapter 17.
Suppose that you’re creating a formal narrative project status report or preparing a presentation for a high-profile project status meeting. You can copy information from a view in Microsoft Project and paste it as a graphic file into a Word document or a Microsoft Office PowerPoint 2007 presentation slide. You can do this either with the Copy Picture function or the Copy Picture To Office Wizard.
With the Copy Picture To Office Wizard, you can configure and copy the information from a view in Microsoft Project and paste that information into a file in Word, Office PowerPoint 2007, or Office Visio 2007.
With this wizard, you can do so much more than simply capture the view as shown on your screen. Instead, you can specify options about the outline levels, the rows to be shown, the timescale, the image size, and even the fields to be included.
To use the Copy Picture To Office Wizard, you must have a 2000 or later version of Word, PowerPoint, or Visio installed on your computer.
To configure and copy a Microsoft Project view to Word, PowerPoint, or Visio, follow these steps:
Click View, Toolbars, Analysis.
On the Analysis toolbar that appears, click Copy Picture To Office Wizard.
Read the first page of the wizard and then click Next.
If you are copying a picture of a task sheet view, the Select An Outline Level page appears. Select the outline level you want to copy in the picture and then click Next.
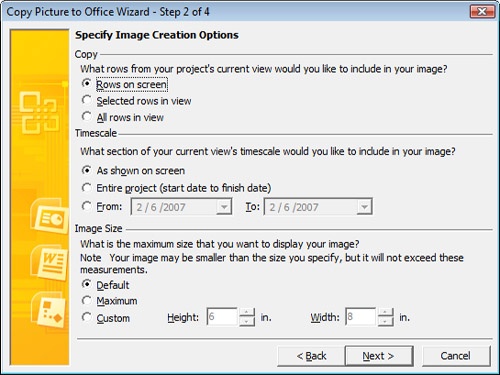
On the Specify Image Creation Options page, select options regarding which rows to copy, the timescale, and the image size to reflect how you want the Microsoft Project view to appear in the Office application (see Figure 16-4).
These options differ depending on the type of view. For example, a Gantt Chart presents different options from the Resource Graph.
Click Next to see the Preview Image And Select Application And Orientation page.
Click the Preview button.
A picture of the view is exported and saved according to the options you selected. A Web browser window appears, showing the generated picture (see Figure 16-5). You might need to click the Web browser button on the task bar to show the window.
Return to Microsoft Project and the wizard. Under Application, select the option next to the name of the Office application to which you want to copy the project picture. If necessary, select whether the picture should be presented in portrait or landscape orientation. Click Next.
The option for any program not installed on your computer is dimmed.
In the Select Microsoft Office Project Fields To Export page, select any additional Microsoft Project fields you want to export along with the picture of the view. The available fields are listed in the Microsoft Office Project Fields box. Click one or more fields (using Shift or Ctrl to select multiple fields) and then click the Add button. Click the Move buttons if necessary to rearrange the positions of selected fields listed in the Fields To Export box. Then click Finish.
The picture of the Microsoft Project view with any selected fields is exported and saved to the selected Microsoft Office application.
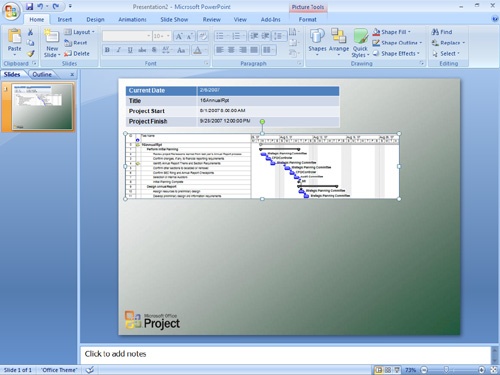
In the final wizard page, click Close.
The selected Microsoft Office application opens and displays the picture (see Figure 16-6). You can now manipulate the picture object as needed in the application.

If you simply want to capture a view and use it in Word, PowerPoint, or Visio without having to go through the wizard steps to configure your options, or if you’re copying to a different application, you can use the Copy Picture function.
With the Copy Picture function, you are taking a snapshot of the current view that you can use in whichever application you choose. This is also a good way to quickly create a simple picture of a view for use on a Web site or in a report. You can still make choices about the image output, the rows to be copied, and the timescale as appropriate to the current view.
To copy and paste a picture of a Microsoft Project view for use in another application, follow these steps:
In your project plan, display the view you want to copy to the other application.
Manipulate the view to show the information the way you want it to appear in the target application.
On the Standard toolbar, click Copy Picture.
You can also click Report, Copy Picture.
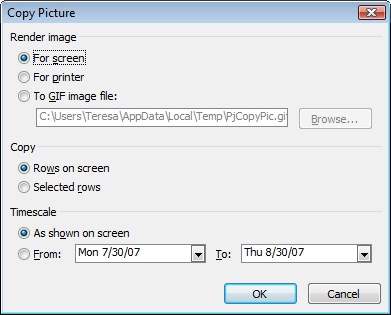
In the Copy Picture dialog box, select the options you want (see Figure 16-7).
In the Render Image section, select whether the image is to be viewed on a computer screen (the default), to be printed, or to be used in a GIF image file.
In the Copy section, select the Rows On Screen option (the default) if you want the rows currently showing on the screen to be copied, or if only selected rows should be copied.
In the Timescale section, select the As Shown On Screen option (the default) if you want the timescale to be represented as set in the current view. Select the From and To boxes if you want to specify the timescale and date range now.
When finished setting the Copy Picture options, click OK.
Open the target application. Click the place on the page where you want to paste the object.
Click Edit, Paste.
If you are pasting into a Microsoft Office 2007 application that uses the Ribbon, on the Home tab, in the Clipboard group, click Paste.
A static picture of the Microsoft Project view as you had set it up is pasted into the target application. If needed, you can resize the image by dragging any of the edges.