
When you begin writing, it is important to prepare to write. To do this, many students are taught mind mapping or brainstorming activities, which help focus thought and bring out what you know about a topic or subject.
What is a mind map? A mind map is a visual way of organizing thoughts and ideas, which help students develop ideas for writing; all of the ideas developed are extended from a core idea or theme. This is usually done with paper and pen; however, there is a third-party module available in Moodle that will allow your students to create theirs in the course and allow it to be visible to other course members.
Another technique used is brainstorming. This is usually done in groups with the object of helping develop ideas for some type of project or assignment. Since we will be looking at collaboration between two or more students, in Moodle, one way to ease this process along is using the Wiki module, which allows multiple users to edit a document.
We will first take a look at mind mapping, then look at brainstorming.
The Mindmap module was developed by Ekpenso.com. It allows you to create mind maps as well as export the maps in several different formats. This module is not part of the core Moodle package so you'll need to download it and add it to your site. To download the Mindmap module go to http://en.ekpenso.com/downloads and follow the installation instructions.
Once the Mindmap module is installed, enter your course and turn editing on. Go to Add an activity, and click on the drop-down menu and the Mindmap module is available for use.
Select the Mindmap and you will be brought to the Mindmap creation page, which is shown in the next screenshot:

As you can see, this is a very simple setup page. All that really needs to be done is to give the Mindmap a name and determine if it is editable or not. If you leave the Editable setting unchecked, students will only be able to view the Mindmap. Leaving it unchecked is useful if you're planning on giving them examples of how a Mindmap should look. However, if you want them to create their own Mindmaps you must check the Editable box.
However, if you do nothing to the Common module settings, there will only be one Mindmap available for all users. You may set up groupings or create multiple mind maps available to individual students. For information on groupings and setting them up, visit: http://docs.moodle.org/en/index.php?title=Groupings&oldid=75013.
Once you have decided on how you want to set up the Mindmap, click on the Save and return to course button.
When you get to your course page, you will see the new mind mapping exercise available. Once you click on the Mindmap link, you will see the following screenshot:
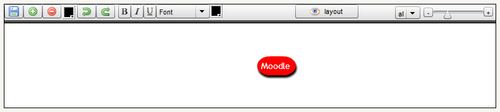
Before any changes are made, the word Moodle will always be shown as a red text bubble in the center of the mind map.
At the top of the box, you will see several commands available. Looking from left-hand side to right-hand side, you can see:
- Save: Clicking on this will save the mind map.
- Add: Clicking on this will add an additional text bubble.
- Subtract: Clicking on this will delete the last text bubble created.
- Palette: Clicking on this will open up the color options for the text bubbles. This uses the hexadecimal format so if the color you want is not visible simply enter the code.
- Undo: Click on this to undo the last action done.
- Redo: Click on this to redo the last step undone.
- Bold, Italics, Underline, Font: These are the formatting options available for text and the mind map.
- Palette: This is the text palette. It functions same way as the one for the bubbles.
- Layout: This button will organize the mind map to make it look as balanced as possible.
- All: This drop-down menu will show the number of levels reaching out from the central point. The options are 1, 2, 3, 4, and All. Clicking on option 1 will only show the first level of ideas. Clicking on option 2 would show the first and second level of ideas, and so on.
- Plus / Minus Slide: This will make the mind map look either larger or smaller depending on which direction we slide the arrow.
We are going to change? Moodle? to? Testing Writing?. To do this we need to click on the red bubble with the word Moodle. This will highlight the text. All we need to do is type? Testing Writing? and the text will be changed.
Now let's say we don't want the bubble to be red, instead we want to change it to something else. We go to the Palette between Subtract and Undo and click on it. We choose the color we want, in this case I have selected #0066ff, a shade of blue.
We do the same thing if we want to change the font or the font color. We are going to change our font to one we like, but leave the font color as it is. Now that we have changed our central theme, the color, and font to what we want it to look like, we can begin to add ideas to our mind map.
Tip
Changing colors and fonts
Having each member working on the Mindmap choose a different color or font to post in is a good way for groups to work together. Requiring each group member to choose a specific color or font, can help to determine who put ideas where. If you're assessing the mind map, it also allows you to see how much effort was put into it by each member of the group.
There are two ways to add ideas to the mind map. The first way is to click on the Add button located between Save and Subtract. Clicking on the Add button will cause a new bubble to appear. A second and faster way to create more text bubbles is to simply click on any white space inside the mind map. This will create a new text bubble exactly where you click on your mouse.
Each new text bubble will appear with an ellipsis (...) already entered. Clicking on the bubble will highlight the ... enabling you to enter text. Once you finish entering your text, you may want to move the bubble somewhere else. Using your mouse you'll be able to drag this new bubble anywhere you'd like on the screen. You will also see a gray line leading from the central idea to each of the sub-ideas included.
For our mind map, we will use Testing as the central idea. From our central idea, we will create four text bubbles, each containing a separate testing area: Testing Writing, Testing reading, Testing Listening, and Testing Speaking. Now, we have four topics in our first level of the mind map. Since we are looking at testing writing, we will add more levels to this subtopic.
To add ideas to the second level we follow the same process, that is, adding the text bubble and entering text into it. Once we've entered the text, we drag the text bubble on top of the topic we want it to be grouped with. For example, we want to include Pre-Writing Activities as a subtopic of Testing Writing. We create a new text bubble, insert Pre-Writing Activities in the text bubble, then drag the bubble on top of Testing Writing. By doing this, we will change the connection origin from the central idea or theme to the topic that it has been dragged over. So now our Pre-Writing Activities text bubble is no longer directly connected to the central idea, Testing, but is now connected to Testing Writing. We will follow this up by including two topics as subcategories of Pre-Writing Activities: Mind Mapping and Brainstorming.
This process can continue as deeply as needed. However, occasionally the ideas added to the mind map will be extensive and you may want to focus on a specific aspect. The Mindmap module allows you to do this by including a plus/minus sign (+/-) next to each topic that has ideas extending from it. By clicking on the minus sign, all the ideas associated with the subtopic will be hidden from view. Clicking on the plus sign will return those ideas to view.
A completed mind map is shown in the next screenshot:
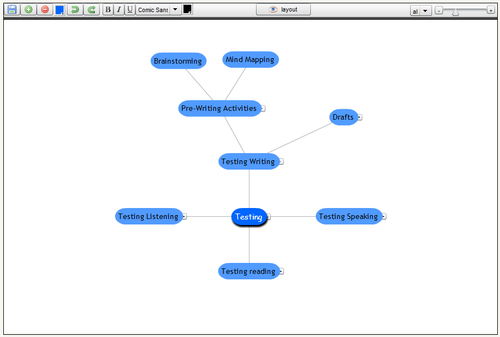
Here, you can see that there are subtopics related to Testing Listening, Testing Speaking, and Testing reading; however, they have been hidden so we are able to better focus on the writing topic.
The Mindmap module is a valuable tool for students in the pre-writing phase. It visually represents ideas and allows sharing between classmates, groups, and the instructor. As an instructor, you will be able to easily see how your students are approaching the topic and what they're likely to include in their writing. Being able to quickly view students' thought patterns may help you to guide them to areas they hadn't previously considered and help them become better writers.