
The first thing we need to do is name the Workshop and give it a description. We will call ours Paragraph Writing Workshop. In the description, we will write a brief summary of what is expected. We are going to test our students on their ability to write a paragraph on a topic of their choosing, with the requirements being that they have a main idea, supporting sentences, and a conclusion.
Now, we need to choose our settings. For our first Workshop, we're going to leave most of the settings at the default. The first settings we are going to change are the Grade for Submission and Grade for Assessments. We want our Workshop to be worth 100 points, with each aspect, the teacher and peer assessment, of the Workshop making up half the grade, 50 percent and 50 percent respectively. The other setting we're going to change is Number of Comments, Assessment Elements, Grade Bands, which we will move from one to three. We are moving it to three because our paragraph has three elements we are going to evaluate: main idea, support, and conclusion. Once we've made that change in the Workshop, we will save it.
The first thing we see after saving the Workshop is Editing Assessment Elements, since we decided to stay with the default Accumulative grading technique. We have three Elements to complete here, and for Element 1 we are going to enter 'Has a main idea.' For Element 2 we are going to enter 'Has supporting sentences.' For Element 3 we are going to enter 'Has a conclusion.' For each Type of Scale menu, we are going to leave it set to the two point Yes or No scale, since we are simply going to be checking whether or not the paragraph has met the requirements set. We are also going to leave the Element Weight set at 1, since we want each Element to be equal. Once we have entered everything and confirmed the spelling, we click on Save changes.
Once the page has been saved, we are taken to the Paragraph Writing Workshop page.
This page has all the information you need regarding the Workshop. It has three sections, which give us all the details about the Workshop. The top section is shown in the next screenshot:
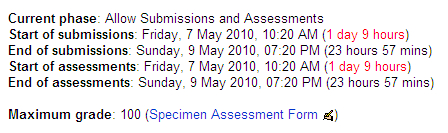
Here, we have the information about the phase the Workshop is in. The phases are Set up Assignment, Allow Submissions, Allow Submissions and Assessments, Allow Assessments, Calculation of Final Grades, and Show Final Grades. The phases let us know where we are in the Workshop. As you can see, we are in the Allow Submissions and Assessments phase. We also see the start and end of submissions and assessments.
The final information contained in this section is the Maximum grade. Here, we see that our maximum grade is 100. This is because we changed the settings from default and the Grade for Assessments and Grade for Submission were both set to 50. Next to the Maximum grade, we see the Specimen Assessment Form link. Clicking on this link will bring us to a sample of the Assessment Sheet we created. This is shown in the next screenshot:
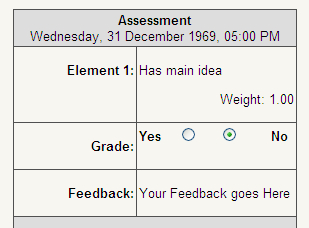
I have only shown the first Element here, and the others follow the same pattern. At the top we see the date and time. Under that, we see the criterion we are assessing in the submitted work. Following this, we see the Grade. We have chosen to use a simple 2 Point Scale, Yes or No, so we are presented with just that. Under this we see an area for comments regarding Element 1.
Underneath all of the Elements of the Assessment sheet, there is a box for general feedback or comments, which is not graded.
At the very bottom of the page, you will see a continue button. Clicking on this will bring you back to the Workshop page.
The final thing to mention here is that next to the Specimen Assessment Form link, there is an Edit icon. This can come in handy if you missed something or want to change something in one of the Elements.
The second section of the Workshop page is shown here:

In the previous screenshot, we see the Show Workshop Description link. Clicking on this link will show the description entered when the Workshop was created. Once review of the Workshop description is done, click on the continue button to return to the Workshop page.
Under this, we see information about submitted assignments. There are five columns, First Name / Surname, Submission Title, Date, Teacher Assessment, and Total Grade. Under this, in the small letters, we see information about how to interpret the grades as well as the total possible points. Each of these columns will display the appropriate information, and we will look at this again once we submit an assignment.
The final section we see on the Workshop page is called Grading Grade Analysis and is shown in the next screenshot:

We can see the Count, Mean, Standard Deviation, Maximum, and Minimum in the previous screenshot. Again, we have not submitted any work or assessed anything yet, so there is nothing here. However, once scores are entered into the Workshop, these numbers will be automatically calculated and updated.
Now, all we need to do is have our students log into Moodle and they will see the Workshop and they will be able to enter and begin using it.
When the students enter the Workshop, they will see a page that looks a bit different than the one we have just looked at. This is shown in the next screenshot:
As you can see, at the top of the page, they see the same thing as the instructor. The student can see the Current phase, which has now moved to the third phase, Allow Submissions and Assessments. It moved to the third Phase because we set the opening for Submissions and Assessments at the same time. We would have seen the second Phase if we had set the Submission and Assessment times to be different.
Students will also see the Workshop submission's and assessment's open and close dates and the Maximum grade possible for the Workshop. They are also able to preview the Assessment Form that will be used. This preview is identical to the one the instructor sees.
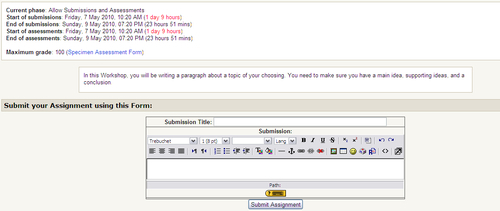
Under this, the students will see the description of the Workshop with the instructions on how they should complete it.
Under the Workshop description, we see the Assignment Submission Form. Here is where the students enter their work. There are three things that are done with this form. First, the student will need to create a title in the Submission Title box.
Tip
Submission Titles
Since Workshop is mostly about peer assessments, you may want to control the way titles are handled. While we can hide the student's name from the peer assessor, the title will always be visible. You may want to have students to use an anonymous system, numbers or some other form of code, so that there is no bias in grading.
The second thing the students will do is enter their work in the Submission rich text editor. If there were any attachments included as part of the assignment, they would be seen directly below the textbox.
When the students have finished with their submission, they click on the Submit Assignment button and the work will be uploaded to a new area called Your Submissions. What a student sees after clicking on the Submit Assignment button is shown in the next screenshot:
This newly created section has four pieces of information for the student to see. The first is the Submission Title. Clicking on the title link will bring the student to a new page where they can view their work.
The second section is the Action link. If the student is not satisfied with their work, they have the option to either edit or delete it. Clicking on the Edit link will bring the student to the submission screen where they can change whatever they would like, including uploading additional files, should this feature be enabled. The Delete link will permanently erase the file, but as a safeguard, Workshop will offer the student one chance to change their mind before completely erasing the file.
The third is the column that shows the date the assignment was submitted. If the assignment is edited, the time of the editing will be reflected in the Submitted column. This can cause a problem for instructors if the deadline for submissions is not set properly. For example, say a student submits the work on time and as they are reviewing the work later in the week, they notice a misspelling, which they edit. The submitted time will be changed to reflect the last edit completed.
The final column is Assessments. This is where the student can see how many times they have been assessed. We have no assessments yet, but we do now have a newly submitted piece of work, so we will switch back to our Teacher profile and look at the changes that have taken place.
The view that we saw before has changed. The view we have now with a student's work included is shown in the next screenshot:

Now that we have a submission, all the assignment information is available. We see the student name, the title of the assignment, and the date it was submitted. Under the heading Teacher Assessment, we now see a link called Assess. This link will bring us to the Assessment Form we saw earlier. We are going to click on this link now and assess the students work.
Once we click on the Assess link, we are brought to a split-screen page, with scrolling options in both areas. The top half of the page has the Assessment Form and the bottom part has the student's name and work. It is shown in the next screenshot:
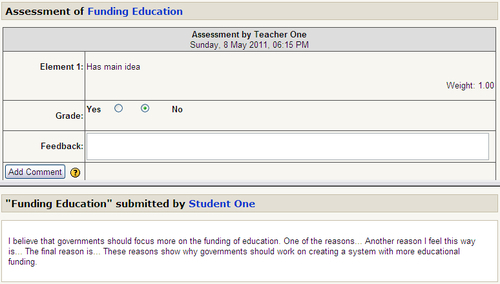
As you can see, at the top we are shown the title of the assignment we are assessing. Under this, we see the Assessment Form with our name, Teacher One, and the date we began the assessment. Under this we see the requirements for the assessment, the grade we will give, and any feedback we want to give. There is also a button called Add Comment.
The Add Comment button allows you to make as many comments as you like during your assessment and save them, so you don't need to retype them each time you want to use them. Once you add a comment, you will see it displayed next to the Add Comment button with a delete mark next to it. The word or phrase itself is a link, and if clicked will add the phrase to the Feedback textbox it is associated with. If you want to get rid of the comment, press the Delete link and it will be erased. So, once you finish with your current assessment and begin the next one, you will see the comment you added there earlier, and you will be able to use it again if you want.
If you decide to use the Add Comment function, and you also want to add feedback in the Feedback textbox, you can. One thing to note is that the comments added via the 'comment bank' will be added to the bottom of whatever was entered in the Feedback textbox. Here is the completed Element 1 with an Add Comment.
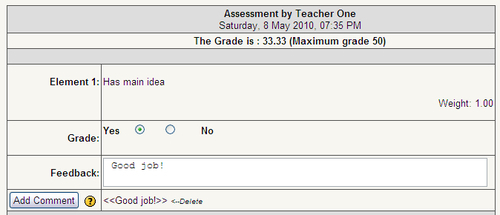
As you can see under the date, we have already graded this assignment. You can see that the student received a 33.33 score. To give our scores, we simply go through each of the Elements and at the bottom of the page, you can see a button called Save My Assessment. Click on this button and you will see the final score you gave and you will be brought back to the Workshop main page.
On this main page you will see that all the information is the same except under the Teacher Assessment column, where you will see the grade you gave. The total grade will still be 0, since only half of the scoring has been completed. Now, we will need to have a student assess their classmate's work.
Now that we have seen how the teacher view looks, let's see how a submitted assignment looks to the reviewer.
The first thing that needs to be done is that the students must go through the Specimen Assessment Form and look over the options available and their assessment task. When finished, they click on the continue button and return to the Workshop page.
Once they have work to assess, the screen will change and they will see something like the next screenshot:
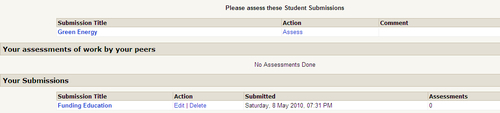
At the top, Student One is being given a list of the work they are supposed to assess. Under this, the student will be able to see their assessments of their classmates. Finally, they see their own submission information.
Student One is now going to click on the Assess link to begin their assessment of the Green Energy submission. They will go through the same process as the instructor, giving a score and any feedback related to the Elements being assessed. When they complete their work, they will click on the Save My Assessment button and they will return to the previous page.
In order to show a complete view, we have created a third student who has submitted a new piece of work. Look at the following screenshot. This shows a student with one piece of work to assess, the student's assessment for a peer, a peer's assessment of the student, and finally, the student's submission, the time and date it was submitted, and how many times it has been assessed. The full view is shown in the next screenshot:
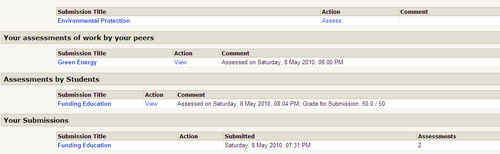
As you can see from the previous screenshot, there is a lot of information on this page, information your students will want access to.
Once the students have begun to make assessments, you might want to see how they are progressing, and if necessary, step in to make adjustments. There is a link at the top left-hand side of the screen called Administration. Clicking on this link will open a new page that will show four sections, two of which are new. At the top you will see the current phase, deadlines, and so on. The second section, and the first of the new sections, is Student Assessments.
Student Assessments shows a box with three columns: Name, Submission Title, and Action. The Name column, as you might expect, lists the names of the students in the Workshop. The second column lists the titles of all the assignments they have assessed for this Workshop. Note the {50 (50)}; here the first number indicates that the student has achieved a score of 50 and the second shows the total possible points, 50. The third column, Action, has a link to a page with the student's Assessment Forms containing the grades, comments, and feedback they gave. This is shown in the next screenshot:

The third section is the Grading Grade Analysis section, which appears as shown in the previous screenshot, except it now has a new link titled Re-grading Student Assessments. This link is not used often, as the calculations are automatic. However, if you were to change any settings or change the weighting of any items, clicking on this button will recalculate all the grades.
The fourth and final section is the second new one. It is called Student Submissions. Here, we have a four-columned box containing: Submitted by, Submission Title, Submitted, and Action. Submitted by and Submission Title are the author's name and the title of the submitted work respectively, with the Submitted column showing the date it was added to the Workshop. The Action column has a few special options. The whole section is shown in the next screenshot:

As you can see, Action has four links: Amend Title, Re-assess, List Assessments (2), and Delete. Delete will erase the student's work completely. The List Assessments link will show all assessments that have been done on the student's work, including the teacher's grading. Re-assess will allow the instructor to change their marks for the Workshop and Amend Title will allow the instructor to change the student's Submission Title to whatever they choose.