Creating a GEDCOM File
When it comes time to share with other researchers, the easiest way to share your information is through a GEDCOM file. This allows researchers to import your work regardless of whether or not they are using Family Tree Maker.
Sharing Your Complete Family File
When sharing with others in your immediate family, you will probably want to share your entire database.


NOTE
NOTE
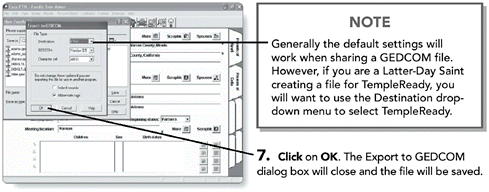
While Family Tree Maker allows you to add digitized images, sounds, and objects, these links are not supported by GEDCOM. If you share a GEDCOM file, the scrapbook images will not be included in the GEDCOM file.

NOTE
TIP
Family Tree Maker automatically names the GEDCOM file with the same name you gave the Family File originally. You can double-click on this name to highlight it and type a new name if you want.
NOTE
NOTE
Pay attention to where Family Tree Maker is saving the file so you can find it later when you want to share it.

Sharing Part of a Family File
Usually when you are sharing with individuals you have met through a genealogical society or on the Internet, you will only want to send them the line that you share in common.
NOTE
TIP
To determine the individual to select, first you need to determine the line you want to share. Find the child of that line in the Index of Individuals.

NOTE
NOTE
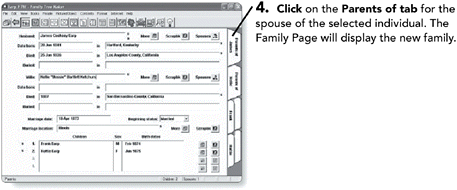
You must remove the spouse from any parents so that you get only the lineage that you want. If you do not unlink the spouse from his or her parents you in effect get the entire database when you create the GEDCOM file.


NOTE
NOTE
For a refresher on how to detach a child, see Chapter 12, “Fixing Relationships and Duplicates.” In this case, you are temporarily detaching the child. You do not want to detach the siblings.

NOTE
TIP
While this example is using the All-in-One Tree to isolate the desired individuals, you also can create a list of individuals using the Custom Report. For detailed information on searching for individuals to include in the Custom Report, see Chapter 22, “Working with the Custom Report.”


Importing a GEDCOM File into an Existing Family File
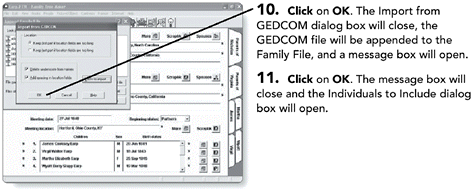
Just as you will share GEDCOM files, you will also receive them. You can import a GEDCOM file directly into your Family File. However, this must be done from the Family Page.
NOTE
TIP
Before beginning this process, it is a good idea to save your Family File as a backup, either by copying it elsewhere on your hard drive or by selecting Backup Family File from the File menu, which is discussed later in this chapter under “Saving a Backup of Your Family File.”

NOTE
NOTE
Before you add someone’s GEDCOM file to your Family File, it is a good idea to first create a new Family File of the data. This allows you to evaluate the data before it gets mixed in your own Family File. Once you have determined its accuracy, you can then follow the steps in this section to add it to your personal Family File. To see how to create a new Family File with a GEDCOM file, see the “Opening a GEDCOM File as a New Family File” section later in this chapter.
NOTE
TIP
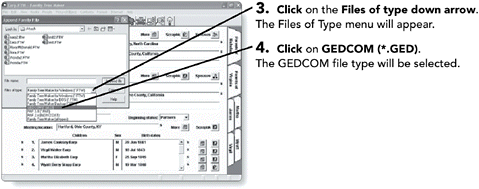
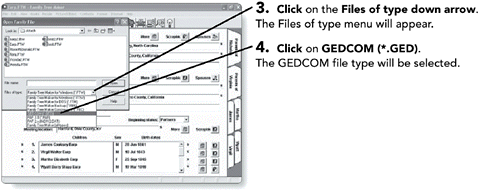
These same steps can be used to append someone else’s Family File or another one you have created. Instead of selecting GEDCOM (*.GED) from the Files of type menu, you would select Family Tree Maker for Windows (*.FTW).


NOTE
NOTE
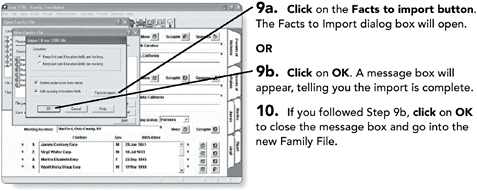
It is a good idea to look and see where Family Tree Maker wants to put some of the facts that will be imported. This is even more important when the GEDCOM file you are importing is coming from someone who is not using Family Tree Maker.


NOTE
TIP
If you need a refresher on how to check the Family File for duplicates, see Chapter 12, “Fixing Relationships and Duplicates.”
Opening a GEDCOM File as a New Family File
In addition to appending a GEDCOM file to an existing Family File, you can also create a new Family File using a GEDCOM file as the source of the data.

NOTE
NOTE
If you have not saved your Family Files in the default Family Tree Maker directory, you might need to use the Look in drop-down menu to select the appropriate folder on your system where the Family File is stored.