
Chase Camera
A good percentage of 3D games use a feature called a chase camera. If you’ve ever played a modern-day Mario Bros. type of game, then you’ve already seen a chase camera in use. A chase camera follows the action of the player of the game. Usually the player is always just a few feet in front of the camera, and wherever the player goes, he remains in sight because the camera follows him around. There’s a good likelihood that you’ll want to incorporate a chase camera into your games, and the good news is that it isn’t all that difficult. Don’t get me wrong, though—it can be made very complicated, as there are all sorts of features and enhancements you can add to the simple chase camera that we are about to create. For now, at least, I’m going to show you a simple way to create a chase camera.
Begin by opening the file called demo13-04.bb. This file contains a cone whose acceleration can be changed by pressing the up and down arrows and can be stopped by pressing the S key. The only problem is that if you press either arrow key for more than a second or two, the cone will zoom off the screen as the camera just stays put. We can create a chase camera with just a few lines of code.
Start off by rotating the camera by 45 degrees along the x axis. Right now, this wouldn’t make much sense to do, but in a moment we are going to raise the camera, so having it rotated 45 degrees will help you see the cone since it will be looking downward toward the cone.
; Create camera
camera=CreateCamera()
RotateEntity camera, 45,0,0
The next thing we are going to do is add the code that will tell Blitz3D to put the camera wherever the cone is and then position it a few units back. Add the following code in bold:
; The following code makes the program run
While Not KeyDown( 1 )
If KeyDown( 208 )=True Then velocity#=velocity#-0.001
If KeyDown( 200 )=True Then velocity#=velocity#+0.001
If KeyDown (31 ) Then velocity#=0
If KeyDown (31 ) Then xvelocity#=0
If KeyDown( 203 )=True Then xvelocity#=xvelocity#-0.001
If KeyDown( 205 )=True Then xvelocity#=xvelocity#+0.001
MoveEntity cone,xvelocity#,0,velocity#
TranslateEntity cone, 0,-0.03,0
PositionEntity camera,EntityX(cone),0,EntityZ(cone)
						MoveEntity camera,0,0,-5
Collisions type_player,type_ground,2,2
Collisions type_ground,type_player,2,2
UpdateWorld
RenderWorld
Flip
Wend
End
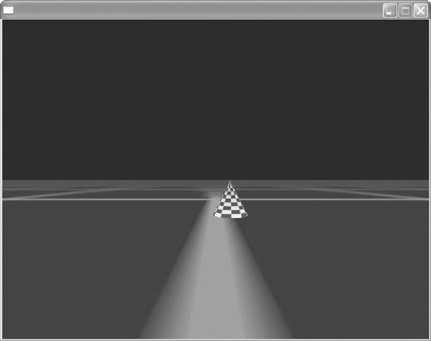
Run the program now, and you should have a chase camera, as shown in Figure 13.5.
Figure 13.5. Chase cameras are very popular in many 3D games. The camera follows the object around the screen.
You’ve done it! You’ve created a chase camera. Let’s take a close look at the code we used to create this wonderful effect:
PositionEntity camera,EntityX(cone),0,EntityZ(cone)—Here we are positioning the camera at the exact same spot of the location of the cone on the x axis and the z axis. The code EntityX(cone) enters the current location of the cone on the x axis, while EntityZ(cone) does the same for the z axis. This means that no matter where the cone is, the camera will be positioned in the exact same location on the x axis and z axis. Since we don’t actually want the camera to be right on top of the cone (we want it to be a few steps back), we enter the next line of code. Note that we left the position of the camera on the y axis at 0. This is because our player doesn’t really jump or move up and down, so there is no need to enter a value for the y axis position. If it did we would have replaced the 0 with EntityY(cone).
MoveEntity camera,0,0,-5—Because we don’t want the camera over our cone (we want it to be a few steps back), we enter this line of code. Basically, we are saying take the current position of the camera (which at this point should be right on top of the cone) and move it back 5 units.
Go ahead and run the program now and watch as the camera follows the action.