
Using Types
The entire chapter has been leading up to types, because they are a very important and useful part of the Blitz3D language. Types are simply a set of related data. That might sound a lot like the definition of an array, but with types, you can have different names for each of the variables, as well as different data types (string, integer, and floating point).
Here is an example. Imagine you have a player ship. The computer needs to know where to put the ship. For this example, we are going to put the ship at the coordinates 100, 100 (if you don’t understand coordinates, they will be explained soon). You could do something like this:
playerx = 100
playery = 100
Seems pretty easy, eh? What if you wanted to add a hit counter? You have to create another variable.
playerhits = 3
That’s three variables. If you wanted to make it possible for the ship to move up and down, you would need two more variables. That’s a total of five variables!
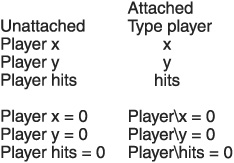
The best way to remedy this problem is to use types. A type can take all of these unorganized variables and attach them to a single type name, like in Figure 3.22. Here is the creation of a ship type:
Figure 3.22. Unattached and attached variables.
Type Ship
       Field x,y ;the ship's location
       Field hits ;ship's hit points
End Type
To create a new type, add the keyword Type before the name of the type. Next, create the individual fields. Each field is a separate variable that is part of the type. Each Field variable can be an integer, a floating point, or a string.
Now you have declared the type, and you have to create a variable that can hold this new data type. The procedure to do this is a little different from defining a variable with one of the built-in types (strings, integers, and floats are the built-in types). To create this new variable, or instance, use the syntax shown on the next page.
player.ship = New ship
Wow, that looks bizarre. Let’s break it down piece by piece. The first thing that you see is the word player to the left of the decimal point. This word refers to the name of the variable you are creating. After the decimal point, you see the word ship. This is the type you want the variable associated with. This variable will now have all of the same fields as the ship type, declared previously. To finish off the process, we provide the proper fields by setting player.ship equal to New ship.
This creates the new player ship. You could create an enemy ship by simply changing the name of player to enemy. Creation of a new type almost always uses this base:
instancename.typename = New typename
Now that we have organized all the loose variables by putting them in a type and creating an instance of the type, we can set the field variables.
playerx = 100
playery = 100
playerhits = 3
Not too bad, huh? To access one of the variables, just use this formula:
instancenamevariablename
Now you can create, define, and access types. Let’s get to an example and see how this baby works. To write this program, I am going to use the function Text, which is declared as
Text x,y,string$,[centerx],[centery]
Refer to Table 3.3 to see what each parameter means. Text allows you to draw text on the screen, just like Print, but it also provides the capability for the programmer to choose the exact coordinate position that will appear.
| Parameter | Description |
|---|---|
| x | The x coordinate of the text |
| y | The y coordinate of the text |
| string$ | The string you want printed |
| [centerx] | Set to true if you want the text horizontally centered |
| [centery] | Set to true if you want the text vertically centered |
This program uses Text to draw the players on the screen and to show their hit points. You will also be able to decrease the player’s hit points and move them around. This is a pretty basic and simple game. Also, the ship will be represented by the characters <-*->. Table 3.4 describes the keys used in this game.
| Key | Function |
|---|---|
| Left arrow | Moves the ship left |
| Right arrow | Moves the ship right |
| Up arrow | Moves the ship up |
| Down arrow | Moves the ship down |
| Spacebar | Decreases the ship’s hit points by one |
| Esc | Exits the game |
;demo03-11.bb - Draw a ship which can be moved and killed

Graphics 400,300

;CONSTANTS
Const STARTHITPOINTS = 3
Const SHIP$ = "<-*->"
Const ESCKEY = 1, SPACEBAR = 57, UPKEY = 200,
    LEFTKEY = 203, DOWNKEY = 208, RIGHTKEY = 205
Const STARTX = 200, STARTY = 150
This is the first part of the program. It begins by setting the graphics mode. Next, it designates which variables are constants. Constants, as you remember, are variables whose values don’t change throughout the game. If you want to make a change to any of these variables, feel free to do so. The difference will be reflected throughout the entire program. It probably isn’t a good idea to change the key constants (such as ESCKEY, SPACEBAR, and so on) because doing so just causes some problems—you will have to search for the correct key.
All of the constants are listed in Table 3.5.
| Constant | Default Value | Description |
|---|---|---|
| STARTHITPOINTS | 3 | The number of times you can decrease the hit points (by pressing spacebar) before the game ends. |
| SHIP$ | “<-*->” | The characters that make up the player. Because there are no images, the player is simply a text string. Change this value to change how the player looks. |
| ESCKEY | 1 | The key code for Esc. |
| SPACEBAR | 57 | The key code for the spacebar. |
| UPKEY | 200 | The key code for the up arrow. |
| LEFTKEY | 203 | The key code for the left arrow. |
| DOWNKEY | 208 | The key code for the down arrow. |
| RIGHTKEY | 205 | The key code for the right arrow. |
| STARTX | 200 | The starting x position for the ship. |
| STARTY | 150 | The starting y position for the ship. |
Okay, let’s keep going.
;TYPES
Type Ship
       Field x,y
       Field hitpoints
       Field shipstring$
End Type
This section defines all of the types used in the program. Here, only one is defined—Ship. The Ship type groups all of the variables necessary to draw the ship on the screen. Table 3.6 lists all of the fields of the Ship type.
| Field | Description |
|---|---|
| x | The x coordinate of the ship. The field is first initialized to the x value given in STARTX. |
| y | The y coordinate of the ship. The field is first initialized to the y value given in STARTY. |
| hitpoints | The number of hit points remaining on the ship. The field is first initialized to the hit point value given in STARTHITPOINTS. |
| shipstring$ | The actual look of the ship. This field is first initialized to the string value SHIP$. |
Next we move to the initialization of the program.
;INITIALIZATION SECTION
Global cont = 1
Global player.ship = New ship
playerx = STARTX
playery = STARTY
playerhitpoints = STARTHITPOINTS
playershipstring = SHIP$
The initialization section defines all of the variables that will be used in the program. It also initializes the fields of the Ship type. The first variable, cont, is used in the game loop as the variable that determines whether the game continues playing. As long as the user wants to continue, cont is equal to 1.
The line
Global player.ship = New ship
creates an instance of the Ship type with the name player. Therefore, any fields that are in the ship type can now be accessed via player. The rest of the initialization section sets up the player type by assigning its fields to their respective constants.
Caution
Be careful to not confuse the "/" operator and the "" operator. A forward slash "" indicates division. A backward slash “” indicates that you are accessing something from a type.
Next, move on to the game loop.
;Game loop
While cont = 1
Cls
Text playerx, playery, playershipstring$
TestInput()
DrawHUD()
Wend
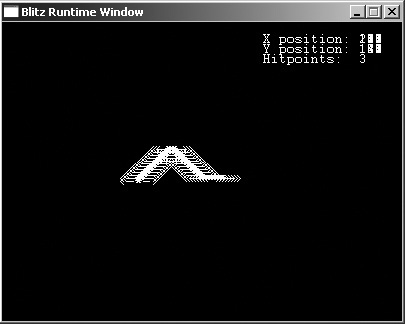
;End of loopThe game loop is short, as it should be. It begins by testing the cont variable. If cont is equal to 1, the game runs; if not, the game exits. After that, the loop clears the screen by calling Cls. Without calling Cls, the screen would exhibit streaks, like in Figure 3.23. After that, the player is drawn to the screen at the given position. The loop then tests the input by calling TestInput() and draws the HUD by calling DrawHUD(). The HUD is the heads-up display, or the area of the screen that explains some values that are being used in the game.
Figure 3.23. The main loop without Cls.
;TestInput() changes the direction or hit points of the player
Function TestInput()
;If player presses left, move him left.
If KeyHit(LEFTKEY)
       playerx = playerx - 3
       If playerx <= 0
              playerx = 10
       EndIf
EndIf

;If player presses right, move him right.
If KeyHit(RIGHTKEY)
       playerx = playerx + 3

       If playerx >= 385
              playerx = 380
       EndIf
EndIf

;If player presses up, move him up.
If KeyHit(UPKEY)

       playery = playery - 3
       If playery <= 0
              playery = 10
       EndIf
EndIf

;If player presses down, move him down.
If KeyHit(DOWNKEY)

       playery = playery + 3
       If playery >= 285
              playery = 280
       EndIf
EndIf

;If player presses spacebar, remove a hit point

If KeyHit(SPACEBAR)

       playerhitpoints = playerhitpoints - 1
       If playerhitpoints <= 0
              cont = 0
       EndIf

EndIf

;If player presses Esc, set cont to 0, and exit the game
If KeyHit(ESCKEY)
       cont = 0
EndIf
The TestInput() function is very long, but also very simple. It simply tests the keys that the user has pressed and updates the variables based on the input. Starting from the top, if the user presses the left arrow, the character moves three pixels to the left. If the user happens to move the character too far (off the screen), the ship’s position is moved back to the right. If the user presses the right arrow, the character moves left a little. The same happens if the user moves the ship too far up or down—the ship is repositioned back on the screen.
If the user presses the spacebar, the hit point counter decreases by one. The program then tests the counter to determine if the player has 0 hit points. If so, cont is set to 0, and the game is exited on the next frame.
The last test determines if the user pressed Esc. If so, cont is set to 0, and the game exits on the next frame.
;DrawHUD() draws user's info in top Right of the screen
Function DrawHUD()
       Text 260, 10, "X position: " + playerx
       Text 260, 20, "Y position: " + playery
       Text 260, 30, "Hitpoints: " + playerhitpoints
End Function
The final function in the program, DrawHUD(), simply writes out the ship’s information to the screen. The x and y coordinate positions and remaining hit points are drawn in the top-right section of the screen.
Note
You might notice a major slowdown on your computer when you run this program. That is because we are running a mini-game without using page flipping. Don’t worry, I will teach you how to fix this problem in Part II of this book.
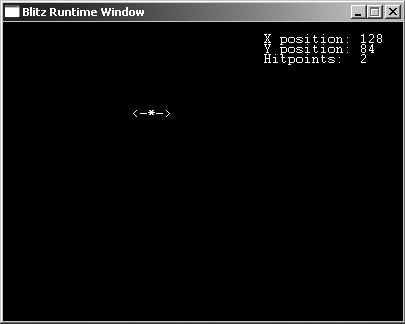
Figure 3.24 shows how the loop works and Figure 3.25 is a screenshot of the actual program.
Figure 3.24. The main game loop.
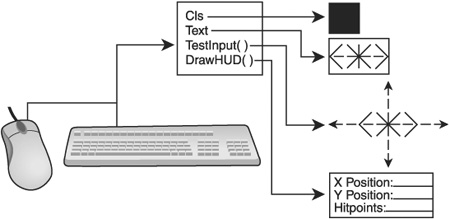
Figure 3.25. The demo03-11.bb program.
Coordinate Systems
I’m going to leave the concept of types for a moment to talk about coordinate points. Coordinates explain where on the screen something is. They are shown in the format of x, y. For example, something that is at coordinate 314, 13 has an x position of 314 and a y position of 13. The coordinate plane looks like Figure 3.26.
Figure 3.26. A coordinate system.
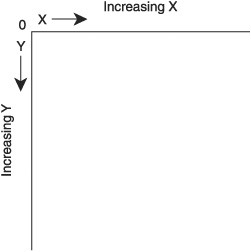
The origin, or 0 value of both the x and y direction, is at the top-left part of the screen. X increases from the origin right, and y increases from the origin down. When you want to get to coordinate position 314, 13, for example, you move from the origin 314 spaces to the right and 13 spaces down.
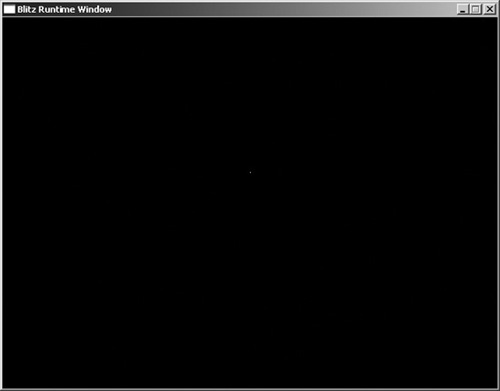
Each position is a single pixel on the screen. A pixel is the smallest measurement of a computer screen. Each pixel is a different color, and the pixels fitted together create an image. To see the size of a single pixel on your machine, run demo03-12.bb (see Figure 3.27). The tiny white dot in the center is a single pixel. Small, huh?
Figure 3.27. A single pixel.
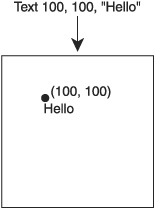
When you want to plot an object to the screen, you plot it to a certain pixel position. Usually the top-left corner of the object is drawn to that pixel position. So, as in Figure 3.28, if you want to write some text to a certain position, the top left of the text is at the selected pixel. If you write with the Text command, you can also center the text.
Figure 3.28. Drawing objects at pixel locations.
For...Each...Next
Types have been specifically designed to work well with loops. In fact, there is a new kind of loop that only works with types. It is called the For...Each...Next loop.
The For...Each...Next loop allows you to create sets of types and perform actions on them as a whole. For example, using a For...Each...Next loop, you could create a set of enemy ships from one call. Using the type
Type ship
    Field x,y
    Field hitpoints
End Type
you now create a bunch of enemy ships—say, 100:
SeedRnd MilliSecs()
For enemycounter = 0 To 99 ;100 new ships
enemy.ship = New ship
enemyx = Rand(1,640)
ememyy = Rand (1,480)
ememyhitpoints = 3
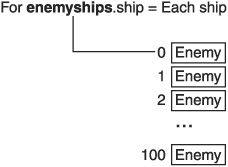
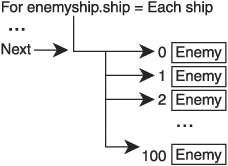
NextWell, we have just created 100 different enemy ships. Now, to test all of the enemies, we need to use the For...Each...Next loop. This loop tests every member of a certain type; this makes it easy to create a bunch of copies of an enemy and get rid of them when you’re done. Refer to Figure 3.29 to see how the For... Each...Next loop looks in memory. This specific loop tests each enemy’s hit points to make sure they are really alive. If not, the program deletes the enemy.
Figure 3.29. The enemyships in memory.
Note
It might seem like we are creating the same enemy over and over again. In actuality, we are creating a whole bunch of enemies with the same name. Using the For...Each...Next loop, you can quickly and easily test and modify every enemy ship.
For enemyships.ship = Each ship
       If hitpoints <= 0
              Delete enemyships
       EndIf
Next
Pretty easy, if I do say so myself! This code snippet tests every one of the ships and deletes them if their hit point counter is equal to or less than 0. To see how the For...Each...Next loop works in memory, check out Figure 3.30.
Figure 3.30. The enemyships loop in memory.
Tip
You might wonder why the program determines if the hit point count is equal to or less than 0. Because the ship is always deleted at 0, why test for less than 0? The reason is, sometimes a tiny error leaks through, and a ship could be assigned a -1 hit point count (this might happen if the ship was hit twice in the same frame). In cases like these, it’s better to be safe than sorry. The moral: always test for unlikely conditions.
You can easily change this loop to interact with the enemy ship’s x and y values. For example, if you add an x or y direction, you can make the enemies move randomly. You might update the type to look something like this:
Type ship
       Field x,y
       Field directionx, directiony
       Field hitpoints
End Type
Next, inside the initialization loop, you randomize the direction values (a positive number for directionx moves the enemy right, and a positive number for directiony moves the enemy down).
enemydirectionx = Rand(-3,3)
enemydirectiony = Rand(-3,3)
And finally, you would add code in the final loop to move the enemy around:
enemyx = enemyx + enemydirectionx
enemyy = enemyy + enemydirectiony
Note
If you put all this code in a program and watch the enemy ships, you might notice that the ships leave streaks behind them. This is because their previous position was not deleted. If you want to fix this problem, simply add the command Cls, clear screen, to the beginning of the game loop.
Congratulations, you have created animation!