
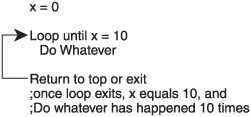
Understanding Loops
A loop is a block of code that is repeated over and over until a condition is met. For example, the main game loop is repeated over and over until the player quits or wins the game. We can use goto, a command that we learned in the previous chapter, as a loop. If you remember the demo02-10.bb program, a set of commands was repeated until the user wanted them to stop. Loops work exactly like this: a set of commands is repeated over, and over, and over, until a condition is met—either the user wants to exit the loop or the loop is executed a specific number of times. Figure 3.1 shows a sketch of a loop.
Figure 3.1. The loop.
Loops are used for many repetitive tasks in computer programs. In a space shooter game, for example, we have to use a loop to check every bullet against the enemy ships. We will also use loops to update the artificial intelligence (AI) for each of the ships.
There are three types of loops, and although they are somewhat interchangeable, each has a specific style and it is best if they are used in the proper situation. The three types of loops are
For... Next
While... Wend
Repeat... Until
For...Next
The For...Next loop steps through a block of code a set number of times. In other words, you use it when you know how many times the loop should iterate. You might use this loop when you want the player to move up exactly 10 spaces. Because you know the number of times you want the player to move up, you might have each iteration of the loop move the player up one space and have the loop go through its commands ten times. This loop also can update the info of a set of types (types are explained later in this chapter).
Note
Before we move on, I want to discuss the concept of iterations. As you know, a loop processes a number of commands over and over again, starting at the top, going to the bottom, and moving back to the top again. An iteration occurs when all of the commands have been processed one full time. When the loop finishes the last statement of the loop, but has not returned to the top of the loop, it has completed one iteration. When it returns to the top, the second iteration begins, and so on.
For...Next loops are always used as follows:
For variable = beginning_number To
ending_number [Step step_amount]
       ;Perform actions
Next
As you can see, a For...Next loop begins with For and ends with Next. The To command defines how many times the loop performs its actions. Step_amount, which is optional, defines how much is added to beginning_number each time. If you omit Step, beginning_number is incremented by 1 each time the loop is traversed.
Let’s examine a code example:
;demo03-01.bb - counts from 1 to 10
;start counter at one and loop till 10
For counter = 1 To 10
     ;Print whatever counter is equal to
     Print counter
Next

;Delay for five seconds
Delay 5000
Figure 3.2 shows the output.
Figure 3.2. The demo03-01.bb program.
This program simply prints the numbers 1 to 10 on the screen. The first line after the entry comment begins the For...Next loop. It declares counter and initializes it to 1. The To command tells the compiler how many iterations the loop will go through. Here, it says it will count from one to ten.
The next line simply prints the value of counter, which adds one to its count every iteration of the loop. The final line of the loop returns the code to the beginning of the loop and raises counter by one.
You can change the step amount of the loop if you want. The step amount is how much is added to the variable on each iteration of the loop. By default, the step amount is 1.
To change the step amount, simply add the command Step after the To command like this:
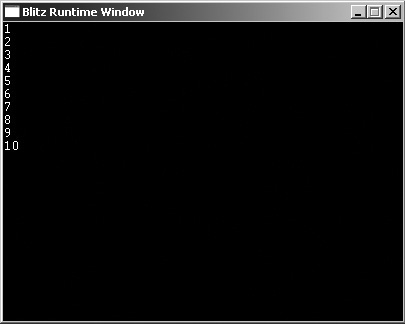
;demo03-02.bb - Counts backwards using step amounts
;start counter at 5 and loop till 0 by -1.2
For counter# = 5.0 To 0.0 Step -1.2
     ;Print value of counter
     Print counter
Next

;Delay for five seconds
Delay 5000
The output is shown in Figure 3.3.
Figure 3.3. The demo03-02.bb program.
Caution
Make sure to double-check your loops to ensure you did not make them never-ending. If this program had been written with the step value as 1.2 (as opposed to -1.2), the program would have looped forever and never ended. Fortunately, Blitz3D normally catches this error and simply skips the loop.
This program might seem a little strange, but I wrote it as such in order to make a few points. First, the counter variable is a floating-point variable (a variable with decimal places). The starting value is 5.0 and the ending value is 0.0. The step value is –1.2.
The step value causes the program to count down instead of counting up. On the first iteration of the loop, the counter variable is 5.0. Then it decreases to 3.8, and so on.
Let’s look at the values for this loop. Table 3.1 explains the values of the counter variable, the step amount, and the output throughout the program. As you can see, the first iteration of the For...Next loop does not decrease the Step amount; instead, the Step amount begins being subtracted beginning with the second iteration.
| Iteration | Counter#/Output | Step |
|---|---|---|
| 1 | 5.0 | -1.2 |
| 2 | 3.8 | -1.2 |
| 3 | 2.6 | -1.2 |
| 4 | 1.4 | -1.2 |
| 5 | 0.2 | -1.2 |
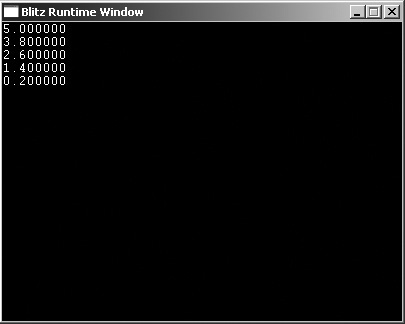
Now is a good time to introduce float trimming. If you look at the output of the demo03-02.bb sample (see Figure 3.3), you will notice that there are six digits after the decimal place. Six digits after the decimal is the default value. Because only one of the digits is significant, why leave the extra five sitting there? Trimming in this context is removing the trailing zeroes from a float value.
In order to trim the trailing zeroes, we have to follow two steps. First, we must convert the floating variable (which has decimal places) into a string. Next, we remove all the unnecessary digits. Then, we are free to display the string.
Let’s try it:
;demo03-03.bb - Counts using step amounts
;loop backwards, from 5.0 to 0.0 by -1.2
For counter# = 5.0 To 0.0 Step -1.2
    ;print out 3 digits of counter, so 5.000000 becomes 5.0 - decimal is a digit
       Print Left$( Str counter, 3)
Next

;Delay for five seconds
Delay 5000
Figure 3.4 shows the output.
Figure 3.4. The demo03-03.bb program.
Note
Notice that this example uses 3 as the length variable. The reason is because the number is converted to a string, and the decimal is part of it. The example keeps the number before the decimal, the decimal, and one number after the decimal.
This program begins the same way as the previous program did: it creates a For-Next loop that begins with 5.0 and decreases by 1.2 until it reaches 0.0. The next line prints the newly trimmed version of counter's value. Let’s examine this statement.
The Print statement writes out each float value with one digit after the decimal place. The first thing it does is call the Left$() function. Left$() is declared as
Left$ (string$, length)
In this case, the string$ variable was
Str counter
The Str function takes an integer or a float and converts it to a string. It then returns the created string. Because the return value is a string, we can use it in place of the string$ variable. The length variable is set to 3 to include the number and only one decimal point. Table 3.2 describes the parameters.
| Parameter | Description |
|---|---|
| string$ | The string you want to trim |
| length | The number of letters you want to include |
While...Wend
The next type of loop is the While...Wend loop. This loop is very much like the For...Next loop, but it is normally used to test variable conditions. In other words, the While...Wend loop is normally used when you aren’t sure when to exit the loop.
While loops are the most common main loops in games. The main loop (also known as the game loop) is a loop that runs over and over until the game is over. Because it cannot be determined exactly when to end a game, the While...Wend loop is a perfect choice.
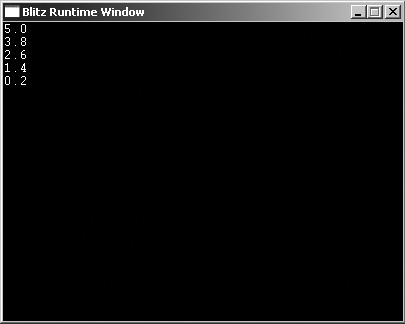
;demo03-04.bb - Waits for a key and then exits
Graphics 640,480
Text 0,0, "This program is worthless."
Text 0,12,"Press escape to exit."
Flip
;Wait until user presses 1 to Escape
While Not KeyDown(1)
Wend
End
Note
You might notice some strange functions in this program, such as Flip and Graphics. To check for KeyDown(), you have to be in graphics mode, and the Graphics command does that. You will learn more about this in Part II; for now, just pretend it isn’t there.
Figure 3.5 shows the output of this program.
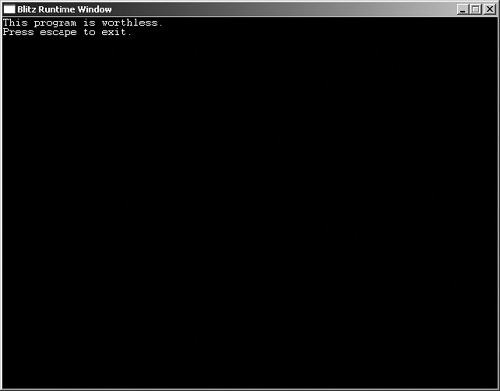
This program simply displays some text and asks you to quit. Almost a waste of time, huh? Well, at least it demonstrates While...Wend and it introduces a new function, KeyDown().
The While...Wend loop begins like this:
While Not KeyDown(1)
This line of code sets up a While loop that exits only when the user presses the Esc key. The loop continues until the user presses the Esc key. KeyDown(), which is declared as
KeyDown(scancode)
and determines whether Esc has been pressed.
Here, the number 1 is used as the scan code. A scan code is a code generated by pressing any key on a keyboard. Each key has its own separate scan code. Esc has the scan code of 1. You can see a list of all of the scan codes in Appendix A.
KeyDown returns 1 (true) if the key has been pressed and 0 (false) if the key has not been pressed. Because we want the While...Wend loop to continue until the key has been pressed, we invert the return value by including NOT. Therefore, if the player does not press Esc, the KeyDown returns 0. The NOT command inverts this to a 1, and the While...Wend loop continues to the next iteration.
Now is a good time to introduce the basic game loop. This loop only ends when the user presses Esc. If the user loses, a function is called that will end the program. Note that this code will not work. It will only call functions that don’t exist (functions are introduced later in this chapter).
;Basic Game loop
While Not KeyDown(1)
      PerformLogic()
      Animation()
      If playerlost Then
         GameOver()
      EndIf
Wend
This game loop is basically the most simplified version possible. Unless the player loses or presses Esc, the loop continues to iterate. The PerformLogic() function probably updates the AI for the game and Animation() probably draws and animates everything onscreen. If the playerlost variable is set to 1 (most likely by the PerformLogic() function), the GameOver() function is called and the game is over.
You should always strive to keep your main loop as simple as possible. It should not perform more operations than necessary. You will learn how to delegate operations to smaller and more efficient functions soon in this chapter.
Repeat...Until
The final Blitz3D loop is the Repeat...Until loop. This loop is almost exactly like the While...Wend loop, except that the condition is written after the closing statement (Until) instead of the opening statement (Repeat).
Doesn’t seem like a big difference, huh? The only time you use this type of loop is when you know for sure that the loop should be executed at least once. This is evident in situations that involve displaying menus and testing for keys.
;demo03-05.bb - Closes program after player presses ESC.
Graphics 640,480
Text 0,0, "Why did you open this program?"
Flip
;y is the variable that judges the location of the text
y=12
Repeat
     ;Print text
     Text 0,y, "Press Esc to exit."
     ;wait a sec
     Delay 1000
     Flip

     ;Move next line of text down
     y=y+12

;repeat until user hits esc
Until KeyHit(1)
Text 0,y, "Program is ending."
Flip
The output is shown in Figure 3.6.
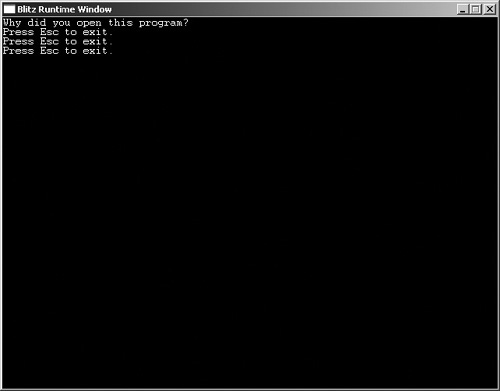
This program simply writes "Press Esc to exit" to the screen until the user presses Esc. It introduces two main functions: Delay and KeyHit().
Delay pauses the program’s execution for a set number of milliseconds. Delay is declared as
Delay milliseconds
where milliseconds is the number of milliseconds you want to delay the program for. This program delays the execution for one second (1000 milliseconds).
The other new function introduced is KeyHit()
KeyHit(scancode)
scancode is the code for the key that might be pressed. This function determines if the key was pressed. If the key was pressed, it returns true; if not, it returns false.
The y variable tracks the location of the Text command. Each time, the y variable is incremented by 12, moving the text down one line.
The reason that the text is moved down 12 pixels is because the font size of the text is size 12. Moving the text down 12 pixels is equivalent to making a new line in the program. The condition for exiting the Repeat...Until loop is the opposite of While...Wend and For...Next loops. Instead of continuing to iterate the loop only as long as the condition is true, the Repeat...Until loop continues only when the condition is false. Take extra precautions to make sure you do not create a never-ending loop.
Note
You might wonder about the difference between the new function KeyHit() and the previously introduced function KeyDown(). The fact is, there is very little difference. KeyDown() determines if the button is down at the time of the test, whereas KeyHit() determines if it has been down since the last KeyHit() was checked. You can see the difference in any game. If you use KeyDown(), you can hold down a key to make it work repeatedly; if you use KeyHit(), you have to press the button every time you use it.
Because the program used Repeat...Until, the "Press Esc to exit" line will always be shown, even if you press Esc before the loop begins. If you ever write a program that utilizes menus (most RPG [Role-Playing Game] games do), you should use a Repeat...Until loop.
Okay, I have now thoroughly discussed each of the loops. I hope that you are now an expert on how, as well as when, to use all three of the types of loops. Now on to an extremely important subject: functions.