Importing Models into Blitz3D
Creating your 3D models is only the first step. They won’t do you any good if you can’t bring them into your programs. That’s what we’ll take care of now by using the LoadMesh function. Once the object is imported, you can apply a texture to it like any other.
Create the following blank program, save it with any name, and make sure that the files missile.3ds and missile.jpg are in the same folder where you saved the program. Or, you can load the final version from the CD. It is titled demo10-01.bb.
We need to actually load our 3D model using the LoadMesh command. We’ll also apply a texture to it, resize it, and position it at the same time by loading the following code, or running the file from the CD.
;demo10-01.bb - Beginning a terrain
; ––––––––––––––––
Graphics3D 640,480
SetBuffer BackBuffer()

Const ESC_KEY = 1

; Create camera
camera=CreateCamera()
; Create a light
light=CreateLight()

;load missile
missile=LoadMesh ("missile.3ds")
tex=LoadTexture ("missile.jpg")
EntityTexture missile,tex
PositionEntity missile, 1,0,5
ScaleEntity missile, .07,.07,.07


; This following code deals with cameras and terrain
While Not KeyDown(ESC_KEY)
    RenderWorld
    Flip
Wend
End
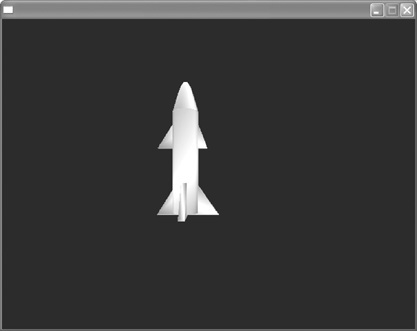
Now run the program, and you should see the missile that you created in 3ds Max, as shown in Figure 10.28.
Figure 10.28. Import your file into Blitz3D using the LoadMesh command.

Let’s break down the code to see how we did it:
missile=LoadMesh ("missile.3ds")—Using this line of code, we loaded up the 3D model. We gave the model the identifier “missile.”
tex=LoadTexture ("missile.jpg")—This is the texture to be applied to the missile after it has been imported.
EntityTexture missile,tex—This applies the texture to the missile.
ScaleEntity missile, 0.07,0.07,0.07—Typically, the models that you import from 3ds Max will be quite large when imported. You can see here that we needed to resize the missile quite a bit in order to see it.
PositionEntity missile, 1,0,5—Here we simply positioned the missile in front of the camera so that we could see it.
