Creating Terrains with Effects
Another option for creating terrains is to use the built-in effects of PHOTO-PAINT. The following two textures are great to use for terrains, walls, or other objects.
Cobblestone
The Cobblestone effect in PHOTO-PAINT is the perfect way to emulate a desert floor. Here’s how you do it.
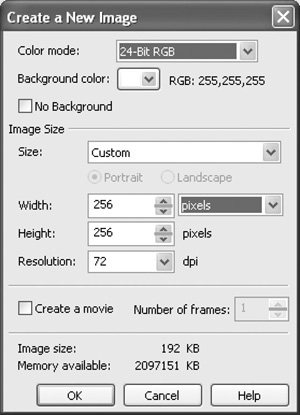
Click the Background color drop-down arrow and select a color for your wall. For the rest of the settings, take a look at Figure 8.25 and make sure that your settings are the same. You want the Color mode to be 24-bit RGB, the Background color should be a light brown, the width and height need to be 256 pixels, and the resolution should be 72 dpi. You’ll probably have to change the units of measurement to pixels to be able to enter these numbers. Click OK once you have all the settings entered.
Figure 8.25. Enter your image settings for color, size, and resolution.
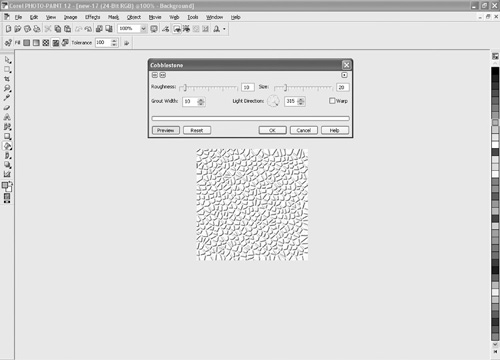
Click Effects > Texture > Cobblestone. This will open a dialog box, and at the same time you’ll be able to preview the effect. You can click and drag the sliders to adjust the cobblestone settings (see Figure 8.26). The larger you slide the Size option, the more realistic the desert floor will look. Once you’ve got the effect the way you like it, click OK.
Now that your desert floor is created, it is a good idea to save it. Generally speaking, you should save it as a .jpg file. In PHOTO-PAINT, click File > Save As to open a dialog box where you can save your file. Click the Save As Type drop-down arrow and scroll until you can select JPG—JPEG Bitmaps. Now give your file a name, and then click the Save button.
Mosaic Tile
From the bottom of pools to bathroom backsplashes to church floors, mosaic tiles are everywhere. You can nicely emulate a real mosaic tile to apply to walls, floors, or ceilings. Open up a new file and follow these steps:
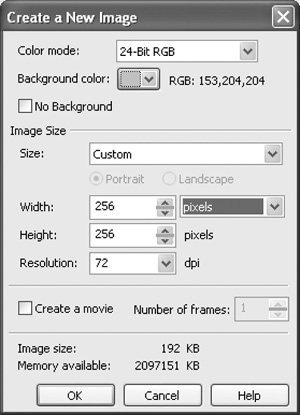
Click the Background color drop-down arrow and select a color for your wall. For the rest of the settings, look at Figure 8.27 and make sure that your settings are the same. You want the Color mode to be 24-bit RGB, the Background color should be a light brown, the width and height need to be 256 pixels, and the resolution should be 72 dpi. You’ll probably have to change the units of measurement to pixels to be able to enter these numbers. Click OK once you have all the settings entered.
Figure 8.27. Enter your image settings for color, size, and resolution.
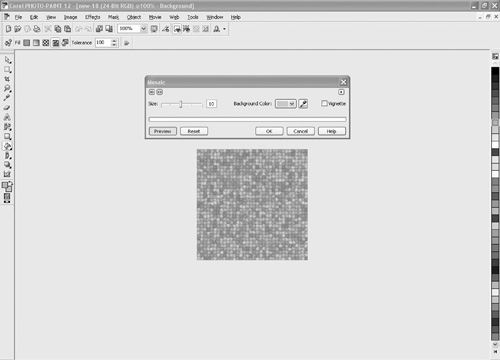
Click Effects > Creative > Mosaic. This will open a dialog box (see Figure 8.28) and at the same time you’ll be able to preview the effect. You can click and drag the slider to adjust the size of the tiles. Once you’ve got the effect the way you like it, click OK.
Now that your mosaic tile is created, it is a good idea to save it. Generally speaking, you should save it as a .jpg file. In PHOTO-PAINT, click File > Save As to open a dialog box where you can save your file. Click the Save As Type drop-down arrow and scroll until you can select JPG—JPEG Bitmaps. Now give your file a name, and then click the Save button.
Note: Now You Try
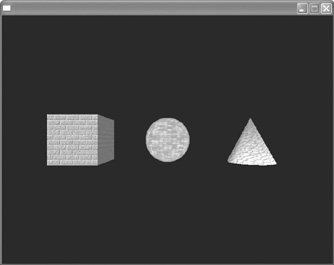
In this chapter you’ve created a variety of different textures. Take what you learned in the last chapter and apply some of the textures you created in this chapter to some basic shapes, as shown in Figure 8.29.
Figure 8.29. Create these shapes and apply a texture to them as shown here.