Setting Font Size and Appearance
As you can see by the previous examples, the appearance of the text didn’t look too spectacular. It was plain white, was relatively small, and used a standard font. You can change all that by loading fonts, specifying their attributes, and then applying those fonts and attributes to your string of text.
In Blitz3D, you use the LoadFont command to bring fonts into the program and specify their attributes. You can create different font variables so that applying different styles to your text becomes quite easy. Once your fonts are loaded, you can use the SetFont command to apply your font to a specific line of text.
Let’s look at a typical line of code used to load a font:
FntArial14U=LoadFont("Arial",14,False,False,True)This code may look a little long and involved, but it’s actually pretty straightforward. There are seven parts to the LoadFont command:
Identifier = LoadFont (fontname$[,height][,bold][,italic][,underlined])
Let’s break down the code used as an example to see how it works:
FntArial14U =—This is the identifier, or name, that we’ve given to the font we’re loading. It’s a good idea to give it a descriptive name that you’ll understand. Typically, the identifier for a font should start with Fnt so that you can quickly recognize what it is. In this case I called the font FntArial14U, which to me indicates that the font is Arial, its size is 14, and it is underlined. Keep in mind that the identifier can be any name you choose.
LoadFont—This is the command that will initiate the font loading. Everything after this command will be within parentheses.
("Arial",—This is the font you are loading. You have to put the font name in quotation marks.
14,—This is the size of the font you are creating. The default size for fonts is 12.
False,—The first of three True or False parameters. This parameter controls whether or not the font is bold. True indicates that the font will be bold, while False will not be bold.
False,—This parameter controls whether or not the font is italicized. True indicates that the font will be in italics, while False will not be italicized.
True)—This parameter controls whether or not the font is underlined. True indicates that the font will be underlined, while False will not be underlined.
Note: Now You Try
Test your understanding of loading fonts. Take a look at the following code and try to determine how the font will appear:
F=LoadFont("Times",28,True,True,False)If you guessed that it would be Times, size 28, bold, italic, and not underlined, then you’d be right!
It’s a good idea to use only one or two different fonts in your games to avoid distracting players from your game. It’s also a good idea to load all of your fonts in various configurations all at once so that accessing them is easy. For example, if you are going to be creating some text in the font Times, you probably should load a few different sizes and some different configurations of attributes all at once so that you don’t have to create them as you go along while programming your game. Here’s a typical example of how you would create several different “flavors” of the same font so that you would have a library to choose from while programming:
fntTunga14=LoadFont("Tunga",14,False,False,False)
fntTunga 14B=LoadFont("Tunga",14,True,False,False)
fntTunga14I=LoadFont("Tunga",14,False,True,False)
fntTunga14U=LoadFont("Tunga",14,False,False,True)
Above I’ve created four different versions of the font Tunga. The first is simply size 14, the second is size 14 and bold, the third is size 14 and italicized, and the last one is size 14 and underlined. You can create any combination of fonts that you want; just keep in mind that every font you load takes up space in memory.
Note: Font Defaults
By default, fonts are set to size 12 with bold, italics, and underline set to False. This means that you do not need to include them as part of your code if you are accepting the defaults. For example, if we wanted to load the font Tunga at size 12, with no bold, italics, or underline, then rather than having to enter fntTunga12=LoadFont("Tunga",12,False,False,False), we would only have to enter fntTunga12=LoadFont("Tunga") because all the other defaults are accepted.
Now that you know how to load a font, it’s time to learn how to actually apply the font. You do this by using the SetFont command right before the line of text you are applying. For example, let’s say you’ve loaded a font as follows:
FntArial14BI=LoadFont("Arial",14,True,True,False)You would then apply this font using the following code right before your line of text.
SetFont Fntarial14BI
All the text that is created after the font is set will take on those attributes (in this case, Arial, size 14, bold, and italicized) until either a new font is set or the font is turned off.
Let’s practice applying a font. Create a new program with the following code:
; Changing Fonts
;_______________
Graphics3D 640,480
SetBuffer BackBuffer()
; Create camera
camera=CreateCamera()
;Create light
light=CreateLight()
;The following code makes the program run
While Not KeyDown( 1 )
RenderWorld
Text 300,20, "This is Arial 24", True
Text 300,120, "This is Arial 24 Bold", True
Text 300,220, "This is Arial 24 Italics",True
Text 300,320, "This is Arial 24 Underlined", True
Text 300,420, "This is Arial 24 Bold, Italics and Underlined", True
Flip
Wend
End
Now enter the following code in bold to load the fonts and then apply them:
; Changing Fonts
;_______________
Graphics3D 640,480
SetBuffer BackBuffer()
; Create camera
camera=CreateCamera()
;Create light
light=CreateLight()
; Loading the fonts
fntArial=LoadFont("Arial",24)
fntArialB=LoadFont("Arial",24,True)
fntArialI=LoadFont("Arial",24,False,True,False)
fntArialU=LoadFont("Arial",24,False,False,True)
fntArialBIU=LoadFont("Arial",24,True,True,True)
;The following code makes the program run
While Not KeyDown(1)
RenderWorld
SetFont fntArial
Text 300,20, "This is Arial 24", True
SetFont fntArialBText 300,120, "This is Arial 24 Bold", True
SetFont fntArialI
Text 300,220, "This is Arial 24 Italics",True
SetFont fntArialU
Text 300,320, "This is Arial 24 Underlined", True
SetFont fntArialBIU
Text 300,420, "This is Arial 24 Bold, Italics and Underlined", True
Flip
Wend
End
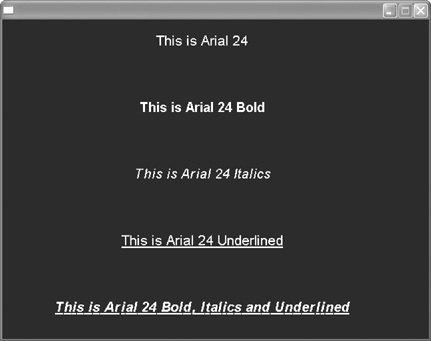
Take a look at Figure 13.13, which shows how the program should look when you run it now.
Figure 13.13. When you run the program now, you should see the different fonts applied.

Note: Font Color
You can change the color of your font by using the Color command before entering the Text line. To apply the Color command, you simply type Color followed by the red, green, and blue values of the color you want to apply. For example, if you wanted to create some red text, you’d enter the code as follows:
Color 255,0,0
Text 200,300, "This text will be red because it is preceded by the Color command"