Understanding Arrays
One large problem in programming is the creation of a large number of variables. Think about how long it would take to create 10 variables of the same type right now. It might look something like this:
variable 0 = 314
variable 1 = 314
variable 2 = 314
variable 3 = 314
variable 4 = 314
variable 5 = 314
variable 6 = 314
variable 7 = 314
variable 8 = 314
variable 9 = 314
Seems like a waste of time, huh? But imagine if you had to create a thousand variables. That might take forever!
As you might have guessed, Blitz3D has a way to remedy this problem. The solution is to use a feature called an array. Arrays are basically sets of variables with almost the same name. An array looks like any other variable, except it appends a subscript (a number within parentheses) to the end of the variable name.
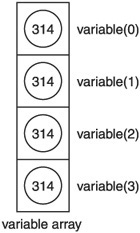
Imagine an array as a single-column box that contains separate places to place jars (see Figure 3.11). Each jar contains a number. In this case, each jar contains the number 314, but you can change these numbers. You can access the number through the array counter, which looks like variable(0) or variable(1). Basically, each jar is independent of the other jars, but they are all packaged in the same box. In arrays, the box represents the array, the jars are the individual array variables, and the numbers are the variable data.
Figure 3.11. Box to array comparison.
Any variable that is part of an array is written something like this:
variablename(subscript#)
Here, the name of the array is variablename and the subscript# (it is always an integer, never a string) is equal to the number of array variables you want to generate.
Now we actually have to create the array. Let’s use the variables from the previous example.
Dim variable(10) ;Declare array

variable(0) = 314
variable(1) = 314
variable(2) = 314
variable(3) = 314
variable(4) = 314
variable(5) = 314
variable(6) = 314
variable(7) = 314
variable(8) = 314
variable(9) = 314
Doesn’t seem any simpler, does it? That’s because I created the array in the longer way. However, using a For...Next loop, we can condense this into a much shorter procedure.
Note
You might be wondering what the Dim command means. Dim literally means “dimension,” and it simply creates memory space that will be used later. You must use the Dim command to declare arrays before using them.
;demo03-08.bb - initializes 10 vars to 314
Dim variable(10) ;Declare array

For i=0 To 10
       variable(i) = 314
       Print variable(i)
Next
WaitKey
The output is shown in Figure 3.12.
Figure 3.12. The demo03-08.bb program.
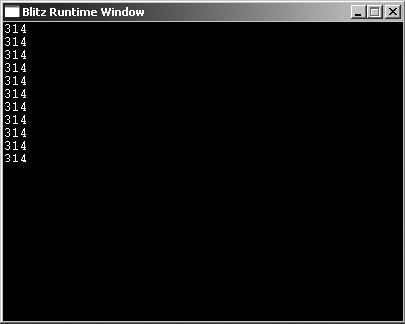
This does the same thing and more (it prints out the variable as well), but it is a heck of a lot shorter! This time, the array is declared just as in the previous example. Next, a For...Next loop iterates through each variable and sets it equal to 314! Easy, huh?
Note
Make sure you notice that all of the variables begin with 0. Computers count differently from humans because they start counting with 0 rather than 1. In other words, the 10th variable in declaration of array(10) is array(9). In other words, when you declare an array, you are telling the computer how many elements the array should have, plus one. However, because computers always count from 0, you access the array elements beginning with 0 and ending with n, where n is equal to the size of the array. For example, if you take an array declared as array(5), the array would contain the elements array(0), array(1), array(2), array(3), array(4), and array(5). So an array that had five elements would be accessed with the numbers; 0, 1, 2, 3, 4, and 5—no more, no less. I often use less than the maximum amount of units, however, so I use 0—4 on an array(5) declaration.
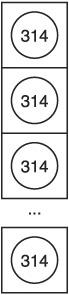
To see how the box and jar example fits in with this program, see Figure 3.13.
Figure 3.13. Demo03-08.bb box and jar example.
All right, how about one more example of functions? This program will set a series of variables to an increasing number. From there, the user can choose to add, subtract, multiply, or divide two of the numbers. It’s sort of like a mini calculator.
;demo03-09.bb - Allows user to perform math operations of 1-100

;op1 and op2 are global so they can be accessed from all functions
;op1 contains first operand, op2 contains second
Global op1
Global op2
Dim array(100) ;0 - 100
InitializeArray()

;continue is 1 as long as program is running
continue = 1

While continue ;as long as the computer wants to play
       ;Get the first operand
       op1 = Input("What is the first number?")
       ;Get the second operand
       op2 = Input("And the second?")

       ; what does the user want to do?
       operator$ = Input("Enter +, -, *, or / ")
       ;Print the answer
       PrintAnswer(operator$)
       ;Find out if user wants to continue
       continue = Input("Enter 1 to continue or 0 to quit ")

       ;Insert a new line
       Print ""
Wend
End
This ends the initialization and the main loop sections of the calculator program. The program begins by creating two global variables: op1 and op2. These are the two numbers that will be added together. For example, in the expression 3 + 14, 3 represents op1 and 14 represents op2.
Next, it creates the array. The array has 101 elements, and therefore, it goes from array(0) to array(100) (remember that arrays begin counting from 0). After the array declaration, InitializeArray() is called.
The continue variable is then created. This variable determines whether the program is still running. As long as continue is not equal to 0, the game loop continues to run.
The main loop begins next. First, it receives the variables op1 and op2 from the user. After that, it asks for operator. operator gives the users a choice of what operation they want to perform (addition, subtraction, multiplication, or division).
The loop then calls PrintAnswer() to print the answer. Finally, the loop asks the users if they would like to go through the program again. If the user chooses yes, continue remains as 1 and the game loop starts from the top. If not, the program exits.
This program has two user-defined functions: PrintAnswer() and InitializeArray(). Let’s take a look at each of them.
;This Function sets up the array
Function InitializeArray()
For i=0 To 100
       array(i) = i
Next
End Function
This function simply creates the array that is used in the following calculations. Each array element contains its respective number. Therefore, the 14th element (array(13)) is equal to 13. After the numbers 0 through 100 have been initialized, they are all sent back to the main loop to go through the rest of the input.
The next user-defined function is PrintAnswer().
;This function prints the answer to the expression
Function PrintAnswer(operator$)
Print op1 + " " + operator$ + " " + op2 +
     " is equal to " + FindAnswer(operator$)
End Function
This function simply writes out what the user wants to do. If the user wants to add 13 and 31, this function writes out "13 +31 is equal to 44." You might be wondering how it gets the answer. That is accomplished by the final user-defined function: FindAnswer().
;This function performs the math based on the user input
Function FindAnswer(operator$)
       Select operator
              Case "+"
                    Return array(op1) + array(op2)
              Case "-"
                    Return array(op1) - array(op2)
              Case "*"
                    Return array(op1) * array(op2)
              Case "/"
                    Return array(op1) / array(op2)

       End Select
End Function
Note that if op1 or op2 is larger than 100 or less than 0, the program will not function.
The output is shown in Figure 3.14.
Figure 3.14. The demo03-09.bb calculator program.

By the way, one thing about this program. The program will crash if op2 is set to 0 and operator$ is division. This is because it is impossible to divide any number by 0. As you can see, this function begins with a Select statement. The Select command chooses an action based on which operator is being used. If the user chooses to multiply something, the function returns op1 times op2. The return value is then printed to the screen in the PrintAnswer() function.
Note
If you happen to try dividing two numbers that aren’t evenly divisible, you will get the correct number, but the decimal place will be missing. That is because this program uses integers. Try modifying this program so it uses floating-point variables instead.
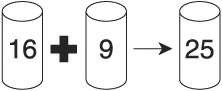
Figure 3.15 and 3.16 portray the array as a box and demonstrate how two numbers are added.
Figure 3.15. The array box.
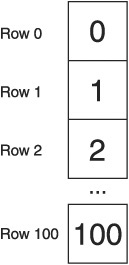
Figure 3.16. Adding two jars.
Multi-Dimensional Arrays
Multi-dimensional arrays are very similar to regular arrays, except that, well, they have more than one dimension. In essence, the main difference is that a multidimensional array has more than one subscript. An easy way to visualize a multidimensional array is to use the box example again. However, instead of only having one column, it has two or more, as shown in Figure 3.17.
Figure 3.17. Single and multi-dimensional arrays.
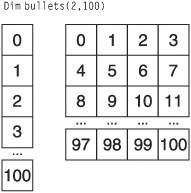
Multi-dimensional arrays are used in situations in which you need sets of variables within the array set. For example, you might create an array of bullets. You could then create an array with two dimensions and place the bullets shot by the player in one dimension and the bullets shot by the enemy in the other. This is demonstrated in Figure 3.18.
Figure 3.18. The two-dimensional bullet array.
Okay, let’s make a multi-dimensional array. This process is very similar to making a single-dimensional array; you only have to add another subscript into the declaration.
Dim bullets(2,100)
This command creates an array of bullets with two parts. The first part determines who shot the bullet and the second part determines which bullet it was. Each column contains 100 bullets.
Now, to actually use the array, you only have to add the second subscript to the variable call like this:
bullets(0,23)
This command calls the 24th bullet from the player. Remember, because the computer begins counting at 0, the subscript 23 is the 24th element of the array.
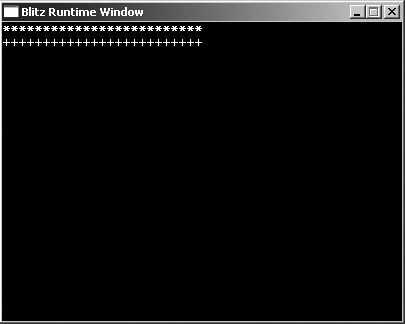
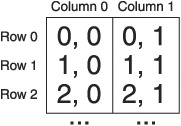
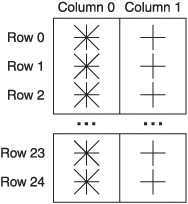
All right, let’s make a program. This simply draws out 25 asterisks (*) and 25 plus signs (+). It doesn’t do much, but you will understand how you can use arrays when you learn about types in the next section. Figure 3.19 portrays the info in a table.
Figure 3.19. The starsplusses$ array.
;demo03-10.bb - Draws out 25 '*'s and 25 '+'s

;create the array
Dim starsplusses$(2,24)

;initialize the array. The first dimension will contain *'s and
the second will contain +'s
For rows = 0 To 1
    For columns=0 To 24
          Assign either + or *, depending on the return value of FindChar$()
          starsplusses$(rows,columns) =
          FindChar$(rows)
    Next
Next
This first fragment begins by creating the starsplusses$ array. Because its subscript is (2,25), it will contain a total of 50 objects. How did I get this number? I simply multiplied the first subscript by the second subscript: 2*25 = 50.
The next section of the code initializes the array. It runs two for loops within each other. In multi-dimensional arrays, two for loops are commonly used. The first loop runs throughout the first subscript and the second loop runs throughout the second subscript. The outer loop, For i =0 To 1, countsfrom 0 to 1. The second for loop counts from 0 to 24. The line
starsplusses$(rows,columns) = FindChar$(rows)
determines what each element is set equal to with the help of the FindChar$() function.
FindChar$() is a user-defined function. It looks like this:
;FUNCTION FINDCHAR$(i)
;returns * or +
Function FindChar$(i)
       If i = 0
              Return "*"
       Else If i = 1
              Return "+"
       EndIf
End Function
If the initialization loop calls this function with the row number being 0, the array element becomes an asterisk (star). If the function is called with the row being 1, the array element is a plus sign. Therefore, the array has two rows of 25 characters—one row is made up of stars, the other is made up of plusses.
Next, you have to display the array.
;display the array
For rows = 0 To 1
       For columns = 0 To 24
              ;Write each value to the screen
              Write
              starsplusses$(rows,columns)
       Next
       ;write a new line after each row
       Print ""
Next
;Delay five seconds
Delay 5000
Once again, this function has two for loops running within each other. The outer loop counts by rows and the inner loop counts by columns. Every element is drawn to the screen. When the loop gets to the end of the first row, a new line is printed so it can print out the next row.
A new function, Write, is introduced here. Write has the same prototype as Print:
Write string$
In fact, these two functions are extremely similar. The only difference between Write and Print is that Write, unlike Print, does not automatically print out a new line after the line is written. This is extremely useful when trying to write out the contents of the array because you don’t want a new line after each element. Figure 3.20 shows what demo03-10.bb looks like when Write is substituted for Print.
Figure 3.20. Demo03-10 without Write.
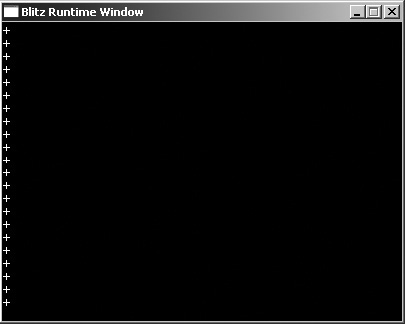
Figure 3.21 shows the demo03-10.bb program.
Figure 3.21. The demo03-10.bb program.