
Orbiting (a.k.a. Pivoting)
What’s the difference between rotating and pivoting? Let’s look to the galaxies for our answer. Think of how the earth orbits around the sun. While the earth is rotating, it is also orbiting (in the case of Blitz3D we’ll call this pivoting) around the sun. The sun is set as the pivot point, and the earth orbits around it. Let’s re-create this scene and combine both rotating and orbiting using Blitz3D. To make our scene look a little more realistic, we’ll add a texture map to both the sun and the earth. On the CD you’ll find the two textures that were used: sunskin.jpg and earthskin.jpg.
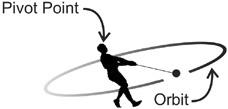
The key to this program is the item called the pivot. Think of the pivot item as an invisible anchor that sets the point of rotation. Have you ever seen someone do the discus or hammer throw at the Olympics? The athlete stays in one spot and spins as the hammer or discus “orbits” around him until he lets go. If we were to compare this to Blitz3D code, the athlete, who acts as the center of the rotation, would be the “pivot.” Take a look at Figure 6.5, which provides an illustrated example of a pivot.
Figure 6.5. The athlete is the pivot and the ball twirling around him is the orbit.
Before we get to the code of this little program, I should warn you: You might get a little confused. There are a lot of concepts in this program, and I combine a few different elements, so if you are a little confused, don’t worry; I’ll break it down nicely afterward and give you plenty of help.
Here’s the code we use to create the program:
;demo06-04.bb - Demonstrating orbiting
; ––––––––––––––––
Graphics3D 640,480
SetBuffer BackBuffer()
;Key constants
Const ESC_KEY = 1

; Create camera
camera=CreateCamera()
PositionEntity camera,0,0,-10

; Create a light
light=CreateLight()
RotateEntity light,90,0,0

;Create the Sun
sun = CreateSphere(16)
ScaleEntity sun, 2,2,2
PositionEntity sun, 2,3,1

;Give a texture to the sun
tex=LoadTexture( "sunskin.jpg" )
EntityTexture sun,tex

; Create a pivot.
pivot = CreatePivot()
PositionEntity pivot,2,3,1

; Create the planet earth. Make the pivot the parent of the earth.
earth = CreateSphere(16,pivot)
tex1 = LoadTexture( "earthskin.jpg" )
EntityTexture earth, tex1

; Position planet so that it is offset from the sun
PositionEntity earth,5,0,0

; This following code runs the simulation
While Not KeyDown(ESC_KEY)

    ; Turn pivot, making planet orbit around the pivot point.
    TurnEntity pivot,0,1,0
    ; Rotate the earth.
    pitch#=pitch#+1
    RotateEntity earth,pitch#,yaw#,roll#
RenderWorld

    Flip
Wend
End
Now take a close look, and I’ll explain the important parts of the above code:
;Create the Sun
sun = CreateSphere(16)
ScaleEntity sun, 2,2,2
PositionEntity sun, 2,3,1

;Give a texture to the sun
tex=LoadTexture( "sunskin.jpg" )
EntityTexture sun,tex
There’s nothing in this code that you haven’t seen already. We simply created the sun by making a sphere and then applied the texture sunskin.jpg to it. The line you should take note of is the position of the sun at 2,3,1. We offset the sun on purpose, to illustrate that the pivot we create later in the program will have to be located in the same spot to make it look as if the sun is the center of the orbit.
; Create a pivot.
pivot = CreatePivot()
PositionEntity pivot,2,3,1
With this code, we name our pivot—in this case we were very original and called it pivot. This is followed by the actual command to create the pivot: CreatePivot(). In the next line we position the pivot. We put it in the exact same location (2,3,1) that we put the sun so that it will appear as if the planet we create is orbiting the sun. The truth is that the planet will actually be orbiting the pivot point. If you deleted the sun, the planet we created would still orbit the same location.
; Create the planet earth. Make the pivot the parent of the earth.
earth = CreateSphere(16,pivot)
tex1 = LoadTexture( "earthskin.jpg" )
EntityTexture earth, tex1
The creation of the earth is fairly straightforward, but you are seeing a piece of code that you have not seen before. In the first line, notice the word pivot after the 16:
earth = CreateSphere(16,pivot)
By doing this we are making the pivot the parent of the earth. A parent is a piece of code that will tie the two objects together. Anything that we do to the parent— in this case, the pivot—will also affect the child, which in this case is the earth. Parents are awesome—you may not think so in real life, but in Blitz3D, they can save you a lot of time and effort. I’ll talk a little more about parents later in the book and you’ll see how they can benefit you.
; Position planet so that it is offset from the sun
PositionEntity earth,5,0,0
Here we are just placing the earth on the screen, a little ways from the sun. Next we enter the code that actually makes the program run:
While Not KeyDown(ESC_KEY)
; Turn pivot, making planet orbit around the pivot point.
TurnEntity pivot,0,1,0
; Rotate the earth.
pitch#=pitch#+1
RotateEntity earth,pitch#,yaw#,roll#
RenderWorld
Flip
Wend
End
We’ve discussed While Not KeyDown(ESC_KEY) already in this book. Again, it says that as long as the Esc key is not pressed, do the following. TurnEntity pivot 0,1,0 tells the program to continually orbit the pivot (this also includes the earth because we made the pivot the parent of the earth) around the y axis. If you wanted the orbit to go around the x axis, you would’ve entered 1,0,0, and if you wanted it to orbit around the z axis, you would have used 0,0,1. You could have also changed the direction of the pivot by making the pivot value a negative number.
The earth doesn’t just orbit around the sun; it also rotates as it is orbiting. To set the rotation, we used the same code you learned in the last section, but we just took out the If statement. Without the If statement, the earth spins continually.
Now You Try
Create a replica of an atom with protons orbiting around the nucleus, as seen in Figure 6.6. Give the protons a different color. Once you’ve tried this, compare it to the actual code used. Keep in mind that we used the texture sunskin.jpg for the nucleus and orbit.jpg for the orbits. You can use those or create your own.
Figure 6.6. The demo06-05.bb program.

;demo06-05.bb - Modeling a nucleus
; ––––––––––––––––
Graphics3D 640,480
SetBuffer BackBuffer()

;Key constants
Const ESC_KEY = 1

; Create camera
camera=CreateCamera()
PositionEntity camera,0,0,-10

; Create a light
light=CreateLight()
RotateEntity light,90,0,0

;Create the Sun
nucleus = CreateSphere(16)
PositionEntity nucleus, 0,0,1

;Give a texture to the sun
tex=LoadTexture( "sunskin.jpg" )
EntityTexture nucleus,tex

; Create a pivot for each orbit
pivot1=CreatePivot()
PositionEntity pivot1,0,0,1
pivot2=CreatePivot()
PositionEntity pivot2, 0,0,1
pivot3=CreatePivot()
PositionEntity pivot3, 0,0,1

; Create each orbit.
orbit=CreateSphere(16,pivot1)
tex1=LoadTexture( "orbit.jpg" )
EntityTexture orbit, tex1
ScaleEntity orbit, 0.3,0.3,0.3
PositionEntity orbit,4,0,0

orbit2=CreateSphere(16,pivot2)
tex2=LoadTexture("orbit.jpg")
EntityTexture orbit2, tex1
ScaleEntity orbit2, 0.3,0.3,0.3
PositionEntity orbit2, 0,0,4
orbit3=CreateSphere(16, pivot3)
tex2=LoadTexture("orbit.jpg")
EntityTexture orbit3, tex1
ScaleEntity orbit3, 0.3,0.3,0.3
PositionEntity orbit3, 4,0,0


; This following code runs the simulation
While Not KeyDown(ESC_KEY)

    ; Turn pivots, making atom orbit around the nucleus.
    TurnEntity pivot1, 0,3,0
    TurnEntity pivot2, 3,0,0
    TurnEntity pivot3, 0,0,3
    ; Spinning the nucleus.
    pitch#=pitch#+3 yaw#=yaw#+3 roll#=roll#+3
    RotateEntity nucleus,pitch#,yaw#,roll#
    RenderWorld

    Flip
Wend
End
Run the program now, and what you see on your screen should look similar to Figure 6.6.