Applying a Heightmap
You may have noticed something peculiar about the terrain you created in the last section—it was flat. If you want the terrain to have a more realistic look to it, you can load a heightmap. A heightmap defines the landscape of your terrain. In other words, it informs the program where any bumps, mountains, and valleys should occur. Heightmap images are made in Grayscale mode, which means that there is no color in them, just 256 shades of gray. Anything that is fully white in the heightmap represents the highest peak, while anything that is completely black represents the lowest point. The shades of gray in between will make up the valleys and mountains in your terrain. Look at Figure 9.7 to see how the heightmap would convert into actual terrain.
Figure 9.6. This plane was positioned at 0,-1,0.
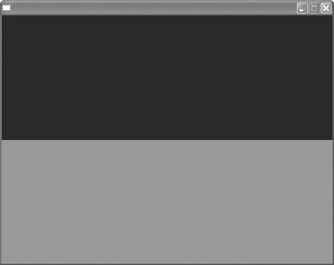
Figure 9.7. The heightmap on the top was used to create the terrain on the bottom.

I discussed the creation of heightmaps earlier in this book in Chapter 8, “Getting Graphic.” There, we created a heightmap, but we didn’t actually apply it using any code. You can refer back to that chapter to learn how to actually create a heightmap.
Once you have a heightmap created, you can simply load it using the Load-Terrain command and then apply a texture to it. In the following example, we will start by creating a program with nothing at all in it and then apply three different heightmaps so that you can get a good idea of how they would look in the games you create. Open up demo09-04.bb, or type in the following code. Make sure that the files spikey.jpg, valley.jpg, highmountain.jpg, and green-ery.jpg are in the same folder. Notice in the code how we’ve positioned the camera 15 units above the ground so that we can get a good view of our landscape once it is created.
;demo09-04.bb - Beginning a terrain
; ––––––––––––––––
Graphics3D 640,480
SetBuffer BackBuffer()

Const ESC_KEY = 1
Const LEFT_KEY = 203
Const RIGHT_KEY = 205
Const UP_KEY = 200
Const DOWN_KEY = 208

; Create camera
camera=CreateCamera()
PositionEntity camera,0,1,0

; Create a light
light=CreateLight(3)

; Loading the heightmap
terrain=LoadTerrain ( "highmountain.jpg" )
ScaleEntity terrain,5,100,5
PositionEntity terrain,-500,0,-500
tex=LoadTexture( "greenery.jpg" )
ScaleTexture tex, 50,50
EntityTexture terrain,tex


; Create the terrain
ground=CreateTerrain(512)


; This following code deals with cameras and terrain
While Not KeyDown(ESC_KEY)

    If KeyDown(RIGHT_KEY)=True Then TurnEntity camera,0,-1,0
    If KeyDown(LEFT_KEY)=True Then TurnEntity camera,0,1,0
    If KeyDown(DOWN_KEY)=True Then MoveEntity camera,0,0,-1
    If KeyDown(UP_KEY)=True Then MoveEntity camera,0,0,1

    RenderWorld
    Flip
Wend
End
Let’s look closely at the code used to load the heightmap:
; Loading the heightmap
terrain=LoadTerrain ( "highmountain.jpg" )
ScaleEntity terrain,5,100,5
PositionEntity terrain,-500,0,-500
tex=LoadTexture( "greenery.jpg" )
ScaleTexture tex, 50,50
EntityTexture terrain,tex
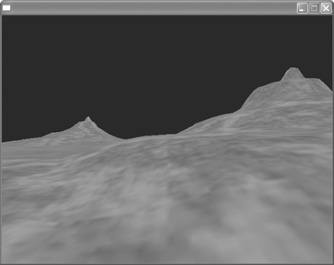
Run the program now, and with any luck your screen should be similar to the one shown in Figure 9.8.
Figure 9.8. The heightmap highmountain.jpg has been loaded, and the texture greenery.jpg has been applied.
Let’s take a look at each line individually to see what we have done.
terrain = LoadTerrain("highmountain.jpg")—This code creates a terrain called terrain by loading up the heightmap file called highmountain.jpg.
ScaleEntity terrain,5,100,5—This is a very important piece of code when working with heightmaps. The heightmap file that we created is saved as a very small file format to save processing time. When we apply it to our terrain, we need to stretch it out. In order to retain the shape of our mountains, we need to ensure that the y axis is stretched out much more than the x and z axes. In this case, we enlarged the y axis by 100 times and enlarged the x and z axes by 5 times. You can experiment with these numbers to see how it will affect your terrain.
PositionEntity terrain,-500,0,-500—With this code, we positioned the terrain at the 0 mark on the y axis and at -500 along the x and z axes.
tex=LoadTexture("greenery.jpg")—This code creates a texture that we called tex from the file greenery.jpg.
ScaleTexture tex, 50,50—Because we scaled our terrain, it’s a good idea to stretch out our texture so that it retains the original look that we intended. Remember that a texture is a two-dimensional image that we apply to a three-dimensional object, so it has only x and y coordinates to adjust. In this case, we have scaled the x and y coordinates by 50 times.
EntityTexture terrain,tex—This command applies the texture we created, called tex, to the terrain.
Before we run the program, let’s add the following code to the run section so that we can navigate through our terrain using the arrow keys:
; This following code deals with cameras and terrain
While Not KeyDown(ESC_KEY)

    If KeyDown(RIGHT_KEY)=True Then TurnEntity camera,0,-1,0
    If KeyDown(LEFT_KEY)=True Then TurnEntity camera,0,1,0
    If KeyDown(DOWN_KEY)=True Then MoveEntity camera,0,0,-1
    If KeyDown(UP_KEY)=True Then MoveEntity camera,0,0,1

    RenderWorld
    Flip
Wend
Go ahead and run the program now and use the arrow keys to navigate through the 3D world that you have created.
Note: Now You Try
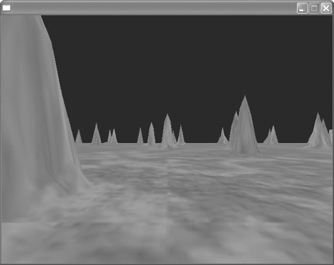
In the code that you just created, replace the file highmountain.jpg with valley.jpg and then spikey.jpg to see how those heightmaps will look when applied to a game. Look at Figures 9.9 and 9.10 to see the results.
Figure 9.9. The valley.jpg heightmap.
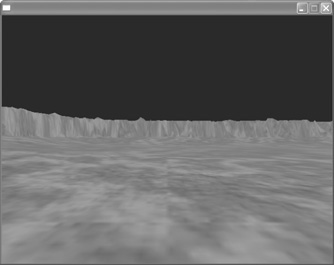
Figure 9.10. The spikey.jpg heightmap.