Creating a New Toolbar
You're not limited to the selection of built-in toolbars—you can also create custom toolbars in any Office program, adding your own selection of buttons and menus to each new toolbar. Use custom toolbars to give yourself one-click access to styles, fonts, macros, and built-in commands. To create a new toolbar, select Tools, Customize, click the Toolbars tab, and click the New button. Give the new toolbar a name and click OK to save your changes.
How do you make a new toolbar available for all new documents and worksheets? The procedure is slightly different for each application. Use Word's Organizer to copy a toolbar from one document or template to another. Unless you choose a different location, Word stores a new toolbar in the Normal document template, Normal.dot, to make it available for all documents.
→ To learn more about copying elements between templates, see "Copying Styles and Settings Between Templates".
If you open an Excel workbook that contains a custom toolbar created by someone else, you can copy it to your Personal Macro Workbook (Personal.xls). Open both workbooks, and then switch to Personal.xls and select Tools, Customize. Click the Toolbars tab and click the Attach button. Select the toolbar you want to copy from the Custom toolbars list on the left, and then click the Copy button to transfer it to the Personal Macro Workbook.
To move toolbars between Access databases, open the database to which you want to add the custom toolbar. Select File, Get External Data, Import. Select the database file that contains the toolbar or toolbars you want to copy, and then click the Options button and check Menus and Toolbars under Import. Select any other items you want to import and click OK.
Note
Outlook allows you to create custom toolbars. Because the program stores all customizations as part of the program options rather than associating them with data files, there's no need to copy these toolbars to a different location.
Adding Macros to a Toolbar
One of the best uses for a custom toolbar is to hold a collection of macros you use for specific tasks. To help manage an Excel list, for example, you might construct a set of macros that filter and sort the list to five or six specific views. By placing all those macros on a custom toolbar, you make switching to any view at any time easy. Use a custom toolbar in Word to hold macros and AutoText entries you use when creating a specific type of document, such as an invoice or a sales report. (Skip to the end of this chapter for an example of how we created a custom toolbar for use in writing this book.)
Adding a macro to a toolbar requires slightly different techniques for each application:
In Word, PowerPoint, and Outlook, follow the same steps as you would to add a command button; select Macros from the Categories list and the name of the macro from the Commands list. If you have macros stored in different Word templates or in the document itself, you must select the correct location from the Save In drop-down list.
In Excel or FrontPage, select Macros from the Categories list and drag either the Custom Menu Item or Custom Button choice onto the toolbar. Right-click the new button or menu item, select Assign Macro from the shortcut menu, and select the macro you want to use.
In Access, select All Macros from the Categories list and the name of the macro from the Commands list.
→ For more suggestions on how you can create shortcuts for running macros, see "Creating Toolbar Buttons, Menus, and Key Combinations".
Customizing the Appearance of Toolbar Buttons
You'll encounter unique design challenges when you create custom toolbars that mix built-in commands with macros, styles, and AutoText items. If the toolbar includes standard button and menu options, you can decide whether you want to see only an image, only text, or both.
For buttons you use infrequently, the default icon might be utterly inscrutable. By showing both the icon and the text, you don't have to constantly scan ScreenTips to see what each icon does. (Outlook, for example, uses this option effectively to show the Find and Organize buttons on the Standard toolbar in the Inbox.) Select Tools, Customize to display the Customize dialog box, and then right-click any button to display the shortcut menu shown in Figure 2.6.
Figure 2.6. Use this shortcut menu to change the text and icon that describe a toolbar button or menu choice.

The four choices on this menu let you decide whether to show icons only, text only, or a combination of both.
Most built-in commands include their own images that Office programs can use as the icon on a toolbar button. You can change the image on any button, and if you're a decent icon designer, you can use Office XP's built-in Button Editor to create your own custom button images.
Note
Although you can create an icon from scratch, it's usually best to start with an existing button image. If you see an image that you like on a built-in toolbar button, copy it to your custom icon using the Copy Button Image and Paste Button Image choices on the shortcut menu for each icon; then edit the pasted image. If you make a mistake, click Reset Button Image and start over.
When you have a group of buttons that work together, use a separator line to define the group. If the Customize dialog box is open, right-click the icon that begins the group and select Begin a Group from the shortcut menu. To quickly add a separator line without leaving the normal editing window, hold down the Alt key, click the button to the right of the place where you want the line to appear, and drag slightly to the right. To remove a separator line without having to go through a dialog box, hold down the Alt key, click the button to the right of the line, and drag the button over the line.
Editing a Toolbar Button's Icon and Label
To edit the text and icon associated with any button, first make sure the toolbar is visible. Then open the Customize dialog box and click to select the button you want to change. Click in the Name box to enter the text that will appear on the button when you select any display option other than Icon Only. The text you enter here will also appear as a ScreenTip for that button.
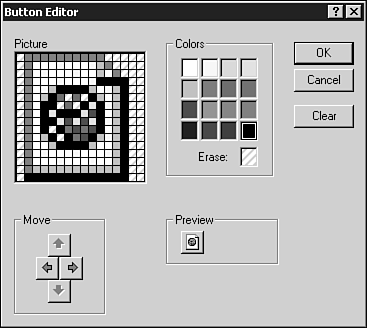
To edit the existing icon, right-click again and select Edit Button Image. This opens Office XP's Button Editor (see Figure 2.7). Click any color in the color box, and use the pointer to paint that color over any pixel.
Figure 2.7. Use the Office Button Editor to create images for use on toolbar buttons. Each image is limited to this palette of colors and a total size of 32 pixels square.

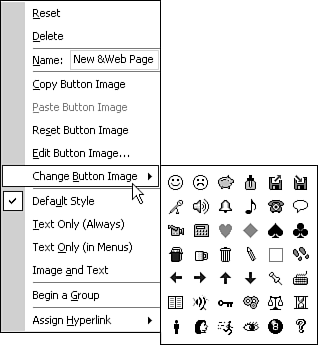
To create a custom icon, right-click the button and select Change Button Image. You can start with any of the icons shown in Figure 2.8 or build a new icon from scratch.
Figure 2.8. Office lets you choose from this assortment of somewhat hokey custom icons, or you can cut, paste, and edit an icon from an existing button.

Assigning a Hyperlink to a Toolbar Button
All Office programs allow you to attach a hyperlink to a toolbar button, although the procedure for doing so is cumbersome. You can create a hyperlink to a Web page or to any file, on your machine or on a network. You can also assign a graphic file to a toolbar button, so you can click a button to insert a logo or other graphic you use regularly.
To attach a hyperlink to a toolbar button, you first must create a toolbar button and then customize it. Only Excel and FrontPage enable you to create a blank button or menu item; in other programs, you first must add a button—any button—using an existing command, and then customize it.
With the Customize dialog box open, right-click the button to which you want to assign the hyperlink. Select the text in the Name box and replace it with a short description of the link you want to create. Then select Assign Hyperlink. Click Open if you want the button to open a file or Web page, or click Insert Picture if you want to create a link to a graphic file.
In the Assign Hyperlink dialog box (see Figure 2.9), click the Existing File or Web Page button and select the item you want to link to the button. Click OK to create the link.
Figure 2.9. Select a file or Web page and assign it to a toolbar button as a hyperlink, and then open the file or insert a picture with a single click.

→ To learn more about using the Office hyperlinking features, see "Maintaining Accurate Hyperlinks" .
→ Use AutoText to enter large blocks of text and graphics with a few simple keystrokes; see "Entering Text and Graphics Automatically with AutoText and AutoCorrect"
To remove a hyperlink from a toolbar button, open the Customize dialog box, right-click the button, and select Edit Hyperlink, Remove Link.
