
Viewing a Daily, Weekly, or Monthly Calendar
When you first click the Calendar icon in the Outlook Bar, you see today's schedule in Day/Week/Month view. The default view of your appointments shows just one day at a time, but you can expand the view to cover appointments that span multiple days, one or more weeks, or a full month at a time.
Using the Date Navigator
The Date Navigator is the small calendar that appears on the right side of the Calendar window, just above the TaskPad. Like similar controls elsewhere in Office, the Date Navigator lets you quickly jump to any date to see the appointments and events scheduled for that date. Bold numbers in the Date Navigator tell you that appointments or events are scheduled on those days.
By default, the Date Navigator is visible in Day and Week views; it displays the current month and next month. To change the number of months shown in the Date Navigator, drag the left border, the bottom border, or both. To see four months at a time, for example, drag the bottom border of the Date Navigator down until you see two rows of two months each.
Switching Between Day, Week, and Month Views
Four buttons on the Calendar folder's Standard toolbar let you quickly switch between Outlook's built-in views.
Click the Day button to display one day's events. Use the Date Navigator to show another day's schedule, or click the Go to Today button to jump back to today's calendar. Press the Page Up and Page Down keys to scroll through that day's calendar; use the left- and right-arrow keys to move through the Calendar folder one day at a time.
Tip from 
In any Day view (including the built-in Work Week view and others that include multiple days), pressing Home takes you to the beginning of the workday and End jumps to the end of the workday—8:00 a.m. and 5:00 p.m., unless you adjust these defaults. Press Ctrl+Home or Ctrl+End to jump to the beginning or end of the day—midnight in either direction.
Click the Work Week button to show a side-by-side view of five days at a time, leaving off weekends, as in the example in Figure 11.4. Because the display for each day is extremely narrow, don't expect to read the full description of each event; point to any item to see a ScreenTip that includes its time, subject, location, and up to the first 12 lines from the Notes field.
Figure 11.4. Use the Work Week view to see five days at a time (customize the display if your work week is different). ScreenTips help you identify each item without opening it.

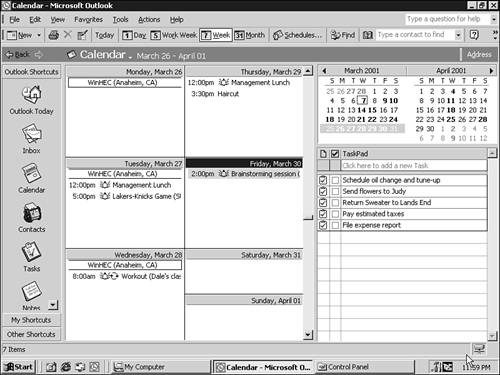
Click the Week button to display a full week's schedule (see Figure 11.5), with each day's appointments in a box; Saturday and Sunday listings are half the size of other days. As in other views, all-day events appear in a banner at the top of each day, with multiday events extending over the tops of several days. Press Page Up and Page Down to move through the calendar a week at a time.
Figure 11.5. Unlike daily views, the Week view shows only scheduled items and events in the block for each day.
Click the Month button to see a month-at-a-glance calendar (see Figure 11.6), with event descriptions truncated to fit; the Date Navigator and TaskPad are normally hidden in this view, although you can drag the right border of the calendar to make them visible. To jump a month at a time in either direction in this view, use the Page Up and Page Down keys, or the vertical scrollbar at the right of the window. The Home and End keys jump to the beginning and end of the current week.
Figure 11.6. In this monthly view, as in all other views, clicking an appointment selects it, and double-clicking opens it.

Tip from 
In any Day/Week/Month Calendar view, press Alt+Page Up to go to the first day of the current month or Alt+Page Down to jump to the last day. Each time you press either key again, you'll move one month in that direction. If you start on March 15, for example, pressing Alt+Page Down repeatedly takes you to March 31, April 30, May 31, June 30, and so on.
Use the Date Navigator to create a custom view of your calendar that's different from the standard day, week, and month views. Hold down the Ctrl key while you click two or more dates (they don't have to be adjacent), and the display changes to show you a side-by-side view of the schedules for the selected days. This technique is especially useful if you're checking your schedule to see which day works best for a meeting or business trip. A multi day view can display up to 14 days at a time, side by side, although it's nearly impossible to see details because each day's display is so narrow.
Color-Coding Important Appointments
If you use Outlook's Calendar to track large numbers of appointments and meetings, it's easy to lose track of individual items. Because each one looks the same on the screen, you might have trouble distinguishing between important meetings (with your boss or your most important client, say) and trivial ones.
A new feature introduced in Outlook 2002 lets you solve that problem by using color codes to highlight items in the Calendar folder. Outlook 2002 includes 10 predefined and color-coded text labels. When creating or editing an appointment or meeting item, use the Label drop-down list (see Figure 11.7) to apply a color coding. By default, for example, red means Important and blue means Business.
Figure 11.7. Use this drop-down list to assign any of the 10 colors to appointments in your Calendar folder.

You can't add to this list, which is hard-wired to exactly 10 entries. But you can change the text associated with each color. For instance, you might change the label on red from Important to High Priority or change Birthday to Family. To work with the list of labels, choose Edit, Labels, Edit Labels. Make your changes in the dialog box shown in Figure 11.8.
Figure 11.8. Be careful—changes you make here apply to all items, past and present, to which you've assigned that color.

Finally, you can tell Outlook to automatically apply a specific color code to an item based on conditions you define. For instance, you might create a condition that applies the Important label to any meeting whose Subject includes your boss's name, or use the Needs Preparation label for any meeting that includes the word Status.
To define an automatic color code, follow these steps:
Choose Edit, Automatic Formatting. The Automatic Formatting dialog box (see Figure 11.9) shows all rules you've created previously.
Figure 11.09.

Click the Add button to create a new rule. Outlook gives it the default name Untitled.
Choose a color and matching text label from the Label list.
Click the Condition button and define the criteria that an item must match to be subject to automatic formatting. This dialog box works exactly the same as the Advanced Find dialog box.
Click OK to save the rule and apply it instantly to the contents of the Calendar folder.
Note that rules are applied according to their order in the Automatic Formatting dialog box. Rules that are higher on the list prevail over those beneath them. Note, too, that manual formatting always overrides automatic formatting.
Customizing the Calendar Display
To change options for Outlook's built-in Day, Week, and Month views, right-click any unused space in the calendar display and choose Other Settings. The resulting dialog box (shown in Figure 11.10) lets you change the fonts and font sizes used in each of the three views:
Figure 11.10. Adjust these options to change the way Outlook's default Day/Week/Month views display your schedule.

In the Day view settings, you can adjust the Time Scale from its default setting of 30 minutes. Professionals who bill in 5-, 6-, 10-, or 15-minute increments might want to choose one of these values from the drop-down list; if your schedule is usually light, on the other hand, you can set this value to its maximum of 60 minutes and see your entire schedule without scrolling.
By default, appointments displayed in Week view include only a starting time. Check the Show End Time box to display end times for each appointment as well. If you want to see more text, check the Show Time as Clocks option, which uses icons to display each time—light clocks represent a.m. and dark clocks are for p.m.
Tip from 
If your vision is less than 20/20, we recommend that you pass on the option to use tiny clocks to show appointment times in Week and Month views. Trying to identify the position of the microscopic hands, especially against the dark background for p.m. times, is difficult at best, and possibly a painful cause of eyestrain.
Options for the Month view are the same as those for the Week view, with one addition. Checking the Compress Weekend Days option shows each week in a row of six boxes, beginning on Monday, with Saturday and Sunday sharing a box. Clear the check box to display each day in its own box, for a row of seven boxes for each week. The latter option makes sense if you have busy weekends and you're willing to surrender some screen real estate for weekdays to see a full display for each day of the weekend.
Customizing Other Calendar Options
Outlook includes another batch of calendar options that let you adjust the basic look and feel of this folder. Choose Tools, Options, click the Preferences tab, and then click the Calendar Options button to display the dialog box shown in Figure 11.11.
Figure 11.11. If you don't follow a Monday-to-Friday schedule, use these options to redefine your work week and its starting date.

In the Calendar Work Week section, check the days that correspond to your work week. In the First Day of Week drop-down list, select the day you want to see at the beginning of Week and Month views. You can also define the Start Time and End Time for your typical work day here.
Note
When you double-click to add an appointment in Week or Month view, Outlook opens a new appointment form using the starting time as defined in this dialog box.
Check the Show Week Numbers in the Date Navigator box if you want to see small numbers to the left of each week. This option is most useful for people who work in retail and other industries that measure performance weekly.
The Background Color option lets you choose from a limited selection of pastel colors to use behind Day and Work Week views. The default Light Yellow is the most readable.
If you regularly travel long distances on business, or if you work with people in another part of the world, you can also specify a second time zone to display in daily views of the Calendar folder. That option lets you see at a glance whether you're trying to call Moscow at midnight or Hong Kong at 3:00 a.m., when no one's there to take the call. Click the Time Zone button to open the dialog box shown in Figure 11.12, and then check the Show an Additional Time Zone box. Select the second time zone and give each one a label, and then click OK. (Be sure to read the section at the end of this chapter before changing your time zone, however!)
Figure 11.12. Frequent flyers can click the Time Zone button to add a second time zone along the left side of a Daily calendar view.

Click the Add Holidays button to incorporate a list of common holidays into your Outlook calendar. Surprisingly, this feature doesn't use a sophisticated set of calculations to determine when Easter, Thanksgiving, and Yom Kippur fall each year. Instead, Outlook looks at the contents of a text file called Outlook.hol; in a U.S. English installation, this file is stored in C:Program FilesMicrosoft OfficeOffice101033. The Add Holidays dialog box lets you choose which country's holidays should be added to your calendar—a handy option if you routinely travel around the globe.
Tip from 
To customize the holidays list, open this text file in a text editor and get started. Each group of holidays (organized by country) starts with a name in square brackets; each item in the list includes a name, followed by the date in yyyy/mm/dd format.
The Resource Scheduling button lets you define options if you're responsible for processing meeting requests for resources, such as conference rooms and slide projectors.
Click the Free/Busy Options button to display a dialog box that lets you publish information about your calendar to an Internet location for other people to use when scheduling meetings.
→ To learn more about making your Outlook schedule available to other members of your workgroup, see "Sharing Group Schedules".