
Finding Outlook Items
If you use Outlook regularly, your collection of personal data will eventually become so large that you won't be able to find information simply by browsing through items. Outlook offers two tools to help you track down items based on their content. The Find pane, accessible via a button on Outlook's Standard toolbar, is fast, simple, and greatly improved by its Outlook 2000 predecessor. The Advanced Find dialog box requires much more work, but it allows you to pinpoint a single item or snag an entire group of items with precision.
For some tasks, using built-in or custom Outlook views is faster and easier than performing a search. For example, if you use categories in the Contacts, Calendar, and Tasks folders, switching to the built-in By Category view makes it easy to locate all related items. Likewise, try the By Sender view in the Inbox folder to see all messages from a specific person, or the By Company view in the Contacts folder to organize all contacts based on the companies they work for.
Finding Contact Information Fast
By far, the fastest way to open any Contact's record is with the Find a Contact text box at the right of Outlook's Standard toolbar. Enter a part of any person's name or e-mail address, and then press Enter. If only one item matches the text you entered, Outlook opens that record. If more than one contact's name includes the text you specified, you'll have to pick from the full list of matching names in the Choose Contacts dialog box. If multiple matches appear in the e-mail address field, you'll see the Check Names dialog box from the Outlook Address Book; pick a name and click OK to open that contact's record.
Using the Find Pane for Simple Searches
To use the Find pane, first switch to the folder in which you want to search, and then click the Find button on Outlook's Standard toolbar or choose Tools, Find. Unlike its huge and obtrusive pre decessor in Office 2000, this version of the Find pane occupies a single row just above the Contents pane, as shown in Figure 9.29.
Figure 9.29. Use the Find pane to search for items in the current Outlook folder.

Enter a word, phrase, or alphanumeric string in the Look For box. By default, the current folder is selected in the Search In box; click the arrow to choose a different folder. To search through all text in all items in the folder, click the Options arrow and choose Search All Text in Each Message. Click the Find Now button to begin the search.
Note
In Outlook 2000, you couldn't stop a search in progress. In this version, Microsoft fixed that annoyance. While a search is under way, look for a Stop button just to the right of the Find Now button.
Outlook searches for the exact text in the Look For box; if you enter two or more words separated by a space or punctuation, all the words you entered must appear in the same field. The search results replace the contents below the Find pane. Unlike in Outlook 2000, you can change the view of the search results; click the Clear button to the right of the Find Now button to restore the full view.
Tip from 
Searches are not cumulative. Each time you click the Find Now button, Outlook searches the entire folder and replaces the results of your previous search. If you want to perform a series of searches to narrow down a large group of items, use the Advanced Find dialog box instead.
Advanced Search Techniques
If the Find pane doesn't turn up the information you're looking for, use the more sophisticated (and complex) Advanced Find dialog box. This option lets you find items that contain specific types of information; you can also use it to search for virtually unlimited combinations of criteria. For searches you run regularly, you can save and reuse any set of Advanced Find criteria.
The Advanced Find dialog box is most useful when you want to search using multiple criteria or within specific date ranges. When filling out an expense report, you might search for appointments that include the word "Dinner" in the description and that occurred in the current month. Before a business trip, you might search for contacts that you've assigned to the Business or Key Customer category who are located in the cities or states you're planning to visit.
Tip from 
If you regularly use Advanced Find, learn its keyboard shortcut—Ctrl+Shift+F—or add an Advanced Find button to the right of the Find button on Outlook's Standard toolbar.
→ For more details on how to add buttons to Office toolbars, see "Customizing Toolbars".
To open the Advanced Find dialog box, choose Tools, Advanced Find. If the Find pane is visible, you can click the Advanced Find link on the Options menu. In either case, you'll see the dialog box shown in Figure 9.30.
Figure 9.30. Use this dialog box to search for Outlook items using a combination of criteria.

Follow these steps to use the Advanced Find dialog box:
Use the drop-down Look For list to specify the type of items you want to search for—messages or appointments, for example. By default, this value is set to the type of item stored in the current folder. For the widest possible search, choose Any Type of Outlook Item—this option is useful if you want to search for all messages, contacts, appointments, and tasks related to a specific company, for example.
By default, your search covers only the current folder. To change that folder or select more than one folder, click the Browse button and check or uncheck boxes as needed.
Note
You can search multiple folders within only a single Personal Folders file. Thus, to search for related messages in cur rent and archived folders, you'll need to perform two searches. Open a second copy of the Advanced Find dialog box if you want to see all search results simultaneously.
Fill in your search criteria using one or more of the three tabs in the Advanced Find dialog box.
The most common options appear on the first tab; the name of this tab and the exact choices available vary slightly, depending on the type of item you're looking for. For example, when searching through mail messages you can look for text in the subject field only, in the subject field and message body, or in frequently used text fields.
Click the More Choices tab to see additional options that are specific to the type of item you're looking for. When searching for Outlook items, this tab always lets you select from the Categories field or find items based on their size. As Figure 9.31 demonstrates, you can use this tab to recover space in your Inbox by selecting messages that contain file attachments over a specified size, and then deleting them or moving them to a new location.
Figure 9.31.

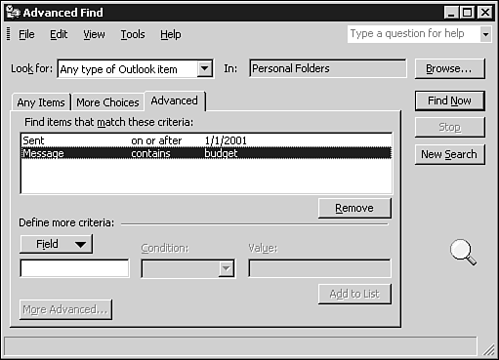
Use the Advanced tab (see Figure 9.32) to define criteria based on any Outlook field. Click the Field button to select a field, and then enter a Condition and (if necessary) a Value. Click the Add to List button to insert the criteria in the box above the button.
Figure 9.32.
Click the Find Now button to begin the search, using the criteria you entered. The results of the search appear in a simple list below the Advanced Find dialog box. Click the Stop button to interrupt the search at any point.
Double-click to open any item in the search results list. You can move, copy, delete, or edit items in this folder as well, using right-click shortcut menus (or click and drag to folders in the Outlook window). You can't choose a view other than the Table view; however, you can customize the fields that appear in the search results, change the sort order, and apply grouping. Right-click any column headings in the search results to display these options.
Tip from 
The settings in the Advanced Find dialog box are identical to those in the Filter dialog box that you use to define a custom view. Unfortunately, you can't transfer settings between these two dialog boxes. When you use the Advanced Find dialog box, you can view the results only as a simple list; if you want to see the search results in a different view, such as Address Cards, define a new view and create a filter for it.
Click the New Search button to clear all previously defined criteria and start from scratch.
One trick that even many Outlook experts don't realize is that you can customize the display of found items in the results pane at the bottom of the Advanced Find window. Right-click the column headings and use the Field Chooser to add or remove columns; you can also group messages in this display. When you save the search, these settings are saved also.
→ To learn how to save and reuse complex searches, see "Secrets of the Office Masters: Building a Library of Saved Searches".