
Planning a Meeting with Outlook
In the world according to Outlook, there is a crucial difference between an appointment and a meeting. When you create an appointment, you set aside a block of time on your own personal calendar. Although an appointment might involve other people, it's your responsibility, not Outlook's, to coordinate your schedule with theirs.
An Outlook meeting, on the other hand, consists of identical items in the Calendar folders of two or more people. Although these items closely resemble appointments—with a subject, start and end times, and the option to set a reminder—there are several crucial differences:
Every meeting has an organizer, who is responsible for setting the time, location, and other details.
The organizer fills in a meeting request form that includes details of the meeting as well as the names and e-mail addresses of all required and optional attendees; Outlook sends the invitations automatically when the organizer saves the meeting request.
When you receive a meeting request, you can accept, tentatively accept, or decline the invitation. If you accept, Outlook adds the meeting to your calendar; Outlook sends all responses to the meeting organizer and tracks the meeting's status automatically.
As part of the planning process, the meeting organizer can reserve a conference room and other resources, such as overhead projectors or presentation equipment.
If you and other members of your workgroup publish the details of your schedule on an Exchange Server or a Web server, Outlook can automatically pick a time when all proposed attendees are available.
Creating a New Meeting Request
You can begin scheduling a meeting by opening a meeting request form directly, using any of the following four techniques:
Choose New, Meeting Request; or press Ctrl+Shift+Q to open a blank meeting request form.
If you've already selected the exact date and time of the meeting, switch to a Calendar view of that date and select the block of time; then right-click and choose New Meeting Request from the shortcut menu. This option opens a meeting request form with the date and time already filled in.
To open a meeting request form with the invitees'names already filled in, select one or more names in the Contacts folder; then right-click and choose Actions, New Meeting Request to Contact.
To create a meeting while viewing a group schedule, click the Make Meeting button and choose New Meeting with All. (You can also Ctrl+click to select individual names from the Group Members list; choose Make Meeting, New Meeting to use only the selected names.)
If you've already created an appointment in your Calendar folder and you want to turn it into a meeting, open the item and click the Invite Attendees button. This option uses all details you defined previously, adding a field in which you can enter the names of other attendees.
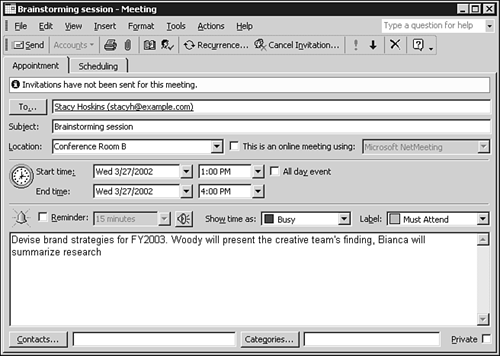
As Figure 13.4 shows, a meeting request form closely resembles an appointment form, with the crucial addition of the To field. Fill in the prospective attendees'names, and then add the remainder of the meeting details—Subject, start time, end time, notes, and so on—as you would for an appointment, and click Send to deliver the invitations.
Figure 13.4. A meeting request form resembles a cross between an e-mail message and an appointment form.
Tip from 
Because the meeting request form is delivered via e-mail, you can use any of Outlook's addressing shortcuts, including automatic name checking. Click the To button to open the Address Book and select names directly.
Don't forget to include details in the Notes box at the bottom of the Appointment tab. Text you enter here appears in the Meeting item added to each attendee's Calendar folder after your invitation is accepted; it also serves as the text of the e-mailed invitation.
Tip from 
To help attendees prepare for a meeting, you might want to send one or more files with the invitation—an agenda or a background memo in Word format, for example, or a worksheet for attendees to review before a budget-planning meeting. Drag a file icon directly into the Notes box on the meeting request form, or choose Insert, File, and select the file from the Browse dialog box.
When preparing a meeting request, you can designate some attendees as Required and others as Optional. By default, anyone you invite to a meeting is a Required attendee. To change their status to Optional, click the Scheduling tab and choose the Show Attendee Status option to display a dialog box as shown in Figure 13.5. Click the icon in the column just to the left of any name and use the drop-down arrow to adjust an invitee's status.
Figure 13.5. Use this tab on a meeting request form to designate an attendee as optional rather than required.

As the meeting organizer, you can change the status of any attendee at any time. When attendees open a Meeting item and click this tab, they see only the list of attendees and their status, without the capability to change the designation. On the meeting organizer's calendar only, this tab also summarizes the responses from prospective attendees.
After you've finished entering all details in the meeting request form, click the Send button. Outlook delivers the requests via e-mail to all prospective attendees.
Tip from 
If many of your recipients use contact-management programs other than Outlook, including Lotus Organizer, consider sending all meeting requests in iCalendar format. To set this global option, choose Tools, Options, click the Preferences tab, and click the Calendar Options button. Check the Send Meeting Requests Using iCalendar by Default box. Outlook recipients will still see all meeting requests exactly as they normally do, but users of other contact management programs will be able to deal with them as well.
Using Group Schedules to Choose a Meeting Time
One of the most frustrating aspects of scheduling a meeting is the lengthy exchange of e-mail messages and phone calls over schedules. If everyone in your group shares their calendars over the office network or over the Internet, Outlook can help you automatically pick a time when every prospective attendee is free. To work with an existing group schedule, open its window. If you've already started a meeting request form, click the Scheduling tab.
The list of attendees appears in the column at the left. To add new invitees to the list, enter a name directly in the blank box just below the last name in the list; click the Invite Others button to select additional people or resources from the Outlook Address Book.
On an Exchange Server where you've been granted permission to view another person's calendar, you'll see details about the other person's appointments. If you don't have access to calendar details for another person, color-coded blocks In the right side of the window show free and busy times on each attendee's schedule. The white zone is the block of time set aside for your meeting; click a new time to move the meeting, if necessary, or drag the left and right borders to change the start or end time and make the meeting longer or shorter. You can also set start and end times by using the controls at the bottom of the dialog box, and then see whether the time you selected works for all attendees. If your meeting includes a large number of people and only one attendee has a conflict, your easiest course of action might be a quick phone call to that person to see whether they can reschedule their conflicting appointment.
Tip from 
Click and hold the Options button to choose from a menu that controls the display of times. By default, you see only working hours for a two-day period, but you can change the display to show all hours. Another option on this menu lets you refresh the Free/Busy times for all attendees instead of waiting for the next scheduled synchronization. Use the Zoom control at the top of the window to see additional days or greater detail.
Use the AutoPick Next button to instruct Outlook to select the next free time in the calendars of all prospective attendees automatically; click the left- or right arrows to pick an earlier or later time that fits on every attendee's calendar.
Checking the Status of a Meeting You've Arranged
Outlook uses special scripts embedded in meeting invitations to process responses. As the invitees accept or decline the meeting request, they return a message to you; when it arrives in your Inbox, Outlook uses the script commands to update the status of the list. As the meeting organizer, you can check a meeting's status at any time by opening it. Look at the information bar at the top of the Appointment tab to see a running tally of the number of prospective attendees who have accepted, declined, or failed to respond.
 If you continually fail to receive updates from specific people, see
"The Case of the Missing RSVP"
in the
"Troubleshooting"
section at the end of this chapter.
If you continually fail to receive updates from specific people, see
"The Case of the Missing RSVP"
in the
"Troubleshooting"
section at the end of this chapter.
For a more detailed view of responses, click the Scheduling tab and select the Tracking tab. This list lets you see at a glance which invitees have failed to respond to your invitation, allowing you to send a follow-up message quickly, if necessary.