
Working with Tables
Table cells behave much like Word paragraphs: They can be formatted, centered, indented and spaced, bulleted and numbered, with borders and shading, and can have tab stops. The formatting is stored in the end-of-cell marker, which you can see only when paragraph marks are showing (choose Tools, Options, View tab, check the Paragraph Marks box).
Selecting Cells, Rows, and Columns
Select data within a cell just as you select data in a paragraph; make sure you pick up the end-of-cell marker, just as you pick up the paragraph mark, if you want to transfer paragraph formatting. Alternatively, you can select everything in a cell (including the end of cell marker) by letting the mouse pointer hover over the left side of the cell. When it turns into a thick arrow pointing to the right, click to select the whole cell. Or you can click inside the cell and choose Table, Select, Cell.
Other selection techniques include the following:
To select an entire row, including the end-of-row marker, move the mouse pointer to the left of the row. When it turns into the shape of a hollow arrow pointing to the upper right, click. Equivalently, click once inside the row and choose Table, Select, Row.
To select an entire column, let the mouse pointer hover near the top of the column. When it turns into a black solid arrow pointing down, click. Or you can choose Table, Select, Column.
To select the whole table, let the mouse pointer hover in the upper-left edge of the table until it turns into a four-headed arrow, and then click to select the table. Alternatively, choose Table, Select, Table.
Entering and Editing Data
You can type in a table cell precisely the same way you would type in a paragraph. If you press Enter, Word creates a new paragraph for you—in the same cell. Single cells can contain text, graphics, linked and embedded items—basically anything you can put in a document.
To move from one cell to the next, press Tab. To move back one cell, press Shift+Tab. To move backward or forward one character at a time, jumping from cell to cell at the end, use the left- and right-arrow keys. To move up or down one cell, press the up- or down-arrow keys.
Tip from 
To enter the Tab character in a table cell, press Ctrl+Tab.
If the insertion point is in the last cell in a table, pressing Tab creates a new row, formatted the same as the current row, and moves the insertion point to the first cell in that row.
Many of the special navigation key combinations described in Chapter 4, "Editing and Formatting Text," work inside tables. For example, Ctrl+Right Arrow selects text one character at a time, Ctrl+Shift+Right Arrow picks up a word at a time, and so on.
→ To learn about Word's extensive text-selection techniques, see "Selecting Text".
Tip from 
You can add text above a table at the top of a document. With the insertion point in the first row of the table, press Ctrl+Shift+Enter to insert a paragraph above the table, and then move the insertion point into that new paragraph. Use this same shortcut to split a table if the insertion point is in any row other than the first.
Moving and Copying Parts of a Table
All the usual copy, cut, and paste routines you're accustomed to in Word work within tables and cells. If you've placed cells on the Clipboard, Word responds by adding new entries in the Edit menu: Paste Cells, Paste Columns, Paste Rows, and Paste as Nested Table.
Paste Cells replaces the existing cells with the contents of the copied cells; the table itself is only expanded if the there are too many copied rows or columns to fit in the existing table. If you choose Paste Columns, Rows, or Paste as Nested Table, Word creates a new column, row, or table as needed and fills it with the contents of the Clipboard. If you click inside a cell, and then insert directly from the Clipboard task pane, Word assumes you want to insert the columns, rows, or table on the Clipboard as a nested table, within the current cell.
Tip from 
However, if you paste cells, Word overwrites the contents of the current cells--without warning, and without giving you an opportunity to change your mind. If that happens, click the Undo button (or press Ctrl+Z or choose Edit, Undo), and try again.
You can click and drag cells, columns, and rows, just as you do elsewhere in Word—with one exception. If you're going to move an entire row, you must select the end-of-row marker.
If you copy or move a cell, including the end-of-cell marker, to an area outside a table, Word creates a new table on the spot, with one cell, which matches the cell being copied or moved.
 If you are frustrated with cell contents or the row markers disappearing, see
"Disappearing Cell Contents and Row Markers"
in the"Troubleshooting"section at the end of this chapter.
If you are frustrated with cell contents or the row markers disappearing, see
"Disappearing Cell Contents and Row Markers"
in the"Troubleshooting"section at the end of this chapter.
Changing Column Widths and Row Heights
To adjust a column's width, you have four choices:
Eyeball it— Move your mouse pointer so it's near a vertical line in the table. When the pointer changes into a double-headed arrow, click and drag the line. If you move left, the column to the left gets narrower and the column to the right gets wider. If you move right, the column to the right gets narrower and the column to the left gets wider.
Tip from 
If you want to change the width of the column only on the left (shrinking or expanding the size of the entire table as you go), hold down the Shift key as you drag.
Measure it— Click inside the column you want to change, and then choose Table, Table Properties. In the Table Properties dialog box, click the Column tab (see Figure 17.6). From that point, you can precisely specify the width of each column.
Figure 17.6. To get precise column measurements, nothing beats the Table Properties dialog box.

Fit the contents— If you want the column width to grow or shrink, depending on the width of the contents, click once inside the row, and then choose Table, AutoFit, AutoFit to Contents.
Tip from 
To AutoFit only selected columns you can double click on the border of the selection.
Fit the margins— You can also have Word automatically calculate how wide a specific column must be to have the table extend all the way from the left to the right margin. To do so, click inside the column, and then choose Table, AutoFit, AutoFit to Window.
If you need to restore some uniformity to the table, you can always make all the columns the same width by choosing Table, AutoFit, Distribute Columns Evenly.
Tip from 
Yes, you can use the ruler to adjust column widths. But trying to figure out the exact function of each little slider and triangle is more trouble than it's worth. It's much easier to manipulate a table directly.
By default, rows expand and contract to hold the tallest item in the row. Row heights can be adjusted in much the same way as column widths: eyeballing it with a click and drag; measuring it in the Table Properties dialog box's Row tab (where heights are either "At least" or "Exactly"); or making each row height the same to fill up the space occupied by the table (choose Table, AutoFit, Distribute Rows Evenly).
Tip from 
If you're creating a Word form for data entry, using "Exactly" for the row height prevents the cell from expanding if the user types in too much text. That prevents entries from pushing information from one page onto the next.
To change the height and width of individual cells, select the entire cell (including the end-of-cell marker), and then click and drag. As long as you've selected an entire cell (or group of cells), only those cells are resized.
 If you can't see all the contents of a table cell, see
"Properly Setting the Row Height for Your Word Tables"
in the"Troubleshooting"
section section at the end of this chapter.
If you can't see all the contents of a table cell, see
"Properly Setting the Row Height for Your Word Tables"
in the"Troubleshooting"
section section at the end of this chapter.
Adding and Deleting Rows and Columns
Sometimes, you want to keep your table formatting intact, but replace existing data in the table. For example, if you create the same sales report every month, you can copy the table from last month's report into a new document, and then delete the old data and replace it with this month's numbers. Here are a few tricks you need to know:
If you select a cell and press Delete, the cell contents are deleted. If you include the end-of-cell marker and press Delete, the end-of-cell marker with its formatting stays intact.
If you select a column or row and press Delete, the contents of all the cells in the column or row are deleted—but the column or row itself stays and, again, the end-of-cell markers and their formatting remain. It doesn't matter whether you select the end-of-row marker or not.
If you select an entire table and press Delete, the contents of all the cells in the table are deleted, but the table skeleton remains, formatting intact.
If you select an entire table plus one or more characters after the table (including, for example, a paragraph mark), and press Delete, the entire table and selected character(s) are deleted completely. No skeleton remains.
To truly delete a cell, row, column, or table, click in the cell, row, column, or table that you want to delete, and choose Table, Delete, and then select either Cells, Rows, Columns, or Table.
Note
Icons for performing all these actions are on the Tables and Borders toolbar. Or, you can get at them by using the right-click context menu from inside a table.
To insert a cell, row, or column (or table, for that matter), click in the cell, or in a row to the left or right of the place you want to put the new row or column, and then choose Table, Insert, and the appropriate entry.
Rotating Text
It's easy to rotate text in a table by 90 degrees, clockwise or counterclockwise. To do so, select the cell(s) you want to rotate, and then choose Format, Text Direction. The Text Direction–Table Cell dialog box enables you to choose orientation (see Figure 17.7).
Figure 17.7. As long as you want your text aimed straight up or straight down, Word can accommodate.

If you want table headings angled at something other than the nosebleed nineties, consider embedding or linking an Excel range. It's much easier to rotate text to any desired angle in an Excel worksheet.
Merging and Splitting Cells and Tables
If you insert a table into a cell, you have two tables, one inside the other, which are nested tables. Most of the time you don't need—or want—two separate tables; usually, when you run out of room in a table, what you really need is the capability to split an existing cell into two, four, or six cells.
There are only a few subtle differences between, say, nesting a four-column one-row table inside a cell, and manually splitting the cell into four smaller cells. The main difference is in spacing—unless you change the spacing settings, nested tables take up an additional amount of space inside the cell to accommodate the outside of the table itself, whereas split cells require no additional spacing. Use a nested table when you want to manipulate the contents of a portion of the table as a unit: You can click and drag a nested table outside of its confining cell, for example, but moving four subcells is considerably more complex.
→ To learn more about using nested tables, see "Nesting Tables Within Tables".
The easy way to split a cell into multiple cells is to use Word's table-drawing tools. Click the Draw Table button on the Tables and Borders toolbar (to display this toolbar, right-click any visible toolbar or the main menu bar and check the Tables and Borders box). Use the pencil-shaped pointer to draw horizontal or vertical lines inside the cell(s) you want to split.
You can use the Table, Split Cells menu command, but why bother?
To merge two cells together, use the Eraser icon on the Tables and Borders toolbar (see Figure 17.8).
Figure 17.8. You might want to merge all the cells in the top row of a table to accommodate a heading, as shown here.

To split a table horizontally—between two rows—click once in the row that will become the top row in the new table. Choose Table, Split Table. A paragraph mark appears between the two tables.
Tip from 
You can easily split a table vertically as well. Select the columns you want to split away from the original table. Cut them (choose Edit, Cut or press Ctrl+X). Move the insertion point to wherever you want the new table to appear, and paste. You can then place the two tables side-by-side, if you want, by using their drag handles.
Sorting Data Within Tables
Although it doesn't hold a candle to Excel's sorting capabilities, Word can sort up to three keys, including dates, and can handle case-sensitive sorts as well as nonstandard sorting sequences (for languages other than English).
Sorting in Word can come in handy in all sorts of situations. You might want to sort a table of names, to put it in alphabetical order, and then copy the table and sort it again by employee ID number. Or perhaps you created a table with the data sorted by region, but you later decide the data is more meaningful if sorted by product. That kind of sorting is easy in Word.
Note
In fact, you needn't put data in a table to sort it. Word does just fine if you have clean data with delimiters—precisely in the same way that's required for converting text to a table. You can also sort simple lists (say, a list of state names, each in a single paragraph), because the paragraph mark is a delimiter.
Tip from 
Entire chapters and sections can be sorted (using their headings) in Outline view.
→ To learn more about automatically converting your text into a Word table, see "Converting Text to a Table".
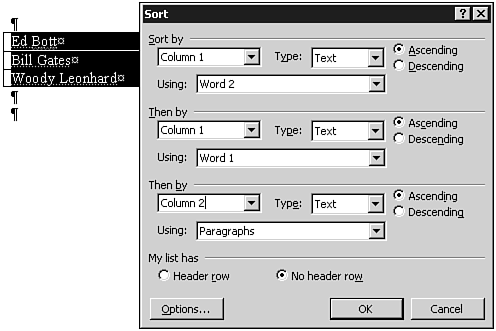
You can also sort by individual words within cells—for example, if you have a row with names in FirstName LastName order, you can tell Word to sort by LastName, the second word in the column, followed by FirstName, the first word in the column (see Figure 17.9).
Figure 17.9. Although not as comprehensive as Excel's sorting capabilities, Word does rather well—it even has a LastName FirstName sorting capability—and you needn't convert your data to a table to sort it.
To sort data, do the following:
Click once inside the table (or data).
Choose Table, Sort. You see the Sort dialog box shown in Figure 17.9.
If your table (or data) has a header row—that is, if the first row describes the data below it—start by clicking the My List Has Header Row option. That way, Word uses the header row's names instead of the generic "Column 1," "Column 2," and so on.
Tip from 
In unusual circumstances, you might want to sort just one column of a table, while leaving the other columns untouched. A teacher might construct a table with two columns, one containing scientific terms, the other containing definitions. By sorting just one column, the teacher could create a "connect the definitions" test, in which the students have to associate terms with definitions. To sort just one column of a table, select the column prior to choosing Table, Sort. Click Options, and check the Sort Column Only box. Click OK, and the single column is sorted independently.
Performing Calculations in a Table
Word contains rudimentary (and historically buggy) features for performing standard math calculations in tables—Sum, Average, Min, Max, Product, and the like.
To put a formula in a cell, select the cell and choose Table, Formula. Then enter the formula, and click OK.
When you use a Word table as a worksheet in this fashion, cells are numbered using Excel's standard A1 format, with a colon separating addresses that identify a range. For example:
=A1+A2 calculates the sum of the first and second cells in the first column.
=AVERAGE(B1:C4) calculates the average of eight contiguous cells.
Special ranges called ABOVE, BELOW, LEFT, and RIGHT represent precisely what you would expect. =SUM(RIGHT) calculates the sum of all the cells to the right of the current cell.
Tip from 
All these calculations use the { =} field. The results of those fields can be formatted by using the # picture switch.
→ To learn more about using Word to perform mathematical operations, see "Performing Mathematical Calculations".
→ For a list of all the ways you can format the results of a mathematical operation, see "Numeric # Picture Switches".