
Formatting Documents with Styles
A style is nothing more or less than a shorthand for formatting: Put a bunch of formatting specifications together, give it a name, and you have a style. If you find yourself applying the same formatting to text throughout a document, use styles to ensure a consistent and professional appearance that's easily modified. Use styles to control the formatting of the following:
Heading paragraphs— Whether the headings are chapter titles, section names, product numbers, department names, contract division subtitles—doesn't matter. If your document has a repeating kind of paragraph that's always formatted the same way, create a style for it.
Repeating body text— If your document includes repeating body text that requires formatting different from the norm, use a style to format it. For example, if your company name always appears in Arial 12 point, bold, create a style for it. If you have a contract in which party of the first part is always bold, use a style. Similarly, use a style to format italicized telephone numbers in a company phone directory, to highlight company names in a marketing report, or to call attention to negative numbers in a corporate balance sheet.
Defining and using styles consistently provides two great benefits. First, it ensures that all similar items in a document are formatted similarly—say, all the department names will appear in Garamond 12 point, bold. Second, if you need to make a change to the appearance of a style—say, you decide that all the department names should appear in 14 point, instead of 12 point—changing the style (which requires just a few clicks) changes the appearance of everything formatted with that style, all the way through the document.
→ To learn when you should use direct formatting from the Styles and Formatting task pane's list and when you should choose styles, see "Direct Formatting Versus Styles".
Paragraph Versus Character Styles
Paragraph styles control all the characteristics of a paragraph. That includes centering, spacing, widows (i.e., whether a single line that begins a paragraph should be allowed to appear at the bottom of a page), orphans (whether a single line that ends a paragraph should be allowed to appear alone at the top of a page), and other settings in the Paragraph dialog box that appears when you choose Format, Paragraph, as well as bullets and numbering, borders and shading, tab stops, and the language Word uses for proofing tasks such as checking spelling and grammar (choose Tools, Language).
In addition, paragraph styles define character formatting for all characters within the paragraph. When you establish a paragraph style, you must also specify the default character format for the paragraph. Unless you specifically override the default character format with direct formatting or a character style, all text within a paragraph will appear in the paragraph's default character format.
Say you have a paragraph style called ProductName that specifies centered paragraphs, with Arial 18-point, italic blue characters. If you apply the ProductName style to a paragraph, all the characters turn Arial 18-point, italic blue. But if you then select the last word in the paragraph and make it red, the formatting you applied manually—the red—takes precedence over the default character formatting specified in the ProductName style.
Character styles behave similarly, except they carry only character formatting. That includes the font, font size and style, color, super/subscript, underscore, and other attributes available in the Font dialog box that appears when you choose Format, Font. It also includes borders and shading, and proofing language.
Say you have a character style called PhoneNumber that specifies the Courier New font in 10 point. If you apply the PhoneNumber style to some text, it loses its old formatting (which probably originated as the paragraph style's default character formatting), and picks up the formatting defined by the character style—Courier New 10 point.
When it comes to character formatting, Word's hierarchy is strict. First comes the paragraph style, which you can modify by applying formatting directly (for example, you can format a Normal paragraph to be right-aligned, without changing its style). Then comes the character style, which takes precedence over the paragraph style settings. Finally, you can apply formatting directly to a character. That formatting takes precedence over both the character and the paragraph styles.
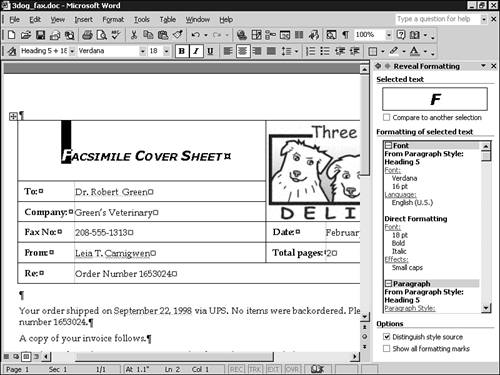
You can see the hierarchy at work by bringing up the Reveal Formatting task pane as shown in Figure 18.2, and then clicking the Distinguish Style Source option at the bottom of the pane. The full hierarchy of formatting applied by both the paragraph and character styles, and by directly applied formatting is shown.
Figure 18.2. Using the Distinguish Style Source option on the Reveal Formatting task pane gives you all the formatting details about the selected text, along with an explanation of where the formatting originated.
Tip from 
Note to former WordPerfect users: In spite of what you might have read or expected, Word's "Reveal Formatting" isn't the least bit like WP's "Reveal Codes."
Every paragraph has exactly one paragraph style. Every character has exactly one character style. In many cases the character style will be "Default Paragraph Font" or "Clear Formatting," in which case Word applies the character formatting defined in the paragraph style.
List and Table Styles
Word has two built-in sets of styles that you might find useful when applying complex formatting:
Tip from 
To see all the built-in styles available to you, bring up the Styles and Formatting task pane, and in the Show box, select All styles.
List styles let you directly specify the level of a list item by choosing the style and applying it to your selected paragraph. For example, if you want a bulleted list item that appears at the third indent level, you can apply the List Bullet 3 style, and Word takes care of the details. List styles are available for standard indented lists with no bullets or numbering (called, simply, "List"), standard lists with extra space inserted below the list item ("List Continue"), bulleted lists ("List Bullet"), and numbered lists ("List Number").
Table styles, which include all the formatting options available in Word's Table AutoFormat dialog. There are dozens of styles, all with names beginning with the word "Table."
Caution
Word makes some effort to apply selected "Table" styles to all the rows in a table, whether they've been selected or not. That's not what you would expect from Word, and it trips up many experienced users. Make sure you review formatting changes made by the "Table" styles before moving on to other parts of a document, making liberal use of the Undo button, if necessary.
Applying Styles Manually
To apply a paragraph style, follow these steps:
Click once inside the paragraph whose style you want to change, or select one or more paragraphs.
Choose the paragraph style from the Styles and Formatting task pane.
To apply a character style, follow these steps:
Select the characters whose style you want to change.
Choose the character style from the Styles and Formatting task pane.
If you select text and apply a paragraph style, Word looks at what you've selected before applying the style. If you have chosen all the text in a paragraph (with or without the paragraph mark), Word applies the paragraph style, just as you would expect. If one or more paragraph marks are in the selection, all the selected paragraphs have the chosen paragraph style applied.
It's easy to assign styles to toolbar buttons, the right-click context menu, or keyboard shortcut keys. Fresh out of the box, Word comes with the keyboard shortcuts shown in Table 18.1.
→ You can create customized buttons for frequently used styles and place them on toolbars; see "Customizing Toolbars".
→ Word gives you the ability to assign keyboard shortcuts to frequently used styles; see "Bypassing Menus with Keyboard Shortcuts".
| Style | Shortcut Key |
|---|---|
| Normal | Ctrl+Shift+N |
| List Bullet | Ctrl+Shift+L |
| Heading 1 | Ctrl+Alt+1 |
| Heading 2 | Ctrl+Alt+2 |
| Heading 3 | Ctrl+Alt+3 |
Tip from 
If you use a lot of styles, consider assigning keyboard shortcuts to the styles, to make applying the style faster. To do so, choose Tools, Customize, and click the Keyboard button. In the Categories box pick Styles. Then in the Styles box, pick the style you want to assign a shortcut key to. Click once in the Press New Shortcut Key box, and hold down the key combination you want to assign to the style.