
Using Office Drawing Tools
Every version of Office XP includes an assortment of applications designed to help you insert, edit, and manage graphics. But some surprisingly powerful graphics tools are built directly into Office, and you can access them directly in Word, Outlook, Excel, and PowerPoint (and, to a lesser extent, FrontPage). With a few clicks you can insert one of six basic prebuilt diagrams, each with many options. With the help of the Drawing toolbar, you can add geometric shapes, lines, arrows, and text boxes to a document, worksheet, or presentation, and then add colors, shadows, and backgrounds to create images with impact. These aren't simple one-dimensional shapes, either—you can stretch, layer, and combine Office AutoShapes to create complex flowcharts and diagrams.
If you're a graphics professional, you'll quickly outgrow the basic capabilities of the Office Drawing tools. But for most business purposes, they're a welcome way to avoid the typical dull, gray report or presentation.
Working with the Drawing Layer
Before you can even hope to harness the power of Office's Drawing tools, you need to come to terms with a fundamental concept: Word, Excel, and PowerPoint documents, as well as formatted (HTML) Outlook e-mail messages, are layered. FrontPage enables you to insert pictures into a Web page and supports rudimentary operations on the pictures (crop, contrast, forward/backward, rotate, and a Web-centric capability called thumbnailing), but there is no FrontPage drawing layer.
Note
When the term document is used in this chapter, it's referring to any Office data file that includes a drawing layer, including formatted (HTML) Outlook e-mail messages, Word documents, Excel worksheets, and PowerPoint presentations. Access also has drawing tools, but they are integrated into its object creation mechanism in a different way. Drawing in Access isn't discussed in this chapter.
It's tempting but misleading to think of an Office document as the two-dimensional (2D) piece of paper that emerges from the printer or the visual display on the screen. Actually, that finished product is only a snapshot of the real document, which consists of multiple layered drawings in addition to the main layer of the document itself; by changing the order, grouping, and arrangement of these drawings and the main layer you can dramatically change a document's appearance.
The main layer is called the working (or text) layer. The graphic material is in a drawing layer, which exists independently of—but can interact with—material in the working text layer. Technically, just one drawing layer is present; however, because you can position each object within the drawing layer independently, from front to back—and the text layer can be set at any depth—it's more useful to think of each object as a layer unto itself.
Think of the layered transparencies that you probably saw in your high school biology book. As you peeled back each layer, a dissected frog appeared, with each layer revealing some additional aspect of the frog's anatomy. The drawing layer works like that: Drawings are arranged from top to bottom (called the Z order), one drawing per sheet, and each drawing can be moved independently toward the top or sent toward the back.
When you begin working with the drawing layer, it helps to visualize a complex document as consisting of many transparencies, each with its own data and properties:
Because each layer, including the text layer, is transparent, you can see the contents of any one layer through all other layers.
Although the main text layer is normally at the bottom of the stack, with individual drawing objects in front of it, you can also position a drawing object behind the text layer.
The contents of the working text layer can be wrapped around a drawing layer.
You can reorder and reposition virtually every object in the drawing layer; you can also group drawing items together and treat them as a single object, and then ungroup them to work on each individually.
The various capabilities for massaging data in Office—everything from search-and-replace to master formatting functions—apply only to the working text layer. The information in drawing layers will not appear in your table of contents, nor will the appearance of the drawing layers change if you alter the formatting of your document.
You generally work with the Drawing layer through the Drawing toolbar. You'll also find a button on the Standard toolbars in Word and Excel that opens the Drawing toolbar. To display the Drawing toolbar, right-click any toolbar or the main menu bar and choose Drawing from the list of available toolbars (see Figure 5.1).
Figure 5.1. The starting point for Office Drawing objects is the Drawing toolbar and AutoShapes.

Working with a Drawing Canvas
Frequently you want to treat several drawings as a group so they can be moved or resized together, or so you can be sure that they will always appear on the same page together. That's the reason for the Drawing Canvas. The Drawing Canvas only appears explicitly in Word and Outlook, although you'll see vestiges of its design in Diagrams throughout the other Office applications.
Consider the analogy developed in the preceding section, where drawing layers are equated with sheets of transparencies in a book. If you use scissors to cut a transparency down to size (almost any size, as long as it is rectangular), you'll see how drawing layers work. They're rectangular bits of transparent film on which you can place any number of drawings. All of the drawings will be handled together as a single unit.
If you select a Drawing Canvas by clicking it, the corners and edges take on a distinctive bold outline (see Figure 5.2).
Figure 5.2. The short, bold corner and edge lines distinguish a Drawing Canvas.

Click and drag on a Drawing Canvas's edge or corner, and you'll change the size of the Canvas, but you won't change the size of the drawings or their relative positions. When the document is printed, all of the drawings in the Canvas will appear on one page.
After a Drawing Canvas is selected, if you insert a drawing (picture, AutoShape, and so on) into your document, the drawing is placed inside the Canvas. From that point, it's treated like any other drawing on the Canvas, moving and resizing along with the rest. To remove the drawing from the Canvas, click it and drag it off. Easy.
If no Drawing Canvas is selected, when you insert an AutoShape into a document—for example, if you click one of the icons on the Drawing Toolbar—Word creates a new Drawing Canvas for you, and places the AutoShape on the Canvas.
Tip from 
You can disable this behavior by choosing Tools, Options and then on the General tab, clear the box marked Automatically create drawing canvas when inserting AutoShapes.
The Drawing Canvas toolbar, which appears whenever a Drawing Canvas is selected, has the following options:
Fit— Make the Canvas as small as possible, without moving any of the drawings on the canvas
Expand— Increase the size of the canvas in small increments, moving the drawings along with it
Scale Drawing— When this button is "pushed," any resizing of the Drawing Canvas increases or decreases the size of the drawings on the canvas proportionally
Text Wrapping— Enables you to control whether (and how tightly) text flows around the Canvas
To apply formatting to the Drawing Canvas (outline, background color, and so on) right-click the border and choose Format Drawing Canvas.
Drawing Simple Shapes
The Drawing toolbar makes it easy to draw simple geometric shapes: lines, rectangles, arrows, and more.
Tip from 
For many shapes, holding down the Shift key while you drag makes the shape symmetrical. For example, Shift+drag with the rectangle shape to produce a square; use the same technique with the oval to draw a circle.
You are not limited to Microsoft's four choices of default shapes. For example, to add an octagonal stop sign shape to the main part of the Drawing toolbar, do the following:
Click and drag the horizontal "tear-away" line at the top of the Basic Shapes list. You'll get a free-floating Basic Shapes toolbar.
Hold down the Alt key, and drag the octagonal "stop sign" icon onto the main part of the Drawing toolbar.
When you no longer want the stop sign on the main Drawing toolbar, choose Tools, Customize, and then click and drag the button off the Drawing toolbar.
Working with AutoShapes
One of the easiest ways to add professional-quality graphics to a document is through the use of AutoShapes, geometric shapes that form the basis for graphics and charts routinely used in business reports.
In addition to rectangles, ovals, and other basic shapes, the library of AutoShapes covers most of the important bases in diagramming: flow-chart symbols, generic geometric shapes, and display arrows. You can also add callouts, balloon-shaped drawing objects typically used to provide information on specific items in a document; for example, you might add a callout to a sales table or chart to show the spike in sales when a new product was introduced. PowerPoint goes even further, providing Action Buttons—not unlike controls on a form—that can be set to execute commands or macros when clicked.
Tip from 
Put related AutoShapes into a single Drawing Canvas so you can move or resize all of them in concert.
If you're creating a diagram that includes several instances of the same AutoShape, a useful approach is to create one example of the graphic item you need, and then copy that AutoShape to the Clipboard and paste it in position as needed.
Tip from 
When you click on the AutoShapes button on the Drawing Toolbar, don't overlook the More AutoShapes entry. That choice takes you to a good sized collection of shapes in the Insert Cip Art task pane.
Tip from 
Instead of having to eyeball a shape, you can set specific dimensions for it. The best approach is to start by drawing in the rough dimensions of your shape with the mouse, right-click the shape, choose Format AutoShape, and click the Size tab. Options in this dialog box enable you to specify a precise size for the shape.
Using Lines and Arrows
After you have your basic shapes down, you'll frequently want lines, dashed lines, and arrows to connect them all, and illustrate the relationships in your charts.
Excel and PowerPointprovide true charting connectors—lines that stay connected to preset positions on shapes—for every shape in a document. As you move the shapes, the connectors move with them without requiring you to manually redraw them. Word and Outlook have connectors, too, as long as all the connected shapes sit in the same Drawing Canvas.
To create a connector, do the following:
Draw the shapes you want to connect. In Word or Outlook, make sure all of the shapes are in the same Drawing Canvas.
Hover your mouse pointer over one of the shapes. The predefined connection points for the shape turn into colored dots on the perimeter of the shape. Click the point you want your connector to go "from."
Repeat the process at the desired connector point on the "to" shape.
To change a connection point, click the connector, and then click and drag one of the red connection boxes at the beginning or end of the connector. Move it over the second shape until you see the colored dots that indicate automatic connection points, and then pick one of those points to snap the connector into position.
Tip from 
If you've moved an AutoShape so that its connectors are on the incorrect side of the shape, let Office make a more logical connection for you; right-click the connector and choose Reroute Connector.
In addition to the connector capability, Excel and PowerPoint also include snap and grid settings—crucial tools for placing lines and other shapes. Word offers similar capabilities, although they are implemented differently.
When you use the drawing layer, you can take advantage of a hidden layout grid. By default, drawing objects align to this grid. Although it's usually a helpful shortcut, this snap to grid feature can be a problem when you're drawing a line manually. Because the edges of shapes are tied to grid positions, they might not line up visually with other shapes that are arranged in slightly different positions on the grid. The fix is to snap objects to other objects (in Excel it's called snap to shape) so, for example, the end point of a line connecting two shapes ends up at a reasonable point on each shape.
Note
Snap objects to other objects is off by default in Word and PowerPoint, but Snap to shape is enabled in Excel.
To set the snap to grid and snap to shape values in Excel, choose Draw from the Drawing toolbar, and then Snap, and toggle the To Grid or To Shape settings.
To set the snap to grid and shape values in Word, Outlook, and PowerPoint (and to make the grid visible, re-set the grid, and much more), choose Draw from the Drawing toolbar, and then choose Grid. In Word, you'll see the Drawing Grid dialog box shown in Figure 5.3. The options in PowerPoint are more limited, but analogous. Check the Snap Objects to Grid and Snap Objects to Other Objects boxes.
Figure 5.3. Normally, the grid is hidden in Office applications; make it visible in Word, and then "snap" drawing objects to the grid for precise alignment.

Note
Don't be confused by the terminology. In this case, a "shape" in Excel is identical to an "object" in Word, Outlook, and PowerPoint.
It's possible to move one or more objects in very fine increments without completely disabling the grid. Hold down the Alt key as you drag the object, and it moves freely rather than following the grid. You can also use the keyboard to move objects. Normally, when you select one or more objects and press any arrow key, the selection moves to the next point on the grid. If you make a selection and then hold down the Ctrl key while pressing any arrow, the selection moves in much finer increments.
Changing Background Colors and Line Formats
Office enables you to draw shapes and lines galore, but they won't accomplish much unless you make them blend in with your document.
AutoShape backgrounds can have their own colors. (A background color is called a "fill" color.) By default, the fill color is white—rarely a good choice because it obscures everything underneath the AutoShape.
Color backgrounds can come in handy if you're working with a color medium—color printer, onscreen documents, or Web pages. But the same technology that makes background color inviting can also jump up and bite you: Unless you choose high-contrast color combinations to differentiate text from background, your message can be lost completely. Remember that PC monitors in particular are notorious for not reproducing colors accurately. A carefully crafted color scheme on one monitor can morph into an illegible splotch on another.
In addition to the fill color, all AutoShapes have borders around the outer edge. You can adjust the border width, style (dashed lines, for example), color, and size. In many cases, the border is superfluous and detracts from the appearance of your document; don't hesitate to get rid of it.
To edit an AutoShape or line, follow these steps:
Select one or more of the shapes or lines in the drawing layer.
Right-click and choose Format AutoShape. You see the Format AutoShape dialog box (see Figure 5.4). Click the Colors and Lines tab.
Adjust the fill color, lines, and arrows per the dialog box. If you want to be able to see through the shape, make sure you change the Color setting to No Fill, or check the Semitransparent box. A semitransparent shape makes the objects underneath fuzzy; for example, it will turn black text to a fuzzy gray.

Tip from 
If you want Office to use the new formatting settings—fill color, line size, arrow types, and so on—for all new shapes, apply the formatting, right-click the object, and choose Set AutoShape Defaults.
Adding Shadows and 3D Effects
3D effects rarely add to, and frequently detract from, the effectiveness of a document. Before you consider using a 3D effect, ask yourself—repeatedly—whether the inherently 2D medium you're working with will be able to properly convey that third dimension. answer is usually no.
Shadows, on the other hand, if applied consistently and with attention to detail, can add depth to a document without detracting from the main story.
To apply Shadow or 3D effects, follow these steps:
Click once on the shape you want to modify, or Ctrl+click to select several.
Click the Shadow or 3D icon on the Drawing toolbar.
A tear-off menu of effects opens up. Click the effect you want, and Office transforms the selected shapes.
In addition to the choice of effects, the two menus also each have a "settings" button for fine-tuning the effects. For example, you can change the depth and "lighting" of a 3D object, or the extent and placement of the shadow.
Tip from 
A few effects go a long way. A business chart is not abstract art; if you use a red 3D rectangle for one particular item, then similar items also should be red 3D rectangles.
Adding Text to a Drawing
In many cases, you will want to put text inside your AutoShapes, to identify the steps in a flowchart, for example, or the decision points in a decision matrix. All the AutoShapes (except lines) can be converted to text boxes, if you know the trick.
Most books (including this one) and many other documents use callouts to draw your attention to specific locations in a picture. Although the terminology varies a bit depending on where you work, a callout in Office parlance is a text box with a line attached to it. Several of the built-in Office callouts look like dialog balloons, like you would see in a comic strip. Here's how to use them:
Click in the drawing layer where you want the point of the arrow to appear, and then drag to form the rest of the callout.
Immediately begin typing; the text you type appears in the callout.
Right-click the callout and set its formatting. In the example in Figure 5.5, we set the balloon to have no fill (so you can see through it), but retained the border line (so that it looks like a dialog balloon), turned it white, and then selected the text and made it white, too. Click anywhere outside the callout to continue with your document.
Figure 5.5. AutoShape callouts come in many different forms. This one looks like a dialog balloon from a comic strip.

Tip from 
Don't worry about getting the text or formatting in a callout perfect the first time. To change text in a callout, click once in the callout text, and then add, delete, or edit the text. To change formatting in a callout, right-click the text and choose an option from the shortcut menu.
Aligning and Grouping Graphic Elements
Depending on the naked eye to center shapes in a drawing isn't always reliable. Office has built-in drawing tools with the capability to bring symmetry out of chaos. When aligning objects, the key is to do it one step at a time, carefully planning out what you need to do to redistribute or align them, and in which order.
If you have four objects on the drawing layer above an Excel worksheet and you want to organize them as shown in Figure 5.6, follow these steps:
Figure 5.6. Use the Drawing toolbar's alignment tools to make your graphics line up.
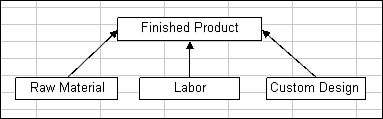
Select the bottom three rectangles by holding down the Shift key as you click each one.
After you have properly formatted, connected, aligned, and distributed all your AutoShapes, you can take one more step to group them all into a single graphic object. This step is crucial; it enables you to preserve the relationships between objects and it helps prevent the chance that you'll accidentally move or resize a shape.
Select all the elements you want to group, and then choose Draw, Group.
Tip from 
When you're creating complex drawings that consist of several AutoShapes, it's easy to leave one out accidentally. After selecting multiple items for grouping, it's always a good practice to drag the collection left and right just a little; you can see whether any odd pieces are hiding behind other shapes.
The individual elements in a group can't be edited independently. For example, if you have a text box in a group, you won't be able to change the text in the box as long as it remains grouped.
If you find you need to make a revision, you can ungroup, make your edits, and then regroup. To ungroup a composite graphic, select the graphic, and then choose Draw, Ungroup.
Wrapping, Layout, and Stacking
Let's say you copy a complex graphic into a Word document. When first placed, the text in your report is shoved out of the way by the graphic.
To improve the look, you can use layout options to adjust the placement of graphics relative to the text layer, thus changing the way text wraps around drawing objects. Right-click the graphic and choose Format, Object. In the Format Object dialog box, choose the Layout tab:
For a light-colored graphic, choose only Behind Text or In Front of Text. Otherwise, the graphic will completely overwhelm the text on the page.
Use the standard Square method to wrap text around the rectangular borders of the graphic.
Use Tight wrapping if you want the empty spaces of the graphic ignored, so the text comes up to the drawing elements themselves.
You can also change the order of objects so that one is in front of another. By default, when you create or position a graphic element so that it overlaps another graphic element (including a Drawing Canvas), the new element appears on top of the old one. To change the front-to-back ordering, right-click the graphic element or Drawing Canvas you want to move, and choose Order. At that point, you can
Float the graphic all the way to the top (Word calls it Bring to Front) or sink it all the way to the bottom (Send to Back).
Bring the graphic up one level (Bring Forward) or push it down one level (Send Backward).
Move the graphic so it's on top of the working text layer (Bring in Front of Text), or place it behind the working text layer (Send Behind Text).
When should you use each wrapping option? The simplest rule of thumb is this: If you want to turn a single graphic into a background or an overlay for your document, use the Layout tab. If you have multiple graphic elements or Drawing Canvases you want to arrange in the document, go with the Order tools.
Tip from 
Adjusting the order also enables you to create sophisticated effects interweaving the text and graphics. For example, you can use the Bring in Front of Text layout option to place a group graphic on top of the text, and then ungroup and move some elements of it under the text.