
Creating, Managing, and Using E-mail Addresses
In terms of complexity, Outlook's address-book structure falls somewhere between baseball's infield-fly rule and the U.S. tax code. What looks simple on the surface quickly becomes baffling, thanks to the many locations in which Outlook can store e-mail addresses and other contact information, and two completely different interfaces for viewing and editing that information. More bad news: If you mastered this stuff in Outlook 2000, you'll have to start over again, because several key Address Book details have changed.
Where are your e-mail addresses stored? Depending on your configuration, Outlook might use any of the locations listed in Table 28.1.
Did you notice that we didn't mention the Outlook Address Book? In Outlook 2002, the Outlook Address Book is not a physical location for storing addresses. Instead, it represents an important alternative method for viewing the contents of the Contacts folder and any other folders that contain Contact items. As you'll see shortly, this is a crucial concept in understanding how to configure Outlook addresses.
Tip from 
When you install other programs, they might take over functions you expect Outlook to handle, including e-mail and address-book management. To specify that you want to use Outlook as your default e-mail, calendar, and contact manager, choose Tools, Options; select the Other tab; and check the Make Outlook the Default Program box.
Outlook includes the Contacts folder as a default store for contact information, but you might find it useful to create additional contact folders. For example, at work you might want to segregate information about friends and family in one folder and reserve your main contacts folder for business contacts. If you're a frequent traveler, put listings for hotels, airlines, restaurants, and other on-the-road resources in a Travel folder. If your collection of contacts is particularly large, you can subdivide it even further, into separate folders for Customers and Suppliers, for example, all stored as subfolders under the Contacts folder.
Configuring the Outlook Address Book
Savvy Outlook users do most address management from the Contacts folder. Its default data-entry form is the most flexible way to enter new items, and its support for custom views and filters makes it the best choice for quickly viewing information. But Outlook also offers another view of the Contacts folder; click the Address Book button on the Standard toolbar to display a window on your Contacts like the one shown in Figure 10.1. Unlike folders that contain Contact items, this view shows only items that have an e-mail address or a fax number.
Figure 10.1. If you've configured Outlook correctly, the Address Book view shows information that's stored in your Contacts folder.

→ For full details on how to use the Contacts folder, see "Managing Your List of Contacts".
It's possible—no, make that way too easy—to inadvertently configure Outlook so that you have more than one address book. We strongly recommend that you double-check your Outlook setup to make sure you've eliminated the possibility of creating duplicate addresses in more than one address book. In particular, if you have a Personal Address Book folder, do whatever it takes to get rid of it. Working exclusively with the Outlook Address Book (and your Global Address List, on an Exchange Server) is much simpler.
Follow these steps to safely migrate addresses from your PAB file and remove it from your Outlook profile:
→ For step-by-step instructions on how to import information into Outlook, see "Importing and Exporting Outlook Information".
Choose Tools, E-mail Accounts. Select View or Change Existing Directories or Address Books and click Next.
Select Personal Address Book from your list of directories and address books and click the Remove button. Click yes to confirm that you do want to remove the PAB.
If the Outlook Address Book is not in your profile, click the Add button in the Directories and Address Books dialog box and install it. Close and restart Outlook if prompted.
Tip from 
You don't have to designate all contact folders as address books. Reserve this honor for folders filled with items that have e-mail addresses or fax numbers. If you create a folder with contact items that identify restaurants, hotels, airlines, and other travel-related institutions that you typically contact over the phone rather than through e-mail, don't designate this folder as an address book.
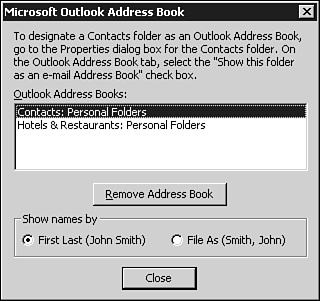
Open the Directories and Address Books dialog box again. Select Outlook Address Book from the list of address books and click the Change button. Make sure the Contacts folder and any other folders you specified in step 5 are listed here (see Figure 10.2). Ad just the way names display if necessary in the Show Names By section of the dialog box.
Figure 10.02.
Note
If you receive e-mail through an Exchange Server, your profile might also include an Offline Address Book. Do not remove this entry from your profile.
Close all dialog boxes and choose Tools, Address Book to verify that the folders you specified are the only ones shown in the Address Book.
Integrating Outlook with the Windows Address Book
The Windows Address Book was originally designed primarily to store e-mail addresses for Outlook Express. You can configure the WAB so that it draws addresses from your Outlook Contacts folder instead of from a WAB data file; this allows you to use your Outlook Contacts folder from within Outlook Express, without having to worry about keeping two address books in sync. Even if you never use Outlook Express, we recommend that you enable this integration, because it allows you to access your Contact information quickly, even when Outlook is not running.
To enable integration with the Windows Address Book, click the Start button, choose Run, type WAB, and press Enter. The Windows Address Book opens. Choose Tools, Options; then select the Share Contact Information option. This allows all contact managers to share address book data stored in the Contacts folder.
Note
This option is only available on a system with Outlook 2002, Outlook 2000 (configured in Corporate/Workgroup mode), or Office 97. On a machine without Outlook, the Options menu is missing from the Windows Address Book.
Some people find it easier to use the Windows Address Book to edit e-mail addresses and other personal information, such as the name of a contact's spouse and children, as well as birthdays and anniversary dates. If you've configured the Address Book and Contacts folder to share information, entering or editing an item in either window changes the information in the Contacts folder.
Addressing an E-mail Message
When addressing an e-mail message, you have several options:
The most reliable way to make sure you address each message correctly is to reply to an e-mail message you've received. In this situation, you can almost always be certain that the address is accurate.
 If you reply to a message and get a delivery failure, see
"When Your E-mail Bounces"
in the
"Troubleshooting"
section at the end of this chapter.
If you reply to a message and get a delivery failure, see
"When Your E-mail Bounces"
in the
"Troubleshooting"
section at the end of this chapter.
Tip from 
Although it's not immediately obvious, all address information in the header of a message you receive is "live." Right-click any address to display a shortcut menu. Choose Add to Contacts to create a new item in your Contacts folder using the name and e-mail address displayed in the header, or choose Look Up Contact to search your Contacts folder for an item that contains a matching e-mail address. You can also use the shortcut menu to copy the address and paste it in the To or CC box in another message.
For addresses you don't plan to reuse (such as a request for information from a merchant), enter the full e-mail address in the To, Cc, or Bcc box. If the e-mail address you enter matches one in the Contacts folder, Outlook replaces the information you typed with the display name from that item.
Open the Address Book and choose Action, Send Mail, or open the Contacts folder and choose Actions, New Message to Contact.
Click the To, Cc, or Bcc buttons to display the Select Names dialog box, which is actually a different view of the Address Book (see Figure 10.3). Use the buttons shown here to add addresses to any of the three envelope fields, or to create a new item or open an existing one. This is the easiest way to add a large number of addresses to a message quickly and accurately.
Figure 10.3. Select one or more names from the list on the left; then click one of the three buttons to add the selected addresses to the fields on the right.

For people you send mail to most frequently, enter any portion of the recipient's name in any envelope field (To, Cc, or Bcc) and let Outlook's AutoComplete feature resolve the address for you. (To enter multiple names this way, separate each name with a comma.)
AutoComplete is a power user's dream. It searches in your Contacts Folder and other Address Book locations; it also remembers addresses you've recently entered manually or by replying to a message. If Outlook finds one and only one matching item, it completes the name automatically, using the default email address. If Outlook finds multiple matching names, it shows a drop-down list of matching names so you can select one.
Caution
AutoComplete can also cause nightmares, if you're unaware of how it really works. Because the list of AutoComplete possibilities includes addresses you've entered manually, Outlook may "remember" a name and suggest it to you. The name looks all right in the To field, so you accept it; unfortunately, you don't realize that the message is going to a rarely used email account for that contact, rather than the address they check 10 times a day. To avoid this possibility, double-click the name in the To field to display a dialog box that shows the Display Name and E-mail Address fields.
To configure AutoComplete options, choose Tools, Options, click the E-mail Options button, and click the Advanced E-mail Options button. The Suggest Names While Completing To, Cc, and Bcc Fields choice at the bottom of the dialog box (see Figure 10.4) lets you turn off AutoComplete.
Figure 10.4. Use this shortcut menu to resolve names when the text you enter matches several entries in the Address Book.

Tip from 
Most Outlook experts don't even know this tip: Every contact item includes a field called Nickname that you can use to make name matching more precise. To find this field, open the contact's record and click the Details tab. Enter the text you want to use as a shortcut when addressing mail to that person; try to find a nickname that isn't also part of other names. For example, if one of your contacts is named James R. Jones, enter JRJ as his nickname and you can avoid seeing the red wavy lines in the future.
How do you deal with contacts that have multiple e-mail addresses? Don't create multiple Contact items, each with a different address; that will cause a mess when Outlook tries to resolve the addresses for you. Instead, enter each different e-mail address as part of the same Contact item. When you use the Contacts folder, you can enter up to three e-mail addresses; the first is the default address that Outlook uses when sending mail to that person.
→ If you've inadvertently created multiple Contact items for the same person, you might be able to merge them into a single record; for details, see "Merging Duplicate Contact Items".
Creating and Using Personal Distribution Lists
Outlook enables you to create a single alias called a Personal Distribution List that represents a group of e-mail addresses. Use this option to avoid having to repeatedly enter a slew of addresses when you routinely send mail to the same group of people. For example, if you're on the board of a local charity, you can create a Personal Distribution List that includes all the other members of the board, and then name it Board. When you type that name in an envelope field on a message form, Outlook recognizes the list and resolves it for you. When you send the message, Outlook substitutes all the individual names so that your message is delivered correctly.
To create a Personal Distribution List in the Contacts folder, choose File, New, Distribution List. From the Address Book, choose File, New Entry, New Distribution List. Both methods lead to the dialog box shown in Figure 10.5.
Figure 10.5. Use this dialog box to add names to a Per sonal Distribution List.

Enter the name you want to use for the list in the Name field. Click the Select Members button to add names from the Address Book. Click the Add New button to open a dialog box where you can enter a new name that isn't currently in your Contacts folder; check the Add to Contacts box to store that new item in the Address Book as well as in the Personal Distribution List. After you finish adding names to the list, click the Save and Close button to save the list.
If you need to change the lineup of names that make up the list—if a member of the board quits and another takes her place, for example—open this dialog box again and use the Remove button to get rid of the names you no longer need.
Tip from 
If you routinely send messages to a large number of recipients—more than 10, for example—think carefully about how to address the message. If it's not necessary for any of the recipients to respond to all others on the list, address the message to yourself and add the other recipients'names to the Bcc field. Your message is far more likely to be read in this format, especially by people using mail software that displays the entire message header—a list of 20 or so names takes up the entire screen and pushes your message completely out of sight otherwise.
Personal distribution lists appear in the Outlook Address Book as boldfaced entries.